#0, Project IMPALA (hopefully not Impala 13)
Posted by Gryphon on Apr-14-19 at 06:17 PM
LAST EDITED ON Apr-14-19 AT 06:18 PM (EDT)
Session 1: April 13, 2019Fair warning up front: This session was mostly reconnaissance and strategizing, and nothing particularly exciting happened. I'm going to note it down anyway, just for the sake of keeping a record. The first order of business was to actually find the car under the mass of empty boxes and random garage kibble that it had accreted over the years. After diligent excavation, we found the driver's side. 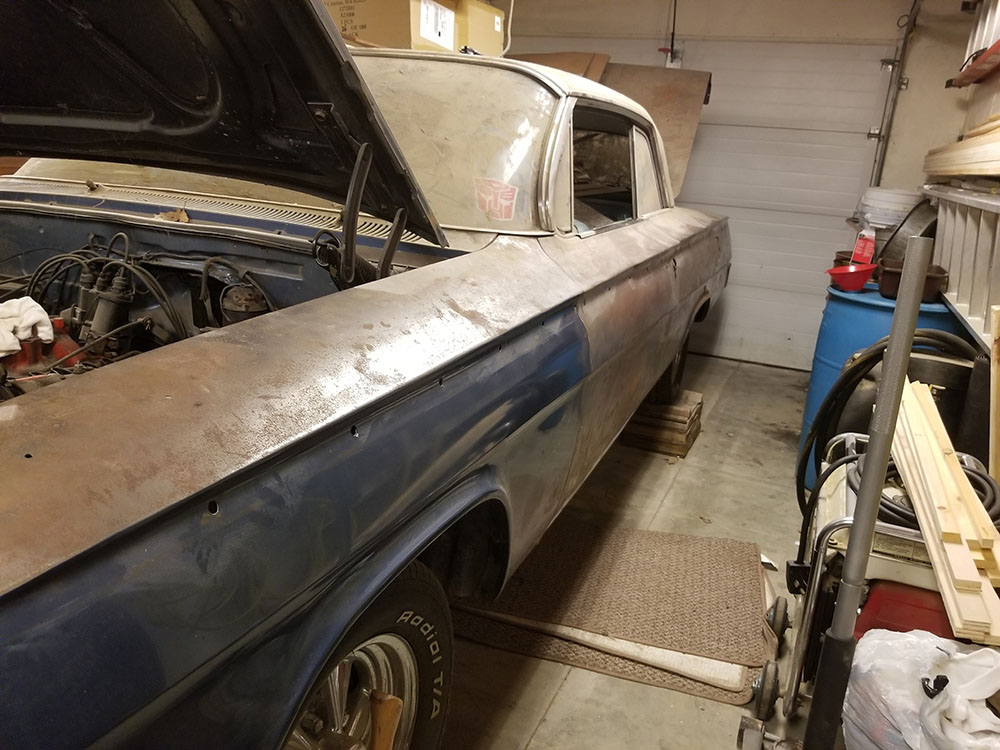
Fig. A Hopefully, we won't need the generator.
Just as a reminder, this is what the driver's side looked like when I first bought the car. 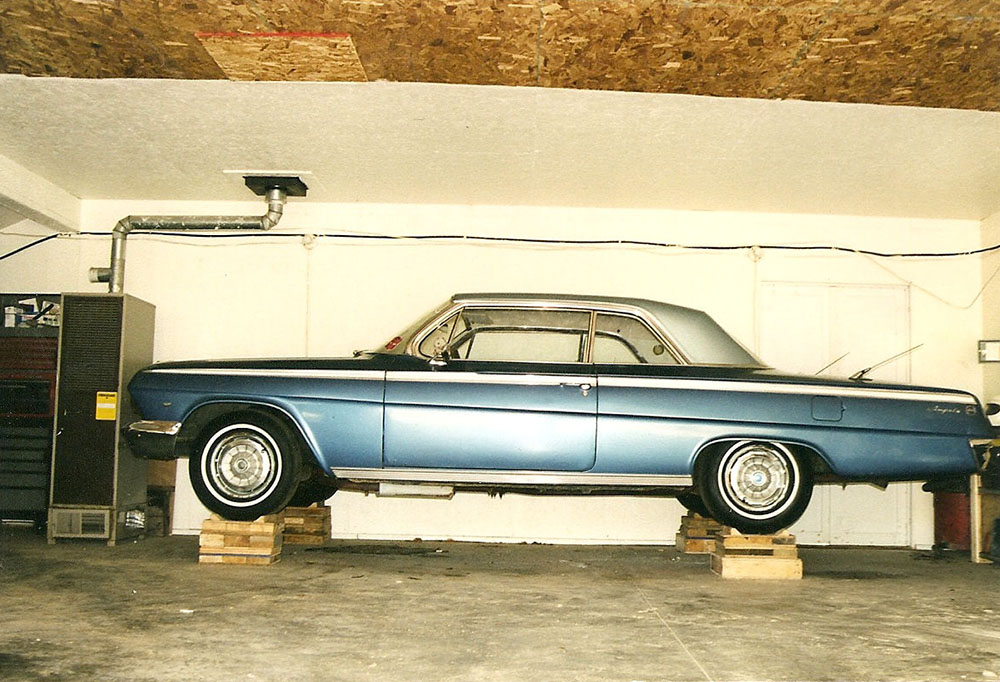
Fig. B Also, look how empty Dad's garage was back then!
As you can see, there was nothing wrong with the driver's side. Dad stripped it anyway, thinking there might be damage and/or shoddy repairs hidden under the paint. If you will refer back to the first photo, you might be able to see (despite the bad camera angle) that there wasn't. So, there's that. Meanwhile, on the passenger side, things are about like they were last time. 
Fig. C Yes, there are still some boxes, it's a work in progress.
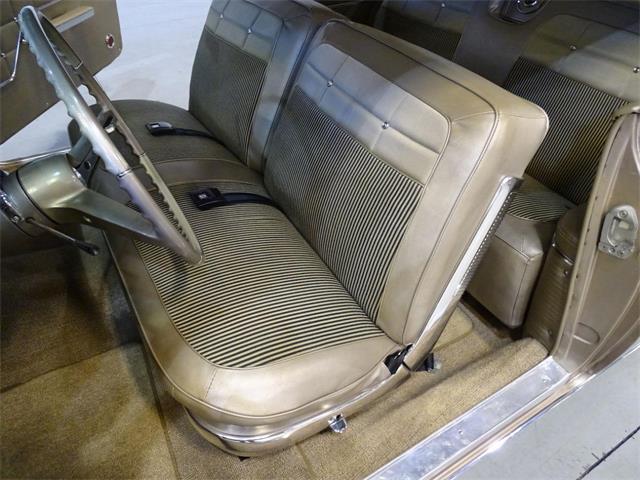
This side did have a bit of repaired damage, although in that shot I've cleverly positioned the door cards to hide it. The right rear fender area looks to have been hit and sort of haphazardly straightened at some point; it looked fine with paint on it, but there was a lot of Bondo* smoothing out a panel that was probably crumpled and then only approximately straightened. Unfortunately, that part of the car is not as easily replaced as, say, a front outer fender. Front fenders are just bolted on; the rear ones are part of the car's main body, along with the roof, cabin bulkheads and firewall, front inner fenders (i.e., the sides of the engine compartment), and so on, which is all welded together from four or five pieces at the factory. So to replace that part, we'd have to buy the appropriate reproduction panel(s), then cut the old ones off, weld on the new ones, sand down and fill the seams, and repaint. Or, well, we'd have to have a body shop do that, because we don't have the tools or the skills for auto body welding. The replacement panels themselves are not hideously expensive—they range from around $100 to $300, depending on how big and complicated they are—but the labor is likely to go high. So, we're not sure if we're going to do that yet, or just try to make what's already there as good as we can. Of more immediate note is the one—and only one, which is surprising for a car of this vintage in Maine—patch of serious rust on the car. This is in the floor on the passenger side in front, just in front of where the seat rails are mounted. Somehow, and we're not sure how, that corner of the cabin got wet enough and stayed that way long enough to rust holes in the floor, the inner rocker panel (the piece of the body that goes along the bottom of the door opening on the inside), and that end of the under-body crossbrace that runs athwartships just in front of the seats. There's also a bit of damage to the outer rocker panel, though it isn't rusted through, and the bottom edge of the door on that side. Again, this is not going to be prohibitively costly to fix, but it will take some work. The most involved part will be replacing the crossbrace, since it goes all the way across the underside of the car and is still sound on the driver's-side end. It looks like four replacement pieces will be needed, plus the labor to cut out and replace the old ones. The good part there is that except for the outer rocker panel, all of these pieces are where no one can see them, so they don't need to be fitted as exactingly as outer skin panels would. This damage is more significant than whatever happened to the rear fender because it would cause the car to fail a safety inspection. You can't be driving around with a hole in the floor. Besides, once a panel like that starts to go, it's like a Southeast Asian country falling to Communism—the others are sure to follow shortly and you have to nip the whole situation in the bud as soon as you can. After assessing the condition of the body, we moved on to the interior. I didn't take any photos of that because it's still full of stuff, although in this case it's not random boxes and junk from the garage like were piled on the outside; it's other parts of the car, like the exterior trim, the carpets (which had to be taken up to assess the state of the floor), and so on. It's also filthy and full of sawdust, because the car has been sitting with its windows open for 19 years in a garage where Dad does carpentry projects. Apart from that, though, it doesn't seem to be in too bad a shape, besides the door cards. 1962 Impala door cards, like those found in most cars of the period, were made by wrapping upholstery around a piece of stiff fiberboard (basically really heavy cardboard), stapling it at the edges, and then adding bits of chrome trim, maybe some decorative stitching, and what the industry calls windlace, but which the rest of us would probably think of as weather stripping. This is then clipped to the inside of the door and the various inner bits (arm rests, latch handles, door glass regulator handles**, and so on) are installed. The upholstery and chrome on this Impala's door cards are in decent shape, but as you can see in the photo above, their inner boards are pretty rough. They got wet at some point (the passenger side worse than the driver, which makes sense given the state of the floor and rocker panel on that side), and like I said, that stuff is basically just thick cardboard. When it gets wet, it swells and loses most of its structural integrity, which it then does not recover when it dries. Annoyingly, you can buy complete replacement door cards, or replacement skins for door cards, from various places online (complete replacements are around $400 for the set), but I couldn't find anywhere that sold just the cards. Of course, the cards are a reasonably simple shape, so it's presumably possible to make your own replacements without too much trouble. I think what we should do is take the old ones to someplace like a glass shop and have them copied in something like heavy Plexiglas, then glue the old skins to that. Let's see water damage that. We also need to source new windlace and such, which should be possible. Beyond that, the passenger side of the front seat has the same split in it that was there when I bought the car, but the rest of the upholstery should clean up decently. Apart from maybe putting a seat cover on there, I don't see where we need to do much to the rest apart from clean it. Of course, that may not be as easy as I would hope. For instance, the headliner is pretty grubby. It's still in good physical shape, not sagging or torn like a lot of vintage headliners get after a while, so I really don't want to try and replace it. In terms of interior modifications, the car has a cassette player someone installed, probably in the '80s or early '90s, in place of the original radio, although the person who installed it took the interesting step of putting the stock knobs on it. (They are thus all that remains of the stock radio, which was not with the car when I bought it.) I'd like to replace that with one of those modern units that look like the stock radio but due Bluetooth or something, but that's not part of the current project. Nor is adding air conditioning, which the car did not come from the factory with (that was pretty rare and expensive in 1962, and didn't work very well anyway). There are kits that can add good modern AC with an original look to cars like that, and again I'd like to have one in there sometime, but they're quite expensive and we're not looking at that now. Right now, the car has an aftermarket steering wheel in it; we do have the original wheel and it's in good shape, so that may go back in. With the structural and cosmetic assessments finished, we moved on to the mechanicals. This car did run when I bought it; it was delivered to my mother's home by the dealer, and then my father went and drove it to his house from there. The engine in it is a 283-cubic-inch small-block V8, which is what it would have had from the factory, although oddly it's not the same 283 it left Detroit with. At some point it was replaced with one from, according to the casting number on the block, a 1966 Chevelle. No telling why nowadays, but there it is. Another interesting thing turned up by a casting number investigation is that the cylinder heads that are on it are not original to that engine either. They were manufactured in the early '70s, and the production run they came from were sold to dealer service departments to be used in a modernization program GM was offering on their cars at the time. If you had a car from before the introduction of unleaded gas, you could have a dealer install a new set of cylinder heads with hardened valve seats so that your car could burn it without ruining the valves. I assume this service was not offered for free, as a recall or warranty matter, but it appears whoever owned this particular Impala took them up on it anyway. Anyway, Dad reported that while the car did run, it didn't run very well, and he thought we should start the mechanical overhaul by either replacing the carburetor or having it rebuilt. The default 283 in Chevrolet passenger cars at the time came with a two-barrel carb made by GM's Rochester division—not a spectacular piece of performance hardware, but adequate for the relatively mild version of the engine used in that application. We spent a couple of hours kicking around options and looking up what they would cost on the Internet. Do we get a nice medium-grade four-barrel for it and see about upping the horsepower? Do we buy a new(ly reconditioned) replacement of the same type? Should we send the existing one away to be rebuilt? Should we buy a rebuild kit and try to rebuild it ourselves? Should we stick the one really-too-big-for-a-283 four-barrel we already have on it and see if we can detune it to the point where it works? So many options. (They make drop-on electronic fuel injection kits for these cars nowadays, but once again they're about a $1,500 proposition, plus you have to replace the fuel pump and do a bunch of wiring. So, not today, I think.) Eventually we decided to pull the old carb off and take it apart, see if we could assess its condition, and find out if it would be worth trying to rebuild it ourselves—by far the cheapest option. And this leads us into an enduring lesson of working on these old automobiles. Mechanically, structurally, and electrically (especially electrically), American cars of the 1960s are vastly simpler than their modern descendants, but that can lead people into a false sense of security. Simpler doesn't necessarily mean easier, and the sheer age of these cars now, plus the number of hands they will necessarily have passed through in that time, means that each one presents unique challenges that are hard to anticipate. For instance: The carburetor on small-block Chevy V8s is affixed to the top of the intake manifold by four threaded studs. These studs have a coarse thread at one end and a fine thread at the other, and are screwed into the carb flange on the top of the manifold with the coarse end. The carb is then put in place with four holes on its corresponding flange over the studs to locate it, and secured in place with four nuts. It's a clever design, because it means if you break one of the studs you haven't just ruined the whole intake manifold; with the right tools, you can unscrew the broken stud and replace it. The carburetor on this small-block Chevy V8 was secured by three nuts and... a bolt. Where the righthand front stud and nut should have been, there was just the head of a hex bolt. Moreover, it was a slightly larger hex bolt than the 1/2" nuts on the three remaining studs. After some experimenting (and some cursing), Dad discovered that it was in fact a thirteen-millimeter bolt. (One-half inch is about 12.7 millimeters, for those of you keeping score at home.) Evidently, someone broke that stud, removed what was left of it, and didn't have a suitable replacement on hand. Why a 13mm bolt I don't know, but it came out with very shiny threads of a slightly different pitch than those remaining on the length that hadn't been screwed into the manifold. It must have taken considerable force to screw it in there. We really, really didn't want to take that manifold off the engine. It's a pain in the butt. 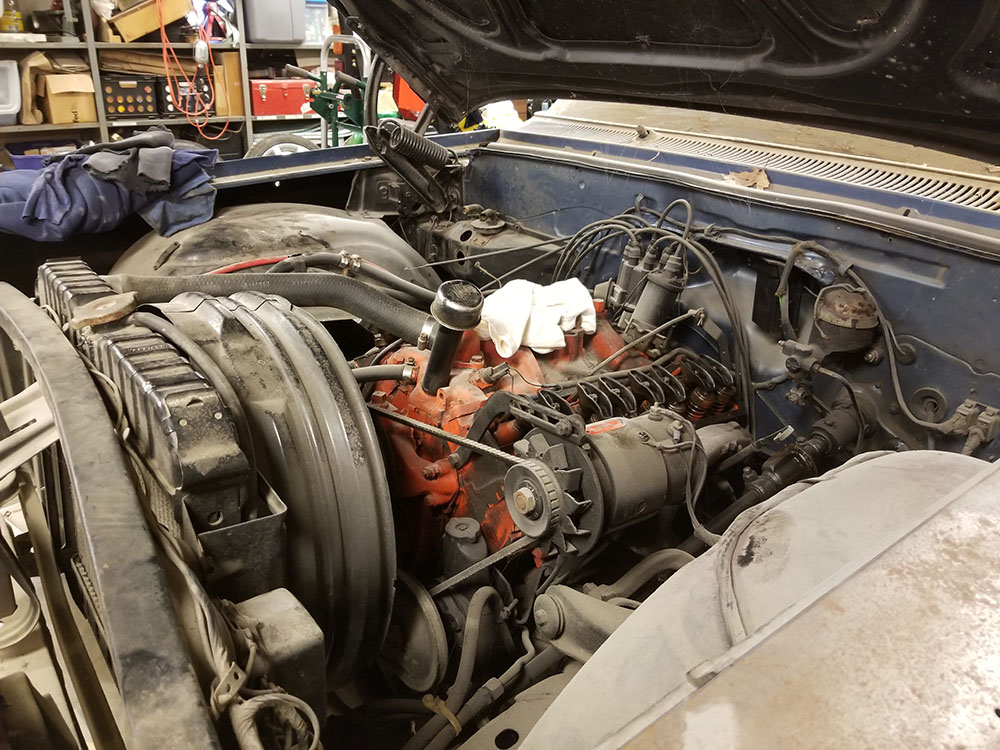
Fig. D You might say we were feeling manifold pressure. I'm not sorry.
The intake manifold is that orange part on top of the engine, between the cylinder heads. Replacing it with the engine in the car is possible, but really annoying. (Note the white cloth. It's covering the carburetor flange, and thus the opening in the manifold where the fuel and air flow into it from the carb. Important shop tip: Whenever you take the carb off one of these engines, you should always stuff a cloth in there, so you can't accidentally drop, say, one of the stud nuts in there. Engines don't run on nuts.) So, being unwilling to screw the 13mm bolt back in there, we had to find another stud, and hope the incorrect bolt hadn't damaged the threads in the manifold. Fortunately, Dad had a random other 2-barrel small-block manifold off an engine he junked years ago. When he dug it out of the parts room, we found that some previous owner of that one had broken the same stud and replaced it, in this case, with a length of all-thread rod. They must have had to remember to use a coarse thread nut on that one, but otherwise, a more elegant solution than the 13mm bolt idea. We removed one of the normal studs from that manifold and screwed it into the one on the car, and it seemed to go in fine; evidently swaging that 13mm bolt's threads to suit it hadn't bothered the hole any. Sometimes you get the elevator, as they say. With that little sidetrack out of the way (time spent identifying and solving that unexpected problem: maybe an hour), we took the carb over to the bench and took it apart. A Rochester 2GV two-barrel carburetor is not a particularly sophisticated piece of performance equipment, but it is still a surprisingly complicated and clever little machine. Basically, its job is to draw in air, mix it with atomized fuel, and spray it into the intake manifold, where the valve train can do the job of distributing it to the cylinders for burning. It has to do this very precisely, and the conditions under which it operates change all the time, so it also has to be able to react to those changes and adjust what it's doing. Early carbs couldn't do any of that and had to be fiddled with manually all the time—most cars in the '30s, for instance, had manual mixture controls and spark advance-and-retard controls and all sorts in the cockpit, for the driver to manage the operation of the top end of the engine by hand and ear. The big aviation engines of the '40s took so much managing that most multi-engined aircraft had a crewman whose principal job in flight was making sure the carbs were working properly. By the '60s, however, even a humble everyday sedan engine's carb like the 2GV could manage most of that stuff by itself. Most of the time. In internal function, an automotive carb resembles nothing so much as, weirdly enough, a flush toilet. It has a reservoir very like a toilet's tank, complete with a float valve that opens to admit fresh fuel when it's empty, and another valve that lets it out in response to a call from the throttle. Toilets aren't designed to aerate the water and deliver it as a spray through a set of Venturi nozzles, of course, but the feed mechanism is strikingly similar. I mention all of this A, because I think it's interesting, and B, because upon dismantling the Impala's carb, we discovered that the filter basket between the fuel input and the rest of the works, the bottom of the reservoir (properly known as a "float bowl"), and the channel from there to the delivery jets were all choked with a very fine orange powder. 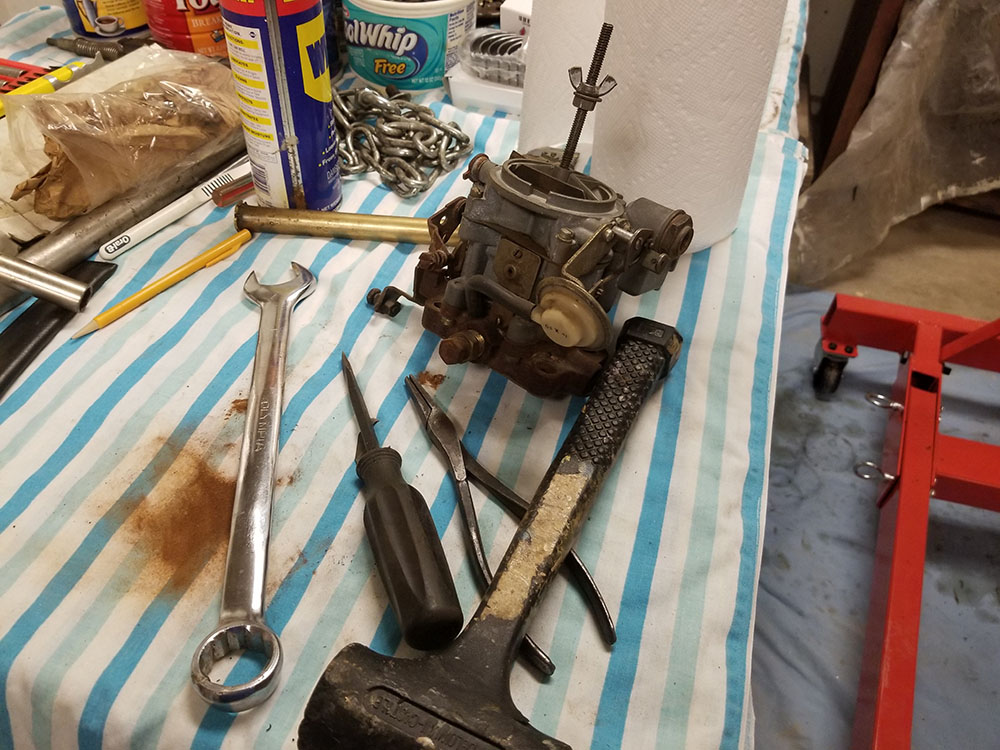
Fig. E CARB FOR THE CARB GOD
You can see a bunch of it in a pile on the table there, by the wrench, after we put the carb back together. That's very fine dried rust. As they used to say on Mythbusters, "Well, there's yer problem." The rest of the carb seemed to be in good shape. Sometimes the floats degrade and don't float properly any more, or the passages to the jets, or what have you, but the float in ours seems fine. A bath in carb cleaner and a blow-out with compressed air, and we figure it should be good to go, so when I got home I ordered a rebuild kit (fresh gaskets, new needle jets, etc.) for it. Next session, we'll give rebuilding it ourselves a shot. If it works, we spent $30 instead of a minimum of $200. If not, we're only out an extra $30. It seems worth a try to me. This, though, is another example of how one thing can lead you to another with these cars. Carburetors aren't made of something that rusts, so it didn't come from the float itself. Fuel lines, likewise, are not made from ferrous metal (the feed line in the Impala seems to be copper, but it's probably a homemade replacement; the stock ones were usually rubber). This means that the rust blocking the fuel filter and piled up in the float bowl must have come from the fuel tank. When fuel tanks rust out, they usually do so from the outside. They're just slung there underneath the car where the road salt and crap can get at them all the time, after all. Sometimes, though, they get rusty on the inside. Gasoline isn't particularly corrosive, but if it's left long enough, it can decay into substances that are. More often, though, it happens because weather conditions cause moisture in the air on top of the fuel to condense on the inside walls of the tank. This is something you don't want for several reasons, most prominently that gasoline with water in it doesn't burn very well, but also because over time it can cause rust scale to build up on the inside of the tank. That's probably what happened to this one. So now we have a couple of choices. We can take the existing tank somewhere and try to get it cleaned out. Sometimes radiator places can boil out tanks the same way they boil the crud out of the inside of old radiators. We could try to clean it out ourselves, although that would involve playing with chemicals I'd really rather not get involved in. Or we can fork out between $100 and $200 and just put in a new one. I'm leaning toward option C, but we'll see how it goes. For now, the carb rebuild kit and a good reference book on Rochester carbs are on their way. Next time, we'll rebuild it and put it on, at which point we'll have to tackle the fuel tank problem before we can find out whether it helped. I was kind of hoping we'd be able to get the car at least nominally running in session 1, but that was always a pretty ambitious hope. For the reasons explored above (and almost certainly others we'll run into along the way), these things always, always take way longer and cost more than you thought they would when you started. But! After 19 years, we're on the way. We've done a bunch of investigative and diagnostic work, researched what we'll need to do to fix problems we've found, and generally made a start. It's nice to be under way. --G.
* other auto body fillers are available
** with apologies to Nick Moran
-><-
Benjamin D. Hutchins, Co-Founder, Editor-in-Chief, & Forum Mod
Eyrie Productions, Unlimited http://www.eyrie-productions.com/
zgryphon at that email service Google has
Ceterum censeo Carthaginem esse delendam.
#1, RE: Project IMPALA (hopefully not Impala 13)
Posted by Gryphon on Apr-14-19 at 06:18 PM
In response to message #0
... oh, god, I think I've just accidentally named the car Impala 13.--G.
-><-
Benjamin D. Hutchins, Co-Founder, Editor-in-Chief, & Forum Mod
Eyrie Productions, Unlimited http://www.eyrie-productions.com/
zgryphon at that email service Google has
Ceterum censeo Carthaginem esse delendam.
#2, RE: Project IMPALA (hopefully not Impala 13)
Posted by Peter Eng on Apr-15-19 at 01:46 AM
In response to message #1
>... oh, god, I think I've just accidentally named the car Impala 13.
>Well, that's a "hopefully not" in the title, so as long as nothing explodes on a test run, forcing you to improvise a way home, I think you could select a different name. Peter Eng
--
Insert humorous comment here.
#4, RE: Project IMPALA (hopefully not Impala 13)
Posted by StClair on Apr-15-19 at 03:37 AM
In response to message #1
In that case, I strongly advise replacing the fuel tank. And hoping that the new one was never boiled dry with a faulty thermostat.
#3, RE: Project IMPALA (hopefully not Impala 13)
Posted by Peter Eng on Apr-15-19 at 01:49 AM
In response to message #0
> ... a very fine orange powder.And that's me saying rather unpleasant things. I don't know where that came from, but I'm pretty sure it's... > ...very fine dried rust. Yep. At least you know where it came from, and what to do about it. This sounds like a promising start, anyhow. Peter Eng
--
Insert humorous comment here.
#5, RE: Project IMPALA (hopefully not Impala 13)
Posted by rwpikul on Apr-15-19 at 05:19 PM
In response to message #0
> Important shop tip: Whenever you take the carb off one of these engines, you
> should always stuff a cloth in there, so you can't accidentally drop, say, one
> of the stud nuts in there. Engines don't run on nuts.This is good advice more broadly: If it's not normally open and it's not trivial to clean out, plug it with something that will keep solids and most liquids out.
#6, RE: Project IMPALA (hopefully not Impala 13)
Posted by Gryphon on Apr-15-19 at 10:14 PM
In response to message #0
They should never have let me download Illustrator...
--G.
(mostly because I'm not very good with it)
-><-
Benjamin D. Hutchins, Co-Founder, Editor-in-Chief, & Forum Mod
Eyrie Productions, Unlimited http://www.eyrie-productions.com/
zgryphon at that email service Google has
Ceterum censeo Carthaginem esse delendam.
#7, RE: Project IMPALA (hopefully not Impala 13)
Posted by StClair on Apr-15-19 at 11:21 PM
In response to message #6
>(mostly because I'm not very good with it) Bullshit. That's great.
#8, RE: Project IMPALA (hopefully not Impala 13)
Posted by Gryphon on Apr-15-19 at 11:34 PM
In response to message #7
>
>>(mostly because I'm not very good with it)
>
>Bullshit. That's great. Thank you. In the interest of full disclosure, I started with the SVG of the actual Project Apollo emblem that's on Wikimedia, so the background was already done. :) (And I had to cheat and do the moon part in Photoshop, because the vector trace of the JPEG Impala logo I had wasn't working right.) --G.
-><-
Benjamin D. Hutchins, Co-Founder, Editor-in-Chief, & Forum Mod
Eyrie Productions, Unlimited http://www.eyrie-productions.com/
zgryphon at that email service Google has
Ceterum censeo Carthaginem esse delendam.
#9, RE: Project IMPALA (hopefully not Impala 13)
Posted by Lime2K on Apr-16-19 at 03:23 AM
In response to message #8
>(And I had to cheat and do the moon part in Photoshop, because the
>vector trace of the JPEG Impala logo I had wasn't working right.) That's not cheating, it's taking advantage of all available resources. And I think it looks really good! I'd love to see it as an actual patch at some point, too, but I know that converting an image into an embroidery pattern is a whole other level of witchcraft and sorcery (read: huge pain in the posterior).
--------------
Lime2K
The One True Evil Overlord
#10, RE: Project IMPALA (hopefully not Impala 13)
Posted by Gryphon on Apr-16-19 at 10:24 AM
In response to message #9
>I'd love to see it as an actual patch at some point, too, but I know
>that converting an image into an embroidery pattern is a whole other
>level of witchcraft and sorcery (read: huge pain in the posterior). I looked into that a while ago for a different thing; it's not particularly hard, but it's expensive, and usually you have to order a minimum of, like, fifty. --G.
-><-
Benjamin D. Hutchins, Co-Founder, Editor-in-Chief, & Forum Mod
Eyrie Productions, Unlimited http://www.eyrie-productions.com/
zgryphon at that email service Google has
Ceterum censeo Carthaginem esse delendam.
#14, RE: Project IMPALA (hopefully not Impala 13)
Posted by MoonEyes on Apr-17-19 at 06:48 PM
In response to message #10
1....!
Stoke Mandeville, Esq & The Victorian Ballsmiths
"Nobody Want Verdigris-Covered Balls!"
#11, RE: Project IMPALA (hopefully not Impala 13)
Posted by rwpikul on Apr-16-19 at 07:03 PM
In response to message #9
>>(And I had to cheat and do the moon part in Photoshop, because the
>>vector trace of the JPEG Impala logo I had wasn't working right.)
>
>That's not cheating, it's taking advantage of all available resources.
>And I think it looks really good! Yep, when I see workflow descriptions over on a couple art hosting sites it isn't strange to see three or four different programs being involved in making something. One to do the initial linework.
One to do the colour work.
One to do the image manipulation that turns flat colour into a final image.
One to do any lettering and page layout work.
#12, RE: Project IMPALA (hopefully not Impala 13)
Posted by Gryphon on Apr-16-19 at 09:33 PM
In response to message #11
>One to do the initial linework.
>One to do the colour work.
>One to do the image manipulation that turns flat colour into a final
>image.
>One to do any lettering and page layout work. And in the darkness bind them. --G.
-><-
Benjamin D. Hutchins, Co-Founder, Editor-in-Chief, & Forum Mod
Eyrie Productions, Unlimited http://www.eyrie-productions.com/
zgryphon at that email service Google has
Ceterum censeo Carthaginem esse delendam.
#15, RE: Project IMPALA (hopefully not Impala 13)
Posted by Star Ranger4 on Apr-17-19 at 07:55 PM
In response to message #12
>>One to do the initial linework.
>>One to do the colour work.
>>One to do the image manipulation that turns flat colour into a final
>>image.
>>One to do any lettering and page layout work.
>
>And in the darkness bind them.
>
That, of course, would be windows itself. (SNERK)Well, okay. the operating sytem in general, but still,...
#24, RE: Project IMPALA (hopefully not Impala 13)
Posted by Wiregeek on May-01-19 at 02:22 AM
In response to message #6
That needs the car driving across the one, thus that the stars are the headlights, and the path from the moon the taillights.
#13, RE: Project IMPALA (hopefully not Impala 13)
Posted by Senji on Apr-17-19 at 06:40 AM
In response to message #0
>In internal function, an automotive carb resembles nothing so much as,
>weirdly enough, a flush toilet. It has a reservoir very like a
>toilet's tank, complete with a float valve that opens to admit fresh
>fuel when it's empty, and another valve that lets it out in response
>to a call from the throttle. Toilets aren't designed to aerate the
>water and deliver it as a spray through a set of Venturi nozzles, of
>course, but the feed mechanism is strikingly similar.
>
>I mention all of this A, because I think it's interestingI thought it was interesting too; but the last paragraph there made me laugh in one of those sudden "how do I explain this to the people around me" ways.
#16, Notes from Session 2
Posted by Gryphon on Apr-21-19 at 06:20 PM
In response to message #0
Session 2: April 20, 2019To prepare for this weekend's session, I ordered a couple of things last Monday which arrived during the week. 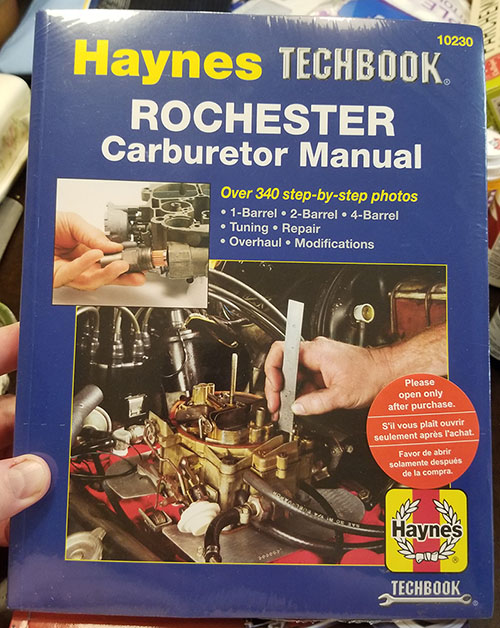
Fig. A No promotional consideration is reflected in any of the plugs given in this project, by the way. It's just what we're using.
First, although we have many, many books about various aspects of rebuilding cars and (especially) small-block Chevrolet V8 engines, Dad and I discovered last time that we didn't have anything specifically about working on Rochester carburetors, so I picked this up. It was the only book I could find in print that offers anything about the various Rochester models not used in high-performance applications, which is to say anything at all other than the four-barrel Quadrajet. I should probably explain what a Rochester even is, since it's an artifact of a manufacturing practice that is much less commonplace nowadays than it was even 30 or 40 years ago. The big American auto manufacturers used to be big into what business management people now call "vertical integration"—they had subsidiaries that made or supplied pretty much everything they needed. Henry Ford was a big proponent of this concept; he wanted his company to be as independent as possible, and so under his leadership the Ford Motor Company at least tried to own everything in its supply chain, including the mines where the iron ore for the steel in the car bodies came from and the logistics companies that moved all the materials and parts from their sources to their ultimate destination at the assembly plant. In the 1920s, Ford even tried to establish his own rubber plantations in South America, so that his supply of tires couldn't be threatened by labor unrest in the Far East or some other problem outside his own control. Fordlandia, as the plantation community in Brazil was modestly called, was an abject failure and probably represented the outer limit of how vertically integrated a manufacturing concern like Ford could get, but in most other respects, the business model worked for a long time. Ford's closest competitor, General Motors, did a similar sort of thing in the '20s and '30s—they would tend to work with a supplier for some particular item for a while, then enter into an exclusive arrangement whereby the supplier's products would only be sold to GM, and then eventually just buy the company. For instance, on the sill plates of GM cars up until the mid-'90s, you could usually find a little medallion that said "Body by Fisher". Fisher Body used to be a coachbuilder—people would bring them a rolling chassis from one of the early manufacturers, and the Fisher brothers would put a custom-made body on it—until GM did the exclusive-deal-to-buyout thing with them. (The Fisher brothers themselves became GM executives.) Other examples of once-independent companies that became GM subsidiary parts suppliers include Guide Signal Lamp, Inland Manufacturing (of M1 Carbine fame), and Delco (formerly the Dayton Engineering Laboratory Corporation), the last of which is probably the best-known today. GM's Rochester Products Division was another of those. It was originally the Rochester Coil Company, an independent firm in Rochester, New York, that made electrical equipment. GM bought it up to integrate its electrical business with Delco (where the electric automobile starter had been invented before GM took it over), and ultimately the Rochester Division became best-known for making GM's fuel systems. Rochester carburetors fueled GM engines across the board until fuel injection finally displaced carburetion altogether in the '80s. (A bit oddly, they also made the cigarette lighters found in all GM cars of the era—an echo of their earlier experience with electrical coils, I suppose.) The other item that came last week was a rebuild kit for the Rochester carb that was on the Impala, which we removed in session 1. 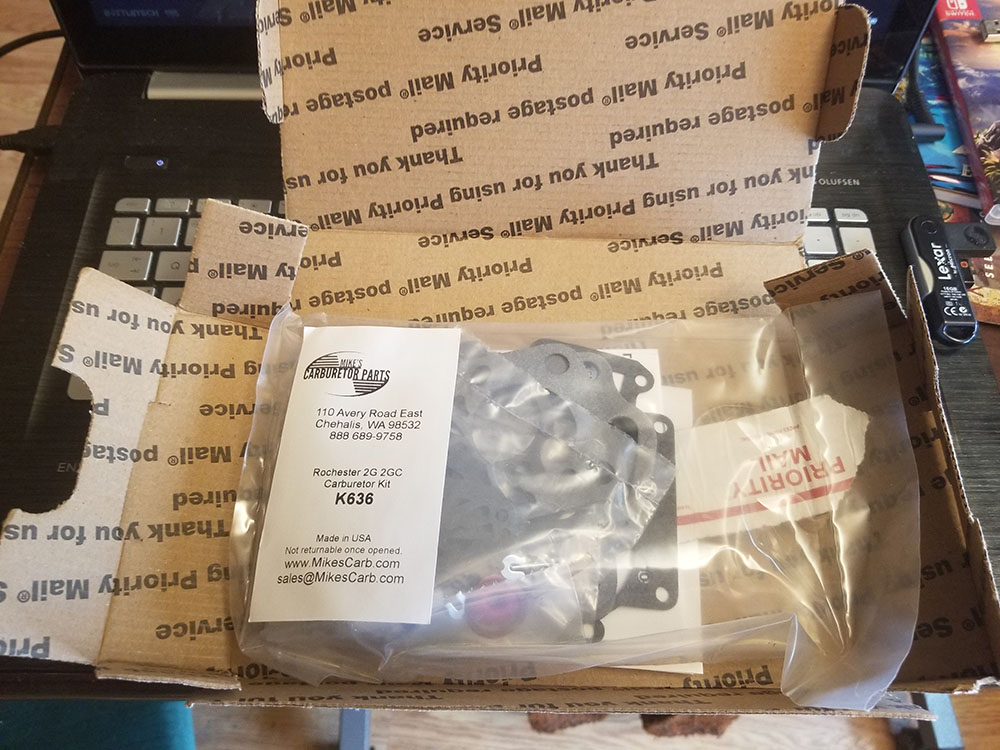
Fig. B Carburetor rebuild kit, in original shipping box.
That probably seems like it has a hell of a lot of parts in it, but the kit covers a wide range of sub-models. Rochester tweaked the design of the 2G series twin-jet carburetor constantly, yielding dozens of very slightly divergent variants over the model's ~20-year lifespan. A lot of these had subtly but significantly different gaskets and whatnot inside them. Rather than go to the effort of creating absolutely specific rebuild kits for each variation, with the increased chance that the customer will buy the wrong one, most if not all aftermarket parts vendors opt for supplying kits that will serve a number of different variants. The parts are so inexpensive to make that the customer is expected simply to discard the ones that aren't needed. With the kit in hand, we dismantled the carb (which we'd already had apart once for diagnostic purposes) and set to work refreshing it. This involved removing all the old gaskets, the little springs and detent balls, the accelerator pump, and so forth, giving everything a good cleaning, and then putting it all back together with new parts from the kit wherever we could find a match. I didn't take any photos of this process while it was going on because I was too busy doing it, but here's a shot of the completed carb with all of the bits we replaced laid out beside it. 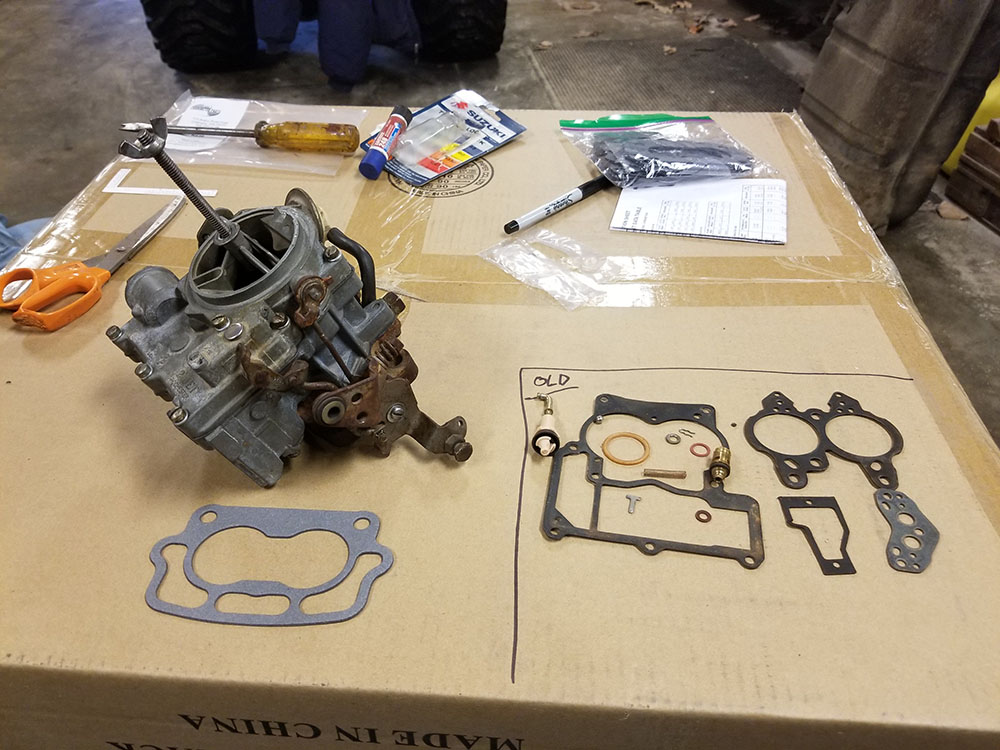
Fig. C Note field-expedient workspace organization system.
All of the stuff inside the box marked "OLD" was replaced with a new part from the kit. The new grey gasket at the bottom is the one that goes between the carb and the intake manifold on the engine. All the stuff in the upper right is the extra bits we didn't need. Dad bagged it up to save it, in case he ever happens to be rebuilding one of the very-slightly-different Rochester 2G carbs they go to. This is very unlikely, but, you know, some people hoard old newspapers... Anyway, with the rebuild complete, it was time to put the carburetor back on the engine. 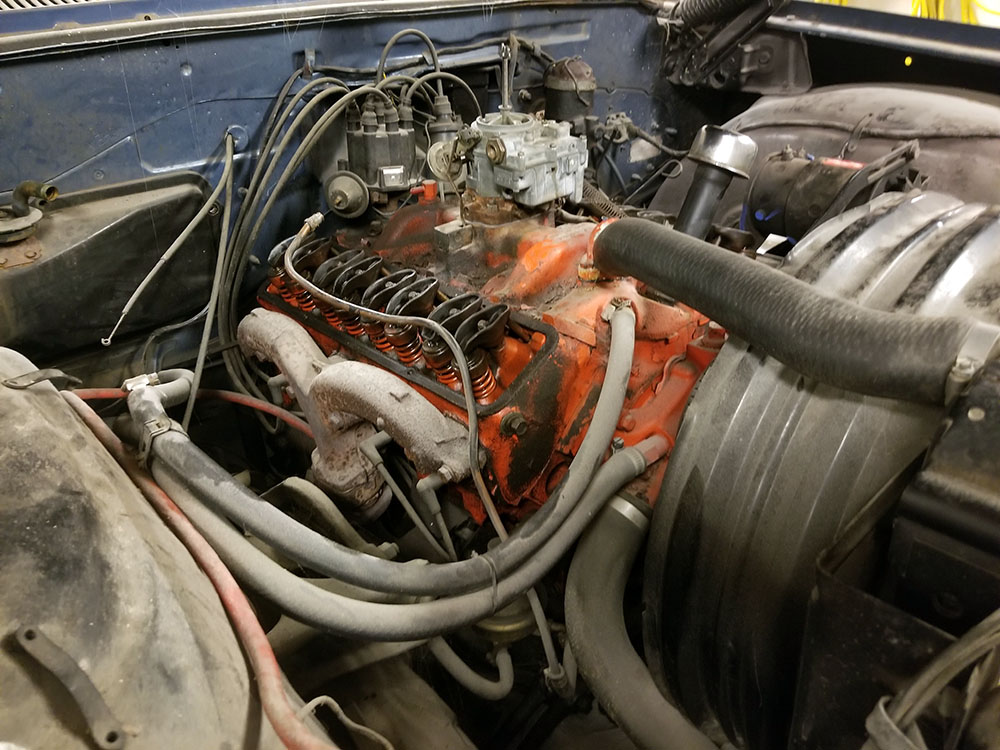
Fig. D Home, home again.
This is a job that is both simple and a mighty pain in the butt. Located right in the center of the car's engine compartment, the carb is awkward to reach,and the studs even more awkward to get a wrench on. You can really tell that the people who originally installed these were doing it befor ethe engine was in the car. Note that the valve covers are not installed on the engine in that shot. Normally, the valves and rocker arms wouldn't be exposed like that. If they were, every time the engine ran, the lubrication system would spray oil all over the inside of the engine compartment. This used to be a pretty common state of affairs—early motorcycle engines, for instance, often had what were called "total loss" lubrication systems, where the oil was expected to be flung out of the valve train and lost, which is why motorcyclists in interwar photos are always covered in oil. As a potentially amusing aside, the rotary engines used in a lot of World War I aircraft, such as the French Gnome engine, also had total loss lubrication. In those engines, the entire engine revolved around the crankshaft, and the oil was forced out to the cylinder heads to lubricate the valves by centripetal acceleration; there was no practical way to reclaim it once it got there, so it just hurtled off the exposed valves into the slipstream at that point. This meant that, in any aircraft with the engine at the front, the pilot could count on getting a face full of oil on any flight, and generally eating a lot of it. Those engines were lubricated with castor oil. You can probably predict for yourselves what happened next. Oh, for the glamorous life of a gallant Great War aviator. All that and a 20-minute life expectancy too! Anyway, after we installed the carb, we did put the valve covers back on. 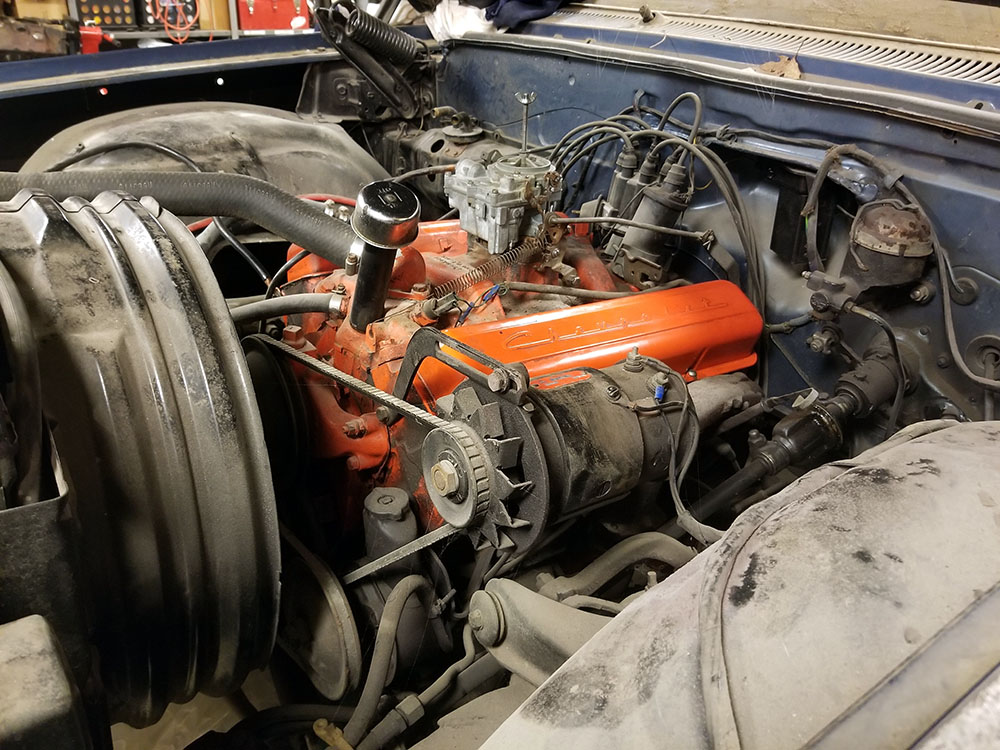
Fig. E Cover those valves, Ethel, people are getting aroused.
That orange paint is original; Chevrolet used to paint all its smallblock V8s that color. Note also the cool vintage script on the valve covers. Dad has a set of chrome valve covers for smallblock Chevy, but I prefer the stock look, particularly on an engine like this old 283 that hasn't been set up for performance in any way. Our plan is eventually to build a 327-cubic-inch smallblock for this car, and that one probably will get the chrome covers. Unfortunately, with the carb overhauled and installed, we couldn't find out whether our rebuild had actually worked, because right now we have no way of fueling it. Last time, when we took the carb apart to investigate, we found it full of powdery rust. An investigation of the car's gas tank left no doubt as to where that rust came from; the tank has been empty for years, but just shaking it we could hear a significant amount of something solid moving around inside it. 
Fig. F She's had it, Jim.
When we pulled the sending unit out, we found that it, too, was rusted to uselessness, and a look through the hole it came out of with a flashlight confirmed that the tank is full of scale rust. This called for a strategy session. You can get a brand new replacement tank for one of these cars, the stock shape in galvanized steel, nothing fancy, for around $120. At the least, the old one would have to be boiled out with caustic chemicals, like an old radiator. That would probably cost $50 to $75, depending on how many repetitions it took to get the tank clean, and if it's rusted badly enough for the chemicals to boil through, then we'd be looking at buying a new one anyway. So, we're ordering a new one. And a new sending unit, too, because that one doesn't look like it's going to be much use. (Note that the sending unit in one of these old fuel tanks combines both the uptake for the fuel line to the engine and the apparatus for measuring the fuel level and transmitting it to the gauge on the dash. It does not include the actual fuel pump. Modern fuel injection systems require much higher fuel pressure, which is better achieved with a pump mounted in the tank, but on an old low-pressure carbureted system like this one, the pump is on the engine and draws the fuel up there, rather than pushing it from the tank side.) It's unclear whether the new tank and accompanying bits will be on hand for next weekend. Probably not, given that they're coming from California and will, I'm sure, be sent in the slowest way available (given that the tank, while not very heavy, is definitely an Oversized Object for shipping purposes). We may have to do something else next weekend while we wait for parts to arrive. Once the tank comes, though, our next order of business is to install it, plumb it up, get a battery for the car, and then see if we can actually get this engine to start and run. It's not a given that it will; it's been sitting for a long time. On the other hand, it's not a given that it won't, either. Chevy smallblock V8s are pretty robust. It's entirely possible that if we change the oil, hook up a battery, and drop some gas in there, it'll fire right up. (And then possibly overheat, because who knows what's going on in that ancient radiator, but one problem at a time. :) I'm looking forward to finding out. One thing we might be able to do in the meantime, if the tank parts are slow in coming, is to work on improving the brakes. In preparation, we had a look at how the Impala's brakes are configured yesterday. In 1962, most cars still had drum brakes all around, and the Impala is no exception. Disc brakes, as are commonplace today, didn't start appearing on full-sized Chevrolets until a few years later, and even then they were a) optional and b) only on the front. They're much more effective and efficient than drums, but they were more expensive and a lot of people considered them suspicious newfangled technology. As it happens, this particular Impala doesn't even have power-assisted drum brakes, despite the fact that it does have power steering. This is an artifact of the way cars were ordered in those days. Cars didn't come with option packages back then; when you bought a car in the early '60s, you got a long list of things it could have, and you checked off the ones you wanted. Whoever ordered this particular Impala evidently figured it wasn't worth the extra cost to get the optional vacuum-boosted brakes. Real Men just step on the pedal harder. In fairness to that unknown person, I've driven a vehicle without power brakes or power steering (Angus the Wonder Truck), and I missed power steering a hell of a lot more than I missed power brakes, so that wasn't a completely crazy conclusion to each. If you only had the budget for one or the other, for instance, going for the power steering makes sense to me. Of greater note nowadays is that in 1962, the brake systems in GM cars (and indeed pretty much all cars) had only a single master cylinder. See the thing mounted on the firewall in sort of the upper right of the photo of the engine with the valve covers on it? That's the brake master cylinder, and you can see that it only has one reservoir. The way hydraulic drum brakes work is that pressure on the pedal pushes a piston inside that master cylinder, which tries to compress the fluid inside. Liquids aren't very compressible, so that has the effect of raising the pressure in the whole system. Tubing runs underneath the car to all four wheels, each of which has its own smaller cylinder; that's actuated by the increased pressure in the system and pushes the brake shoes inside the drum outward against the drum's inner surface, which causes friction, which converts some of the car's kinetic energy to heat and slows the car down. The problem with having a single master cylinder is that it makes the whole system vulnerable to a single failure. If the master cylinder, or any of the wheel cylinders, or any point along the yards of tubing underneath the car fails, and the brake fluid leaks out, that's it—you've just lost the entire braking system. Unless your emergency brake (which uses a simpler cable and lever to force the rear brakes to engage) is in good working order, you now have no way to stop the car short of putting it in neutral and hope you can coast to a halt before you hit something. In 1967, this problem would be addressed by changing to a dual system. In those systems, the master cylinder has two reservoirs, one of which is plumbed to the front wheels, the other to the back, both actuated by the pedal simultaneously. In theory, a failure of a wheel cylinder or one of the brake lines will only drain half the system, leaving the other half available to limp carefully back for repairs. Only a catastrophic failure of the entire master cylinder or the pedal linkage can disable the whole system at once. (A dual master cylinder also makes hybrid braking systems, with drums at the back and more effective discs at the front, practical. Disc and drum brake systems require different pressures to operate effectively, which means making them share the same hydraulic system is impractical at best. Even getting them to share the same pedal requires some fancy plumbing, in the form of what's called a porportioning valve, which tones down the high master cylinder pressure needed to operate front discs to a level that will work rear drums without just making the rear wheels lock up all the time.) A number of firms make kits to convert these old cars to power disc brakes, either in front or all the way around. However, these kits start at "quite expensive" and go up from there, depending on how much of the suspension you want to upgrade while you're in there, and they usually require new wheels and everything to clear the calipers and whatnot, so they're not really an option for us right now. Instead, we're looking at dropping a dual master cylinder from a slightly newer Chevrolet in there. The pedal linkages and all from the late '60s seem to be either directly compatible or fairly readily adapted, but that will of course require the wheels to be replumbed. This isn't necessarily a bad thing, since the roads around here tend to eat brake lines, and it's not uncommon to have to replace them anyway. The Impala hasn't been driven much in the winter (you can tell that because it still has a body on it), but even so, those old lines could probably stand to be redone anyway. So, if we can't proceed to further work on the engine right away, we might have a look at doing that next. We at least need to get the wheels off and investigate the current state of braking affairs further before we try to drive anywhere. --G.
-><-
Benjamin D. Hutchins, Co-Founder, Editor-in-Chief, & Forum Mod
Eyrie Productions, Unlimited http://www.eyrie-productions.com/
zgryphon at that email service Google has
Ceterum censeo Carthaginem esse delendam.
#17, RE: Notes from Session 2
Posted by DaemeonX on Apr-26-19 at 05:26 PM
In response to message #16
Thank you for sharing this with us. I appreciate it and look forward to more Adventures of Impala and Family! DaemeonX
#21, RE: Notes from Session 2
Posted by Peter Eng on Apr-29-19 at 09:04 PM
In response to message #16
Not particularly important, but I finally figured out what was bugging me about that collection of parts on the left side of the "old" section.It makes me think of a Snorlax. Peter Eng
--
Insert humorous comment here.
#18, Session 3
Posted by Gryphon on Apr-29-19 at 00:44 AM
In response to message #0
LAST EDITED ON Apr-29-19 AT 10:14 PM (EDT)
This week's session happened today rather than on Saturday. I don't have time to write it up right now, but will edit this post, probably sometime tomorrow, with a report. It was not a hugely productive session in terms of concrete tasks accomplished, but it did yield some solid plans, forthcoming parts procurements, and at least one interesting mystery, so I think it'll be worth checking out if you're following the project.Teaser: One of the assumptions from the very beginning of the project (as in, 20 years ago) turns out to be dead wrong, in a way that is both baffling and tantalizing. Also, there's a bit where we're #1 rocket scientists. Don't miss it!
Session 3: April 28, 2019 First, the bad news: The parts we ordered last week haven't arrived yet. This is not entirely surprising, since they are quite large and coming from California, but it means doing anything that involved, say, a fuel system wasn't going to happen. So, instead, we concentrated on the brakes. There was nothing wrong with these when the car was last used, but it's been sitting for 20 years, so who knows what's going on in there? We decided to get the car down off the blocks it's been sitting on all this time, put it up on jack stands instead, and take off the wheels to see what's what—and also conduct a more thorough investigation of how the hydraulic lines that operate the brakes are laid out underneath the car. We have a new publication this week to help us dope out exactly where those lines go: 
Fig. A manual d'assemblage
This is a reproduction of an internal GM document intended for assembly plant personnel, and it shows in the fact that it has no index, only the most rudimentary table of contents, and no particular internal organization. It's basically just a pile of technical drawings without any context or narrative (unlike, for instance, a shop repair manual, which were intended for dealership service personnel and contains actual explanations). Still, it's helpful for things like figuring out where cable runs and pipes go, how thing are connected together, and whatnot—the general anatomy of the vehicle. Once off the blocks, the wheels came off easily thanks to the lovely new electric impact wrench I got a while back, replacing the pneumatic one we used to use (which no longer works since Dad's old industrial air compressor rusted out). 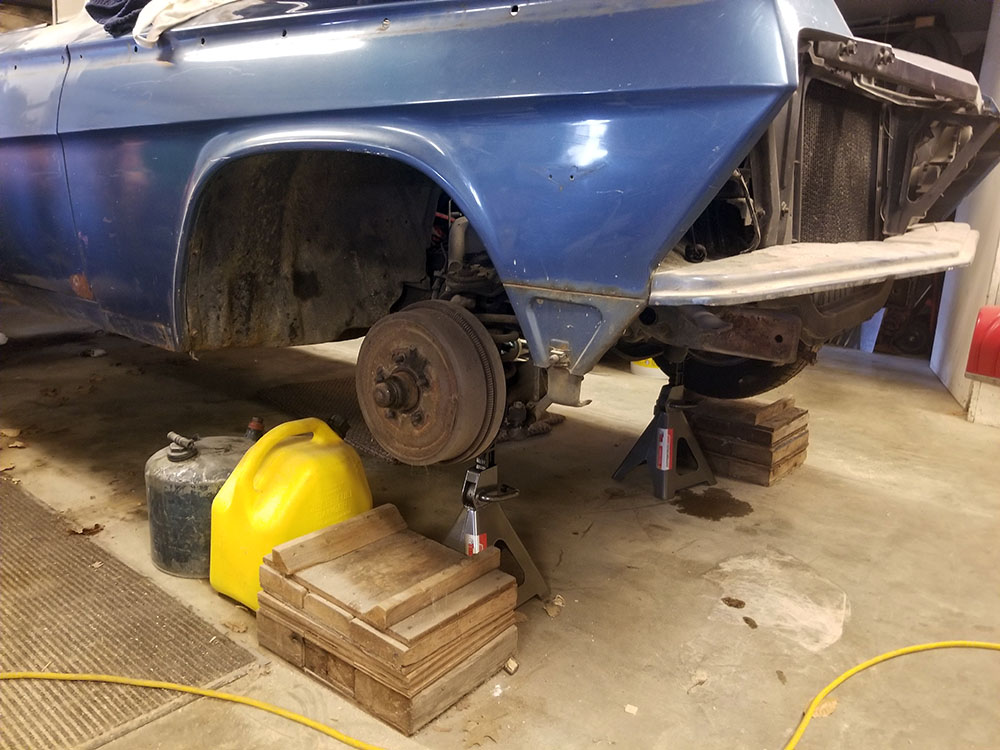
Fig. B right front suspension, wheel off
As you can see, this car—like all 1962 Chevrolets—has drum brakes all the way around. (As noted in the sidebar on brakes, discs didn't become available until 1967.) Having removed the wheels, the next order of business was to pull the drums off and see how things stood inside, and here we ran into a problem. We started with the passenger side rear, and that drum did not want to come off. Prybars, Aero Kroil, even the holy deadblow hammer availeth not. Finally, Dad decided he would have to make a drum puller. 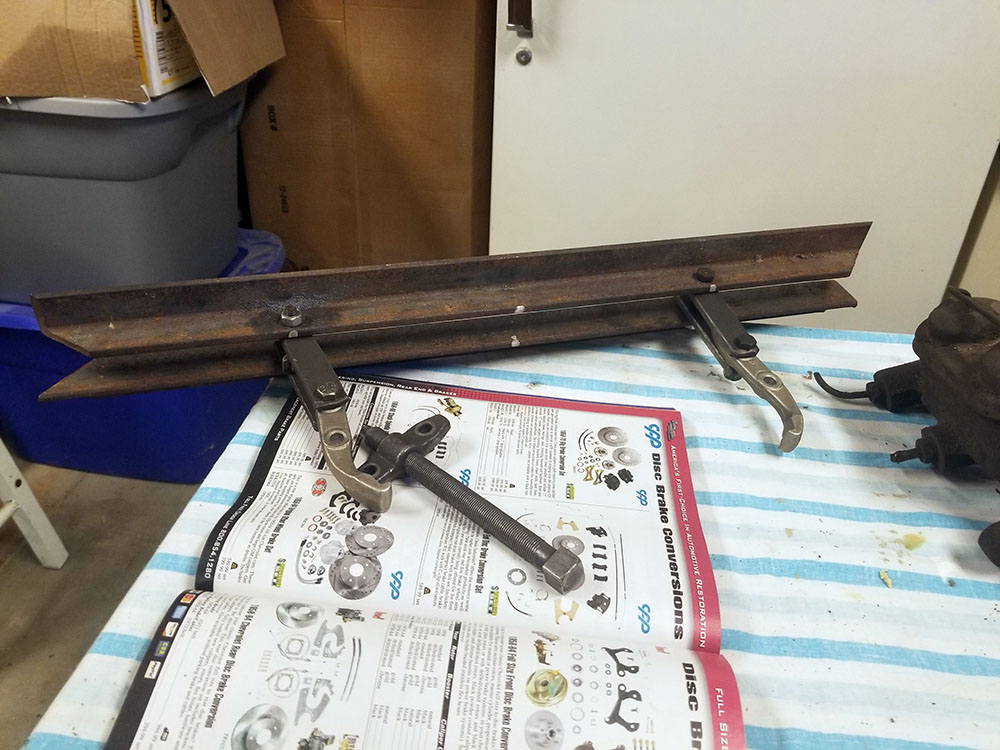
Fig. C it pulls drums
Here's how this works: the hooked arms (which are from a puller meant for smaller-diameter items) are hooked onto the lip at the back of the drum. That square-head bolt with the wings on it goes through the gap in the homebrew spreader bars, and is then turned so that the wings are against said bars, between them and the drum. When the bolt is screwed in against the fixed center hub (which, on the back wheels, is literally just the end of the solid axle), the awful power of the helical inclined plane (that's a screw to you and me) forces the drum outward and off. This thing was a major pain to make. It's mechanically simple, but the only suitable metal Dad had lying around to make the spreaders out of turned out to be insanely tough. We though it was just bits of angle iron from an old shelving unit or something, but it must be some kind of face-hardened structural steel. We went through two drill bits trying to make the holes for the bolts to secure the hook arms. 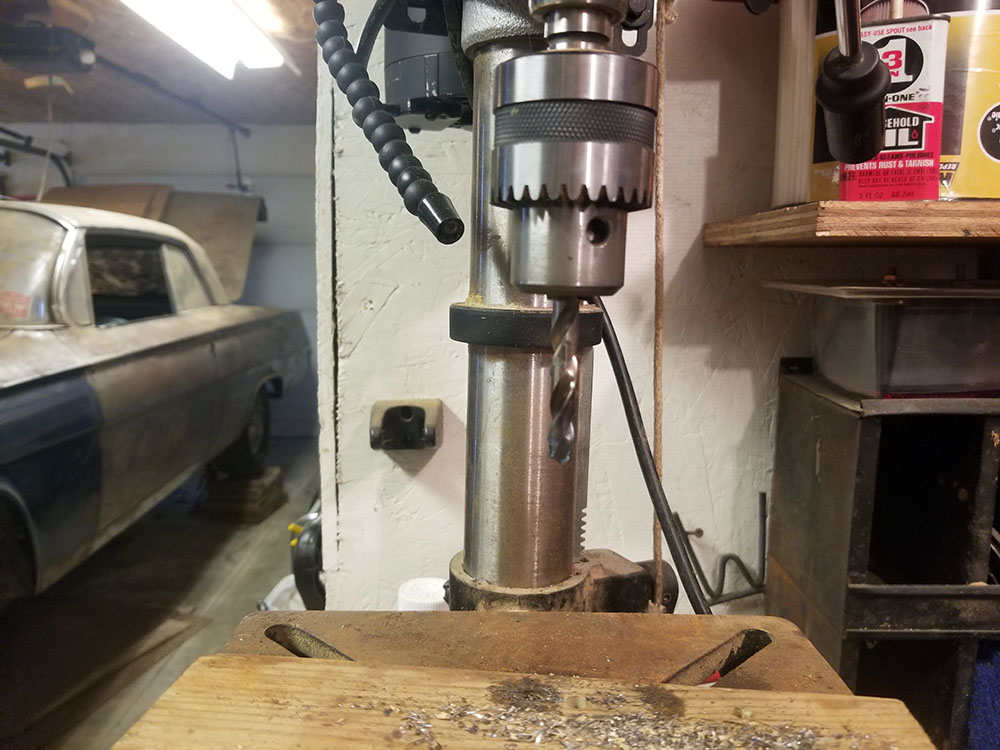
Fig. D yup. that one's done
We did eventually get it done, after drilling a series of smaller holes and then chucking a round file into a hand drill to ream them to size, but it took us a couple of hours of messing around to make the damn thing... and then even it wouldn't budge that drum. It just would not move. We had visions of the interior mechanisms having somehow managed to rust into a solid block inside there. ... And then I had a passing thought, went around to the driver's door, reached in, and pulled a little handle under the dash. Yeah, uh... the parking brake was on. We are number-one rocket scientists. Once the brake was off, the drum came right off, as did the other three. 
Fig. E the Victorians would have needed to cover those up
With the drums off, we found that the only obvious problem with any of the brakes was the left rear, which was full of grease. There's not supposed to be grease in there. After further investigation, we determined that it was leaking down the axle from the rear differential, so evidently the differential seals have failed. This is not uncommon in cars that have sat around for a while; the seals dry out and start leaking. We found a similar little puddle under the power steering pump, which is either a failed seal or a leaking hose. I expect when we do get the engine running and there's oil and coolant pressure, we're going to find leaks pretty much everywhere. It's expected, part of the cost of doing business in a project like this. Here's a closer look at what's going on inside a typical automotive drum brake from the 1960s: 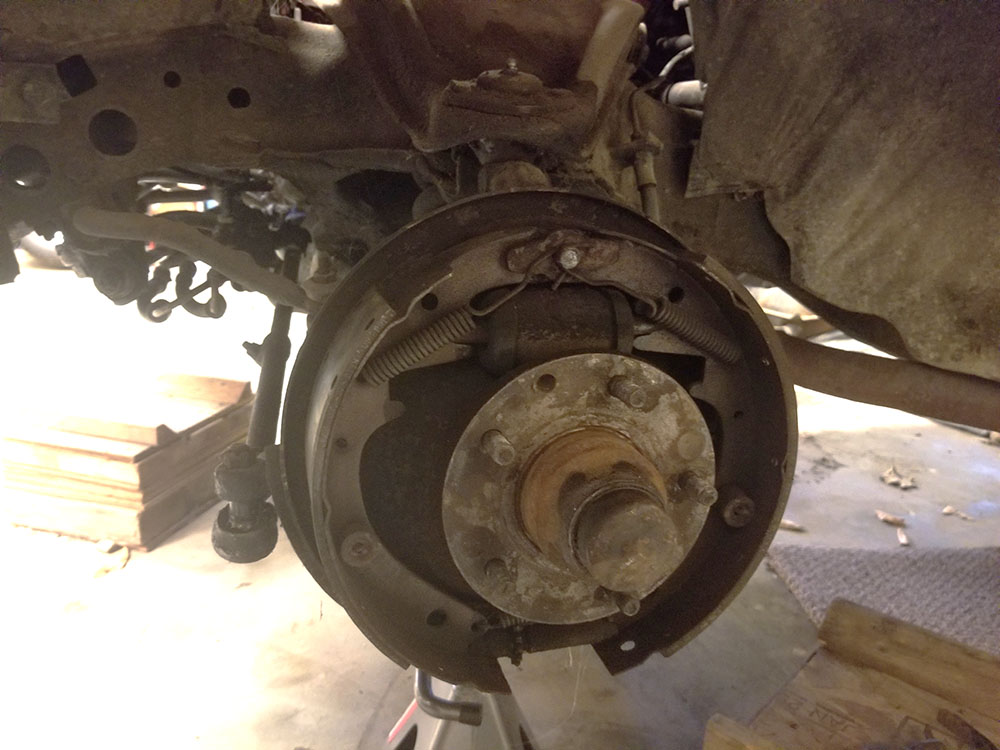
Fig. F stop! in the name of love
You may note the springs, which keep the shoes from rubbing on the drum when the brakes aren't on, and the wheel cylinder between them, which is what pushes them outward when they're supposed to rub on the drum. Everything is dirty, because that's how stuff gets underneath cars, but it all seems to be in working order. The shoes aren't even very worn; the car's previous owner must have had the brakes done relatively soon before it changed hands. Interestingly, this car has bigger brakes—wider drums and shoes—in front than in the rear. We're not sure if this was a standard Impala thing, or an option the original buyer specified. Dad had a '63 Bel Air, the trim level down from the Impala, when he was in high school, and according to his memory it had the same size drums all the way around. Having gotten the system to this point, it was time to strategize. We have a dual master cylinder out of some Chevy or another from the later '60s, so there was the possibility of bolting it up in place of the single master the car came with and replumbing the wheels. It would still have non-power drums all around, but an added margin of safety. We could also have tried to source a '67 or later power brake vacuum servo and convert the whole system to dual master power drums. Or, well, you probably noticed the page that Classic Industries catalog in the photo of the drum puller was open to. There are conversion kits with which one can add modern disc brakes to these old cars. They're pretty expensive, but Dad told me he'd been kicking it around for most of the week and was pretty sure he wanted to go that route, if it was OK with me. Specifically, there's a less expensive kit that puts discs on the front wheels and adds a power dual master, so that when it's finished, the car has power brakes all around, discs in the front and the original, but now power-assisted, drums in the back. This is a configuration that was not at all unusual in GM cars; when disc brakes first appeared in 1967, they were only on the front, and remained that way for years. Most of a car's braking power comes from the front wheels anyway. The kit for this conversion costs less than half what the kit to put power discs all around costs, and after discussing it for a while, we decided the extra stopping power of rear discs wasn't worth the extra cost. Not in our application, anyway. If we were going to go racing, or some other high-demand endeavor, it would be, but for just driving the car around like a normal person, the hybrid system will be fine. So, that was the end of our work on the brakes for the time being. I'm not sure how long it will take the kit to arrive; it's heavy and coming, like all such things, from California, so I expect it will go by the slowest available freight. There's a lot of waiting around for parts and supplies in a project like this, especially if you're doing it in Maine. We're just about as far as you can get from the center of classic car/hot rod culture (the greater Los Angeles area) as you can get and still be in the continental United States. We still had some things to research and discuss, though, because the decision to go with the disc brake conversion gave us a new problem. Remember those fancy wheels Dad put on the car all those years ago? 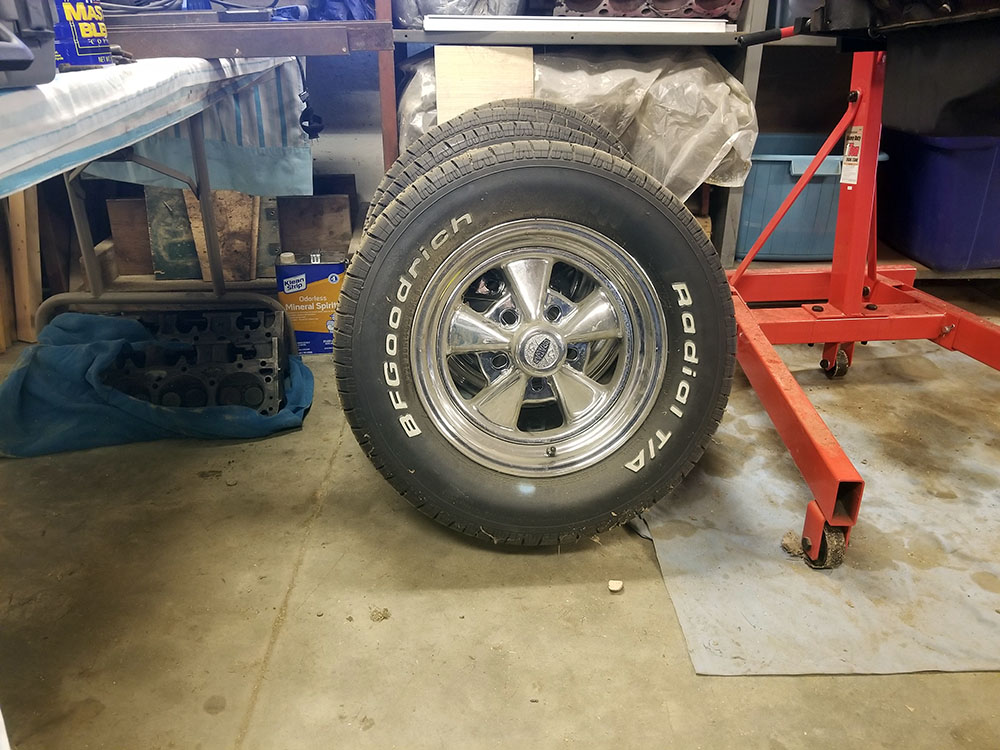
Fig. G chroooome
Those are Cragar Super Sports, which were the hot aftermarket wheel in the 1960s and are classics of the field nowadays. They were Dad's favorite wheels when he was in high school, and I forget if he had a set on his '63 Bel Air or just desperately wanted them, but either way, he bought this set for the Impala way before they were necessary. Unfortunately, they're 14-inch wheels, and the disc brake conversion kits require 15-inch wheels in order to clear the calipers. So if we're doing the brake conversion, and we are, we can't use them. This is annoying for a number of reasons, chief among them the fact that while you can get 15inch Cragar S/S wheels—they're still in production—they're ca. $200 apiece, and that's before you put tires on them. For the short term, as part of the overall "get it running and worry about how shabby it looks later" program, we do have a set of old 15-inch steelies that have the right bolt pattern (5×4¾", if you're curious) that we can put on it just to get it rolling: 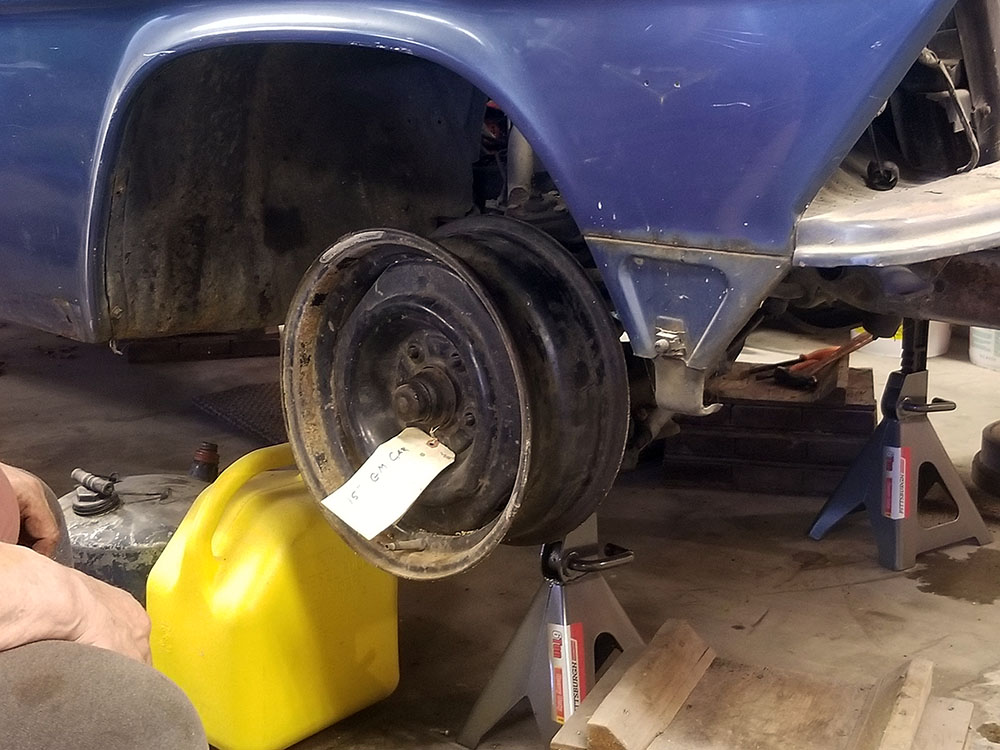
Fig. H you'd look a bit dusty too if you'd just been dug out of a shed you were in for 15 years
Ultimately, this is probably going to be the subject of another debate, because if they were color-matched to the car and had some nice hub caps on them (I'm leaning toward these, which are technically from 1958 but would look perfectly acceptable on a '62, since the originals aren't going to be the right size), I would be fine with steel wheels on the car, but Dad's probably not going to be able to let the Cragars go. On one level, hey, if he wants to spend that much money for another set of those wheels, who am I to say he can't? On another, $1200, that could put air conditioning in there. (Dad doesn't think air conditioning will be necessary because the car will be so infrequently used. I don't think he fully grasps the extent to which temperature extremes are a thing I have to avoid. Come to think of it, the garage is going to get pretty hot at the height of the summer. Oh bother.) So that's the brake situation as it stands right now: Dad's ordering the kit to convert the system to dual-master power assist with discs on the front, and when it comes, if we're satisfied with the quality of the product (and I don't see why we wouldn't be), we'll spend a while putting them on. In the meantime, we've worked up a checklist of things we have to do before we can see if the engine will run. Obviously we have to install the new fuel tank, sending unit, and all the fuel plumbing when the parts arrive. We'll also need to reinstall the heater, since it's connected to the cooling system (that's where the heat comes from—the heater core is basically a second radiator that's connected by a duct and fan to the cabin), and check/refill the cooling system itself. Fortunately, he did drain it when it became obvious the car was going to sit for a while, but like I said earlier, I expect we'll have to replace some hoses. All of this is predicated on the electrical system working normally when we put a battery back in the car, of course. So that's the result of the actual work session. Next post, the mystery. --G.
-><-
Benjamin D. Hutchins, Co-Founder, Editor-in-Chief, & Forum Mod
Eyrie Productions, Unlimited http://www.eyrie-productions.com/
zgryphon at that email service Google has
Ceterum censeo Carthaginem esse delendam.
#19, RE: Session 3
Posted by MoonEyes on Apr-29-19 at 08:28 AM
In response to message #18
> I think it'll be worth checking out if you're
>following the project. If? What if? This is the next best thing to more Binky! >Also, there's a bit where we're #1 rocket scientists. Don't miss it! Yayness! ...!
Stoke Mandeville, Esq & The Victorian Ballsmiths
"Nobody Want Verdigris-Covered Balls!"
#20, Session 3 sidebar: brakes
Posted by Gryphon on Apr-29-19 at 02:31 PM
In response to message #18
I should probably take a moment and give a capsule summary of automotive braking technology in the 1960s, rather than just assume everyone reading knows how this stuff works. If you already do, you don't really need this part, which is why I made it a separate post.The '60s were a time of significant change in this corner of the auto industry, as it happens, so a 1962 car is a good starting point. In 1962, as in the several decades before, virtually all cars had drum brakes on all four wheels. (Before about 1930, it was anybody's guess how many wheels you'd even have brakes on or what, if anything, they would do.) The way these work is pretty simple in concept: each wheel hub has a metal drum surrounding it, and inside that drum are what's called shoes. These are curved pieces of metal with a facing of some durable, high-friction, heat-resistant material (in the olden days, asbestos—we'll get back to this in a moment), spring-loaded to keep them from touching the inside of the drum. The shoes are fixed in place to the stationary part of the wheel hub, while the drum rotates with the wheel and tire (which are bolted onto the rotating wheel hub through it). When the brake pedal is pressed, it drives a piston inside a device up in the engine compartment called the brake master cylinder, which pressurizes the hydraulic fluid in the brake system. In response to this pressure, a hydraulic cylinder in each wheel's brake assembly overcomes the spring tension and forces the shoes outward, where they rub against the inside of the rotating drum. The friction converts some of the wheel's kinetic energy to heat, slowing the rotation of the wheel, and—all else being equal—that slows down the car. Drum brakes were the standard for a long time, and are still seen in some applications (such as heavy trucks), but they have some inherent problems. One is that the steel drums and the shoes retain a lot of heat. The drums expand more than the ceramic/fibrous material of the shoes, which means after one or two hard brake applications, the brake system has to push the shoes farther outward to reach the inside of the drum. Compounding the problem, hot shoes generate less friction than when they're cool. All this means the driver has to press harder to achieve the same effect—and eventually that "harder" exceeds the mechanical limits of the braking system and can't be applied anyway. This is called "brake fade" and can be a really serious problem, as you might expect. Oh, yes—there's also the small matter of brake shoes having been made for many years from asbestos, for its heat-resistant properties. Brake shoes wear out, they're designed to ablate very slowly in use. When you pull the drum off a well-worn drum brake, a bunch of black powder falls out. If the brakes are old, it's asbestos dust. Try not to breathe it. (The occupational safety and health implications of this for anyone who worked repairing vehicle brake systems should be plain...) The other major shortcoming of drum brakes is that they're just not as effective as some of the alternative. They're mechanically simple, cheap to produce, and easy to service, which kept them popular for a long time, but there are far better ways to slow down a spinning wheel. The most obvious of those better ways is the disc brake. In this system, instead of the drum, the part of the system that's fixed to the wheel and rotates is a disc (usually metal, but some high-end ones are made of fancy composites or even carbon), sometimes called the brake rotor since that's what it does. The fixed part of this system is a hydraulically operated caliper that, when the brakes are applied, pinches the rotor with a set of pads made from a high-friction material similar to what drum brake shoes are made from. (N.B. Nowadays this is not asbestos.) Disc brakes are much better at stopping a wheel than drums; they're more efficient at converting rotational energy to heat and better at dissipating that heat, and they work better under adverse conditions (for instance, if you get drum brakes wet, good luck, whereas discs, though also less effective when wet, dry out a lot faster). A car fitted with disc brakes will stop in a much shorter distance than the same car, from the same speed, with drums. They're just better. Their only real drawback is that because of the forces involved, they have to be power-assisted to be effective (but power discs are still that much better than power drums). Another drawback not directly related to drum brakes themselves is that before 1967, most American-made cars only had a single brake master cylinder and one system of hydraulic brake lines running to all four wheels. That meant that a leak anywhere in the system—a hole in a line, failure of a wheel cylinder, what have you—would depressurize the system and cause all four wheels' brakes to stop working at once. In 1967, this problem was corrected by the introduction of the dual master cylinder. With a dual master cylinder system, applying the brake pedal simultaneously pressurizes two independent hydraulic circuits, one for the front wheels, the other for the rear. The master cylinder/pedal linkage assembly itself remains a potential single point of failure, but a leaking wheel cylinder or punctured line won't drain the whole system, giving the motorist a reasonable chance of keeping control of the vehicle. Nineteen sixty-seven was also the year that GM started offering disc brakes on some of its cars. At first, and for a number of years, these were optional, and for a long time—into at least the 1980s, I believe—they were only on the front wheels. The rear brakes were still drums. This worked because most of a car's braking power comes from the front wheels anyway, so keeping the less effective but simpler braking technology on the rear wheels didn't hurt performance much. (Drum brakes are also simpler to set up for secondary cable operation, which is why the parking brakes in most such cars only operate the rear wheels.) It was also possible because of the dual master cylinder—disc and drum brakes need very different operating pressures, so the master cylinders on cars equipped with front discs had what's called a proportioning valve in them, ensuring that the front brakes get the high pressure they need without running the whole system so high that the rear brakes would just instantly lock up. I remember when I was a kid, this was still a Big Deal. We had several cars in those days, including the green Mailbu hoopty of blessèd memory, in which the brake pedal had "DISC BRAKES" proudly embossed on it. Some of the early disc-equipped cars even had an exterior badge to that effect on them, as a warning to drivers of mere mortal drum-braked cars that the newfangled disc-equipped car in their midst would be stopping a lot shorter than they could. Anyway, that's car brakes of the 1960s in a nutshell. Certain bits of this will become relevant back in the main post when it's finished... --G.
-><-
Benjamin D. Hutchins, Co-Founder, Editor-in-Chief, & Forum Mod
Eyrie Productions, Unlimited http://www.eyrie-productions.com/
zgryphon at that email service Google has
Ceterum censeo Carthaginem esse delendam.
#22, Session 3, cont'd: Car Detectives
Posted by Gryphon on Apr-29-19 at 10:18 PM
In response to message #18
LAST EDITED ON May-02-19 AT 12:04 PM (EDT)
Now for the strange part. Remember back at the beginning when I talked about the color of the car? We know it's been repainted, but we weren't sure how to interpret the layers that have been revealed by sanding on various bits of the body. Based on the interior color, we assumed that the car had always been blue, just a different shade (we thought it was originally Silver Blue).For reference, here are the layers I'm talking about: 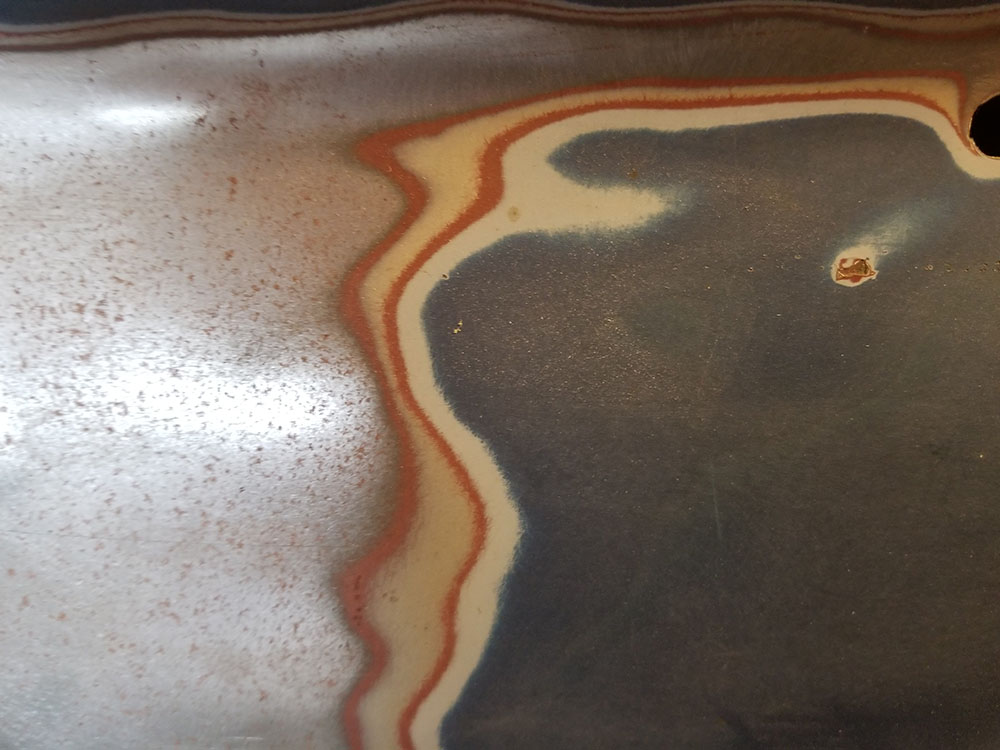
Fig. I ignore the thing that looks like it might be a bullet hole; it's where part of the trim was installed, I think
We thought that grey-brown layer was body filler from a repair to that part of the car, and wondered why there's no sign of the original color underneath it. Well, yesterday we found the cowl plate, a metal plate riveted to the firewall in the engine compartment, which has codes on it enciphering various details of the car's original construction. 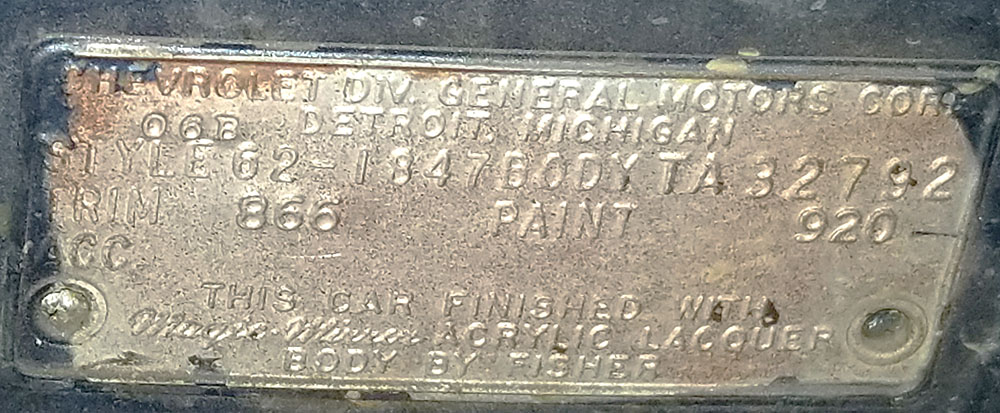
Fig. J cowl as in what they used to call the bulkhead in front of the cabin in roadsters, not cowl as in Batman's hat
In case the picture isn't clear enough or doesn't load for some reason, the cowl plate in this particular car says: CHEVROLET DIV. GENERAL MOTORS CORP.
06B DETROIT, MICHIGAN
STYLE 62-1847 BODY TA32792
TRIM 866 PAINT 920
ACCTHIS CAR FINISHED WITH
Magic Mirror ACRYLIC LACQUER
BODY BY FISHER If you know, or can look up, the code, this reveals surprising things about our Impala. BODY TA32792 is the serial number for the body, which was made independently of the car by (as the last line on the plate suggests) GM's Fisher Body Division; the TA indicates that this particular body was built at Fisher's plant in Tarrytown, New York. STYLE 62-1847 discloses the particular model of car it was for. 62 is obviously the model year. Full-size Chevrolets of this era were officially the "1000 Series", though this designation scheme seems only to have been used internally; I can't remember ever seeing it in any customer-facing docs (owner's manual, marketing bumf, etc). Impalas were either 17XX (6-cylinder engine) or 18XX (V8 engine). 47 indicates a Sport Coupe (i.e., two-door pillarless hardtop). (As an aside, this same code appears, without the leading 6, as the first five digits of the car's Vehicle Identification Number, which is elsewhere in the car. VINs as we know them today, with a standardized 17-digit format, didn't come along until 1981; before then, manufacturers could do pretty much whatever they liked as long as the numbers were unique and encoded all the required information. In 1962, Chevrolet VINs were 12 digits, and started with the body style code, then a letter indicating where the car was made, and then a six-digit serial number. Ours begins 21847T, the T meaning that final assembly was carried out in Chevrolet's Tarrytown Assembly plant, unsurprisingly part of the same facility as the Fisher Body factory where the body was made. Tarrytown Assembly closed in 1996.) Skipping ahead a little, ACC would have a code or codes after if it the car had been fitted with various options. EZW, for instance, would indicate that the car was bought with the tinted window option; SPORT would denote the Super Sport trim package; AC would mean it had factory air conditioning; and so on. As you can see, this car didn't have any of those. Now here's the interesting part. That PAINT code, 920, is the code for a color called Autumn Gold. 
Fig. K 1962 Chevrolet paint swatch card
(As an aside: Yes, color #903 is the same Surf Green as Ui Hirasawa's Fender Stratocaster. For a few years there, GM and Fender shared paint colors. See also #917, Twilight Turquoise, or as it is known to customers of Fender's Dìqiú branch, Avatar Blue.) Knowing that, suddenly the odd paint layers made sense. That greyish brown layer isn't body filler, it's what the original paint looks like when it's dull from being edge sanded. At some point, long ago, somebody repainted the car light blue, and then, either as part of the same process or later on, left the roof that color and went over it the body with a darker blue (possibly an attempt at matching #918, Twilight Blue). The thing that baffles Dad and me is that the car's interior is also blue. 
Fig. L you've seen this one before
And not just the seats, but everything. The dash, all the interior pieces, the carpets, even inside the doorjambs and (not visible here) the floor under the seats. People who repaint cars usually miss places like those last two. Well, we thought, maybe somebody ordered it in Autumn Gold with a blue interior. That would be weird, but back then you could do stuff like that. Nowadays, if you even have a second option for the interior color of a car, it's virtually always going to be coupled with the exterior color, a trim package, or both, but in 1962, you could special-order pretty much anything the factory could make. But, no, the cowl plate puts the lie to that, too. TRIM 866 means the car came from the factory with an interior color called... Fawn. 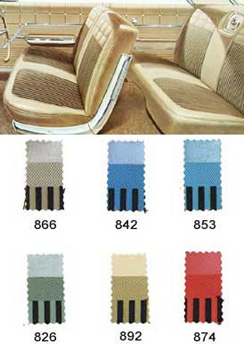
Fig. M or as we might call it today, Premium Beige
Curious, I did a quick snout around the Internet and found an expired auction listing for a 1962 Impala without the SS package and in exactly this color scheme (although the one shown here had the rare and sought-after 409 big-block engine, which is why the asking price is so absurd). I've linked the auction so as not to swipe their photos unacknowledged, but in the event that it's taken down now that it's over: 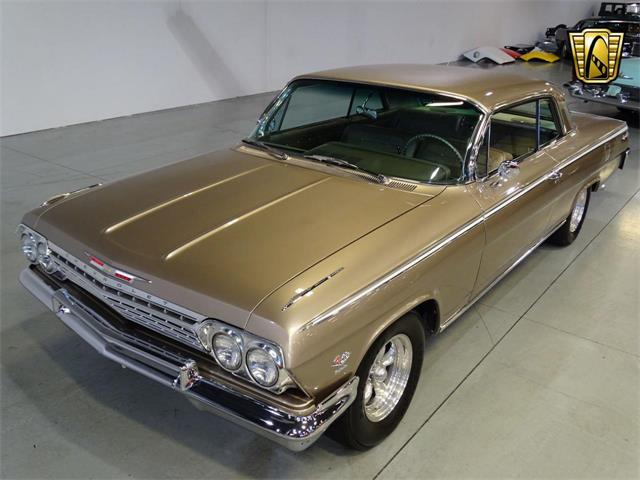
Figs. N-O I don't think those seat belts are original; they look to be from the '70s
These were even the colors chosen to represent the Impala in 1962's sales brochure. 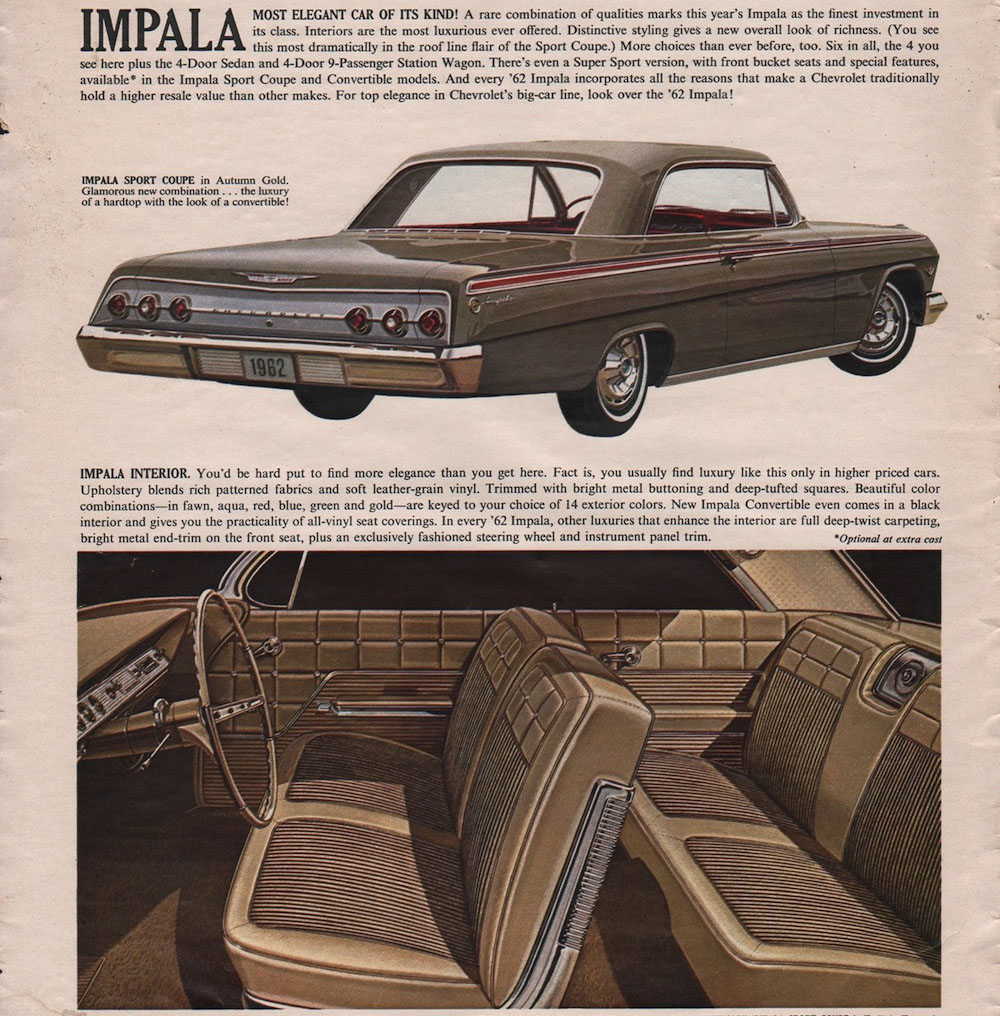
Fig. P although you'll note that the Autumn Gold hardtop in the exterior shot has a red interior
This is what's so baffling. Repainting the car, particularly as thoroughly as this one was repainted, would have been a time-consuming and expensive process, but completely re-doing the interior? The seats, the door cards, every piece of interior trim and upholstery, the dash, even the carpets? Now, it was clearly done a long time ago, long enough ago that the carpets have significant wear and staining and the front passenger seat is torn, so it probably wasn't as fantastically costly when it was done as it would be now—but on the other hand, that means the car was much newer when it happened. Who would've done that? And why? I mean, I'm not a fan of beige either, but it seems like a very great length to go to simply for aesthetics. Anyway, we, uh, won't be putting it back. The upholstery alone would be somewhere north of $1,000. --G.
-><-
Benjamin D. Hutchins, Co-Founder, Editor-in-Chief, & Forum Mod
Eyrie Productions, Unlimited http://www.eyrie-productions.com/
zgryphon at that email service Google has
Ceterum censeo Carthaginem esse delendam.
#23, Session 3, cont'd: incidental observation
Posted by Gryphon on Apr-29-19 at 10:44 PM
In response to message #22
At one point, having gotten tired of having to poke a screwdriver into the hole in the passenger door to unlatch it and get inside, we decided to put the door handles back on the car. To do this, we had to dig out the bucket with all the small bits in, lay a bunch of them out on the table, and find both the exterior handles and the door glass regulator handles, because the windows have to be up to get at the holes for bolting the exterior handles back on.Earlier in the day, we had strewn the table with the contents of a big can of bolts, hunting for suitable ones to make the drum puller with. 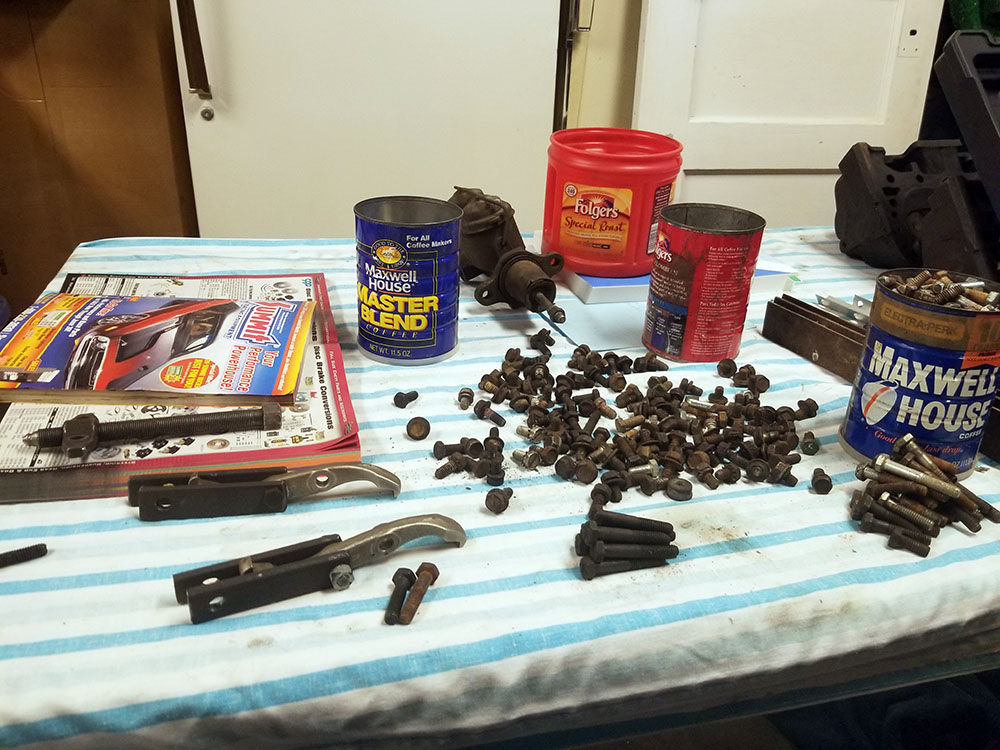
Fig. Q what? doesn't everyone have multiple coffee cans full of filthy old nuts and bolts in their garage?
In order to make room for the stuff that had to be removed from the box o' parts to find the handles, I had to put all the extra bolts back in their can, and later, at the end of the day, I happened to be sitting there when I had the impulse to take a closer look at one of the taillights, which were still laid out on the table. (This picture is from slightly earlier, you can see at left that one of the door handles hasn't been put back on the car yet. Also, note the grungy old dual brake master cylinder, which we were thinking of putting on before we decided to go with a conversion kit that includes a new one.) 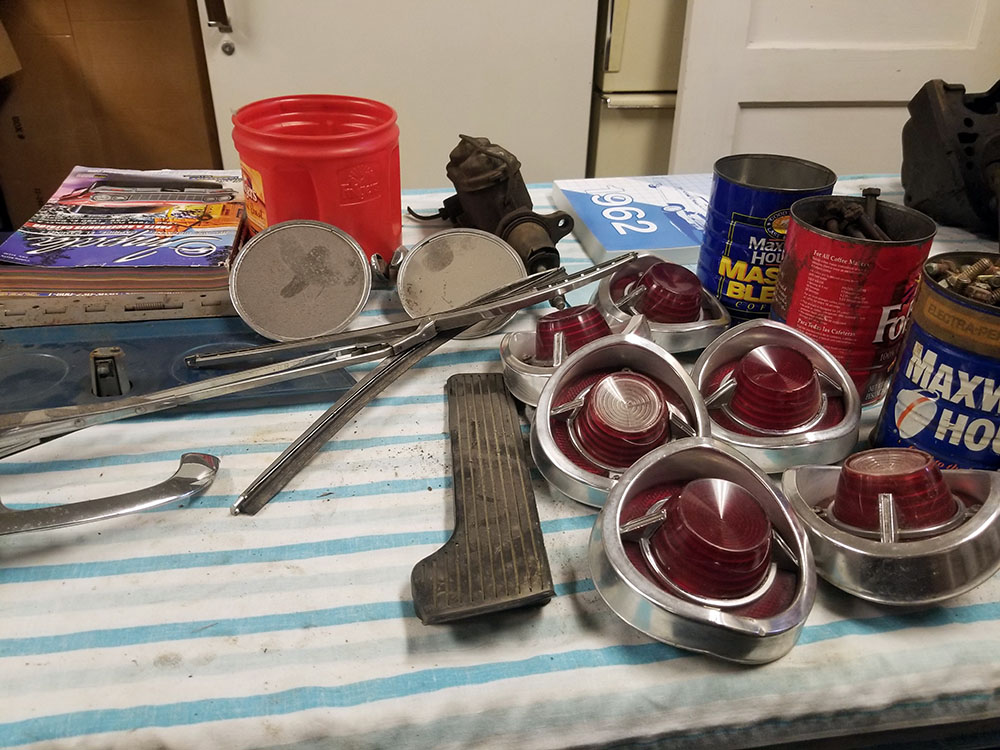
Fig. R along with the loud pedal!
(Interestingly, this car had a door mirror on both sides. That was pretty unusual in 1962, and must have been an option; my 1968 Tempest, six years and many safety regulations newer, didn't have one. It wasn't that long before '62 that they didn't have to have door mirrors at all! And look—they even painted the inside of the glove compartment door, or replaced it outright.) Anyway, I picked up one of the taillights and had a closer look at it, and was pleased to discover that it was marked: on the reflector lens surrounding the part that lights up, along with the part number, were the words GUIDE LAMP. This wasn't just the name of the part; "Guide Lamp" is the name of one of GM's many once-independent parts subsidiaries, the Guide Motor Lamp Company of Cleveland, Ohio. First incorporated in 1906, Guide Lamp started making electric lights for automobiles in 1910 (before then, car headlights were usually acetylene lamps), and ultimately developed the now-familiar high beam/low beam system with dual-filament lamps and multiple reflectors. GM bought them out in 1928, but the name remained for a long time; the division was finally shut down in 2007. During World War II, Guide made—unsurprisingly—lights for a wide range of U.S. military vehicles. Since they were the GM division responsible for hub caps at the time, they also made a range of small metal stampings, such as the propeller hub covers for various aircraft, and shell casings... and, perhaps a bit more surprisingly, all 622,000-plus M3 and M3A1 "Grease Gun" submachine guns made for the U.S. Army during the war. (Ithaca later produced a much smaller second batch of M3A1s during the Korean War.) I couldn't get a decent photo of the part number mark for some reason, but I did get a nice pic of this little detail, which shows the brand name of the signal lamp line of which the Impala's taillights were part. 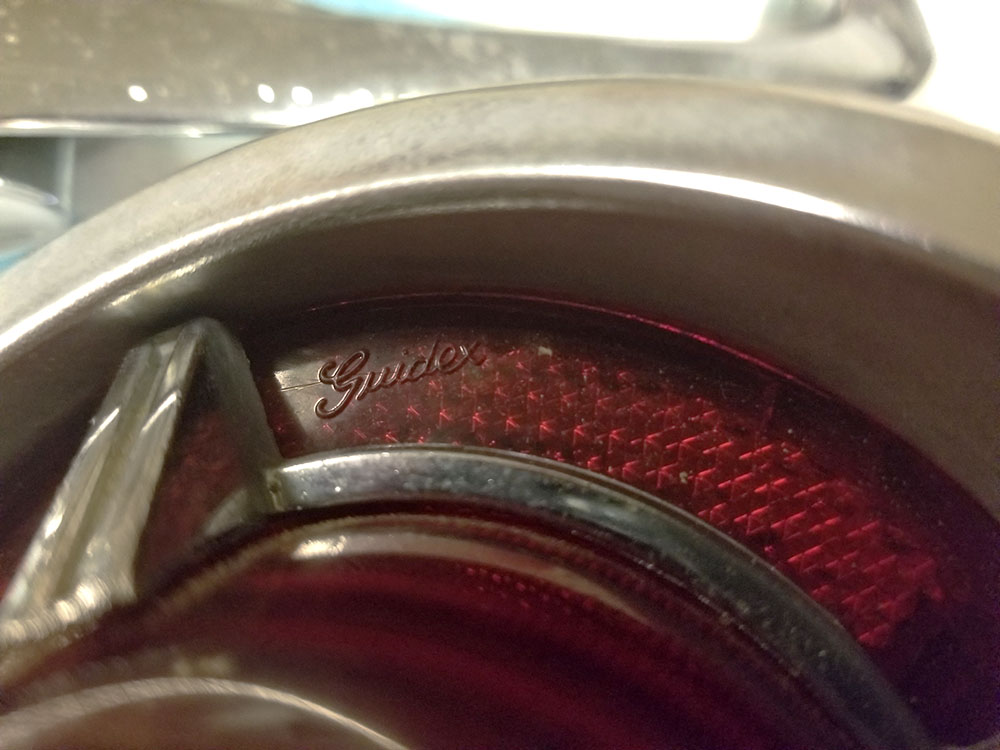
Fig. S Guidex, for all your guidance needs
It's a tiny thing, but I love that GM's many, many divisions put small details like this on their products back then. It's the kind of thing that's been lost in the current age of monolithic marketing and bland corporate identity. --G.
-><-
Benjamin D. Hutchins, Co-Founder, Editor-in-Chief, & Forum Mod
Eyrie Productions, Unlimited http://www.eyrie-productions.com/
zgryphon at that email service Google has
Ceterum censeo Carthaginem esse delendam.
#25, RE: Session 3, cont'd: Car Detectives
Posted by rwpikul on May-01-19 at 04:41 PM
In response to message #22
>Who would've done that? And why? I mean, I'm not a fan of beige either, but it
>seems like a very great length to go to simply for aesthetics. The obvious reason would be that Something Happened™ that forced a replacement and the blue interior was more available. Either cheaper, for whatever reason, or simply being the best not involving waiting for a shipment. You can now speculate if it was something tragic, prosaic, strange or comic. Then, when someone decided to repaint the car, they matched the new outside to the inside.
#26, RE: Session 3, cont'd: Car Detectives
Posted by Gryphon on May-02-19 at 11:55 AM
In response to message #25
>The obvious reason would be that Something Happened™ that forced a
>replacement and the blue interior was more available. Either cheaper,
>for whatever reason, or simply being the best not involving waiting
>for a shipment.Hmm, that could be; I hadn't thought of the possibility that it may have happened in that order. Given the wear and staining on the blue carpets, it seems like the changeover may have been quite a while ago—it's possible that it happened early enough in the car's lifetime that 1962 Impalas were still findable in junkyards at that time, and the only one they could find with a good interior was blue. Either way, the conversion was unusually thorough, which makes one suspect it was professionally done, although now that I think about it, the state of the cowl plate argues slightly against (whoever painted the firewall didn't mask it very well, there's blue paint all around the edges). On the third hand, most amateurs who repaint cars don't bother painting things like the firewall in the first place. Hmm, I wonder if it would be possible to look through its registration records in Augusta and find out what year the color changed. That stuff is all supposed to be public-record information, I think... --G.
-><-
Benjamin D. Hutchins, Co-Founder, Editor-in-Chief, & Forum Mod
Eyrie Productions, Unlimited http://www.eyrie-productions.com/
zgryphon at that email service Google has
Ceterum censeo Carthaginem esse delendam.
#27, Session 4: Making Lemonade
Posted by Gryphon on May-03-19 at 10:48 PM
In response to message #0
LAST EDITED ON May-03-19 AT 10:49 PM (EDT)
So... there wasn't supposed to be a Project Impala session this week, because I was supposed to be away this weekend. MegaZone has spent the last year and a half or so having a new house built somewhere just outside the greater Worcester area, and this weekend he is at last having his housewarming party, to coincide with both the Kentucky Derby (for some reason) and the Star Wars-themed pun I decline to say out loud. I was of course invited, and I intended of course to go.This past Wednesday, however, I had my first meeting with my new neurologist. I didn't get fed up with my old one; rather, he decided to transfer my care to the MS clinic operated by the hospital with which his practice is affiliated, where they are doing some things that are closer to the cutting edge than he has access to in his regular practice, and that clinic is operated by a different one of their several neurologists. I won't bore you with the details, but the short version is that the current wisdom in RRMS treatment is to be more aggressive with it than used to be the case, so we're switching things up and seeing what happens if we go after it hard for a while. In the course of laying out the process involved in switching primary therapies (and there is a lot of process involved in that), Dr. Elmalik asked if I had left the state within the last six weeks. When I told him no, he said good, you shouldn't until the measles outbreak in the lower 47 runs its course. Well... shit. Yeah. There's a measles outbreak, in the United States of America, in the year 2019. A disease that was declared eradicated on these shores in something like 2002 is back. And I had my shots as a kid, but that was a long time ago, and anyway, those of us who are engaged in chronic medical adventures that involve dicking around with our immune systems are advised to keep well away from that action if at all possible. So, I'm unable to go to Zoner's party, because it's happening in a state where there is a fucking twenty-first-century measles outbreak happening. You may speculate amongst yourselves about the size of my happy hat. (And his, for that matter.) Thanks, anti-vaxxers! Good work. You must be very proud. But, in the interest of finding a bright side, that means I can go down to Dad's tomorrow and put stuff on the car. The brake parts won't arrive until the middle of next week sometime, but all the fuel stuff is in! Should be a good session. I'll try to remember to take the Big Camera (the one I bought for Gun of the Week) and take some proper photos this time. --G.
-><-
Benjamin D. Hutchins, Co-Founder, Editor-in-Chief, & Forum Mod
Eyrie Productions, Unlimited http://www.eyrie-productions.com/
zgryphon at that email service Google has
Ceterum censeo Carthaginem esse delendam.
#28, RE: Session 4: Making Lemonade
Posted by Lime2K on May-04-19 at 07:33 PM
In response to message #27
LAST EDITED ON May-04-19 AT 07:34 PM (EDT)
>You may speculate amongst yourselves about the size of my happy hat. (And his, for that matter.) At Cornell University, there is an incredible piece of scientific equipment known as the Tunneling Electron Microscope. Now, this microscope is so powerful that, by firing electrons, you can actually see images of the atom. The infinitesimally minute building blocks of our universe. If I were using that microscope right now, I still wouldn't be able to locate your happy hat.
--------------
Lime2K
The One True Evil Overlord
(who is sorry to hear about this. FUCKING VACCINATE, PEOPLE. KTHX.)
#29, RE: Session 4: Making Lemonade
Posted by Gryphon on May-04-19 at 10:43 PM
In response to message #28
>>You may speculate amongst yourselves about the size of my happy hat. (And his, for that matter.)
>
>At Cornell University, there is an incredible piece of scientific
>equipment known as the Tunneling Electron Microscope. Now, this
>microscope is so powerful that, by firing electrons, you can actually
>see images of the atom. The infinitesimally minute building blocks of
>our universe. If I were using that microscope right now, I still
>wouldn't be able to locate your happy hat.Technically, in the original Denis Leary track, the happy hat was a manifestation of extreme sarcasm, so it got larger with decreasing happiness. :) --G.
-><-
Benjamin D. Hutchins, Co-Founder, Editor-in-Chief, & Forum Mod
Eyrie Productions, Unlimited http://www.eyrie-productions.com/
zgryphon at that email service Google has
Ceterum censeo Carthaginem esse delendam.
#30, Session 4: Actual Notes in This One
Posted by Gryphon on May-05-19 at 00:42 AM
In response to message #27
Session 4: May 4, 2019This session is fairly light on photos (naturally, since I took the big camera along this time), because a lot of what we were doing was in places that are hard to photograph. The writeup may not be as exciting as previous weeks' either, but what the hell, one soldiers on. This week, the big news is that we got the new fuel tank (and, indeed, the entire fuel system) installed. 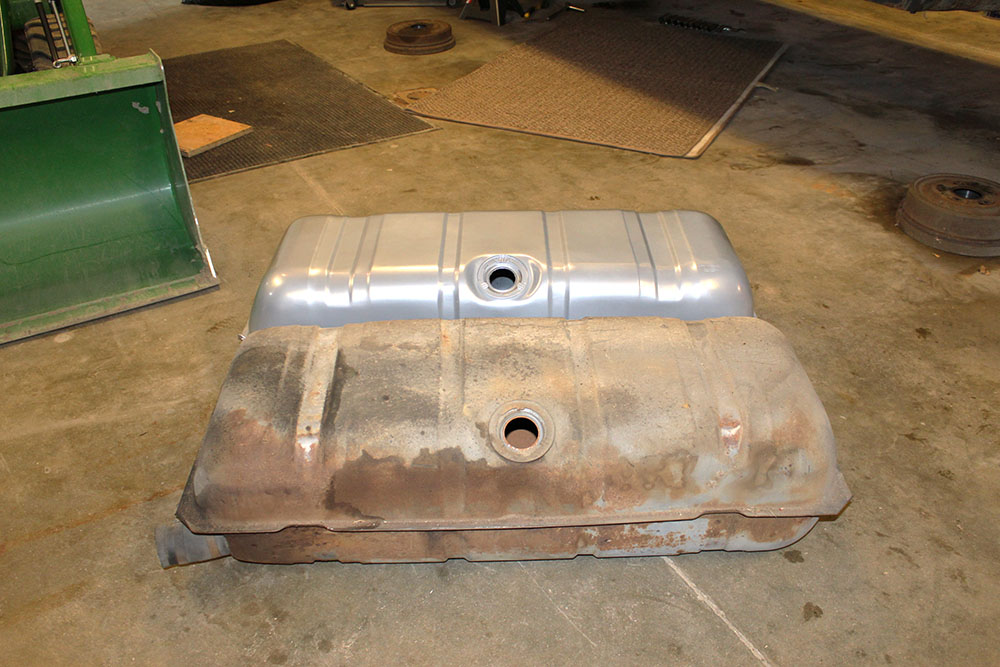
Fig. A Old and busted; new hotness.
Here we see the new and old tanks together. From this angle, with the sending unit removed, it's possible to see how rusty the old tank was inside. Note that the face that's on top in these photos is actually the front of the tank; when installed, that faces forward with the sending unit at the top and the fill neck (visible here in the lower left) pointing up toward the driver's side rear inner fender, where the hole for the filler flap is. The tank is secured with two metal straps that fit into those grooves near the ends (you can see where the straps wore the old tank shiny at the corners). In order to install the new tank, the first step was to install the new sending unit (which contains the siphon tube for the fuel pump pickup and the measuring and transmitting apparatus used by the fuel gauge) in its hole. 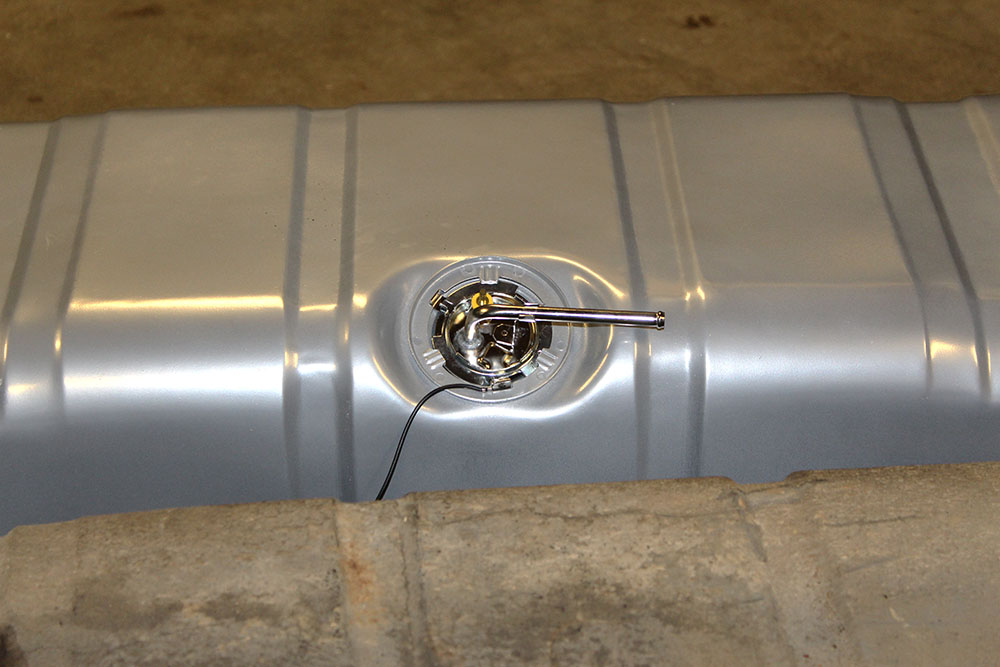
Fig. B Ooh, shiny!
The pipe is where the gas comes out, obviously. The yellow connector above it is where the wire from the fuel gauge plugs in; the black wire hanging down has a terminal on it (hidden behind the old tank in this shot), which is screwed to the body to provide a ground for the gauge circuit. I forgot to get a picture of it, but I noticed while we were wrangling the tank into position that the other side of it has a circular blank depression for that sender hole on it as well, although with the hole not cut. Evidently they make these tanks with two identical stampings, which they weld together, bend the corners, and then knock out one of the circles. A clever way of economizing a bit on the part, since the tooling to stamp big pieces of sheet steel like those ain't cheap. Next, it occurred to me that, given the condition of the old tank and the state we found that carburetor in, we should probably clear out the fuel line between the tank and the fuel pump (which is mounted on the engine in these pre-fuel-injection cars). Besides the rust problem, if you leave gasoline sitting for more than a year or so without any stabilizing additives, it basically turns into varnish, so if there was any left in the line when the car was last run 20 years ago, it would have gone off long before. To clear the line, we disconnected the pump end up in the engine compartment, then put some compressed air to it while the tank end of the line was still hanging free under the car—and it's a good thing we did, because doing so blew out several ounces of a nasty slurry made of rust powder and old partially-polymerized gasoline. I'm not sure the fuel pump would even have been able to pull that out, but if it had, it would have pumped it straight into our nice newly-rebuild carburetor and really ruined our month. With that done, it was time to break out the new fill hose section (which connects the neck on the tank to the hard filler pipe that goes up through the fender to the fuel door) and clamp it all together. While we were unpacking the hose and the new clamps that came with it, I noticed something. 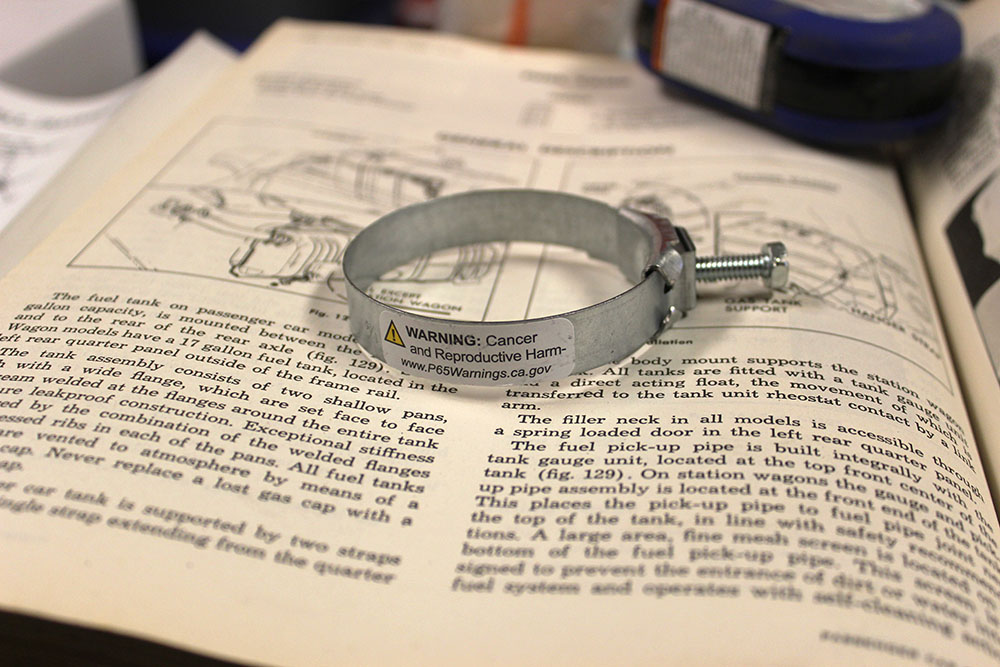
Fig. C Proposition 65, man. It's here for your protection.
Apparently whatever this hose clamp is made of is known to the State of California to cause both cancer and birth defects. Which is... interesting... since it appears to be made of steel. How did they test that? (Or it could be because the screw is, I think, chrome-plated. Chromium is pretty toxic. But, I mean... seriously?) In the It's Always Something department, the two identical fancy perpendicular hose clamps provided with the fill hose section wouldn't open far enough to fit over the tank flange once the hose was on, so we had to go to Dad's trusty neighborhood hardware store and buy an ordinary one (the kind where the screw is at a tangent to the clamp) for that end. Unfortunately, I don't have any pictures of the tank in position, because I was not about to clamber under the car with the camera in hand, and Dad's hands were too dirty for me to pass it down and get him to take them. However, I do have this photo of the other side of the old tank, which I happened to notice when it was sitting pushed out of the way on the floor. 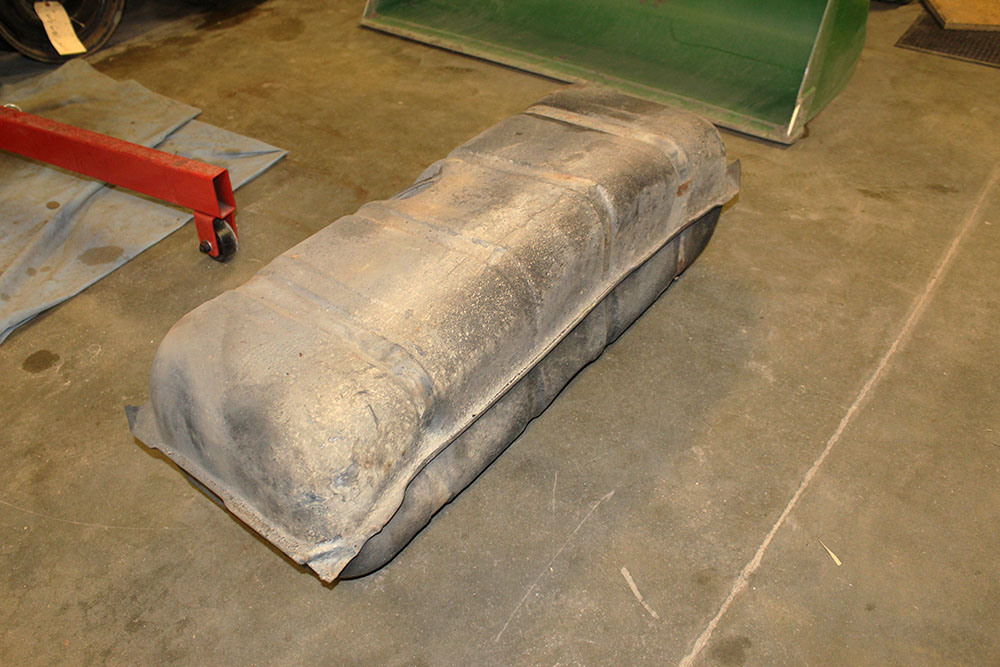
Fig. D Do you see what I see?
It might be hard to tell in the picture, but that's the side of the tank that would be the bottom when it's installed in the car, and that seam across the bottom is supposed to be straight. Somewhere along the line, the bottom of this tank lost an argument with something—I'm guessing possibly a railroad crossing, or one of those frost-heave-generated ripple gullies that used to plague the roads of Maine in the springtimes of my childhood, and which we always used to call yes-ma'ams. Those old Chevys don't have the stiffest rear-end springs. Something to be wary of when we finally have the old bucket back on the road, although with more advanced roadbuilding techniques, yes-ma'ams seem to be mostly a thing of the past nowadays. With the tank in place and the filler neck reconnected to its place behind the fender flap (we'll probably have to replace the rubber seal that holds it in place at the top, it's gotten pretty hard and inflexible in its old age, but it went back on without breaking and is holding up for now), we went up front and replumbed the feed lines, the one to the pump and the one from the pump to the carb. These have little flexible hose sections in them as well, to avoid having to have metal-to-metal tube joints, and after 60 years those tubes were pretty dried out. Fresh hose sections and clamps sorted them right out, and now the car has a complete fuel system again. Unfortunately, that doesn't mean we could finally pour some gas into the tank, hook up a battery, and see if the car will start, because, the cooling system is incomplete. In the 1962 Impala, as in pretty much every liquid-cooled automobile I've ever heard of, the cabin heater is a branch of the cooling system. Hot coolant from the engine is routed through hoses back through the firewall into a small radiator inside the cabin, technically known as the heater core. This then radiates heat, and a system of blower fans and ducts directs that heat into the front footwells and/or up onto the windshield to defrost it (vents on the dash are a thing cars without air conditioning didn't have back then). When Dad was dismantling the car back in the early 'oughts, he found that the old heater core was pretty badly corroded and needed replacing, so he took the heater all apart, ordered a new core, and then... never installed it. It was still in its shipping box when we dug out all the stuff for this project. Worse, when we went to place it in the ducted box under the dash where it goes, the pipes that go forward through the firewall wouldn't clear the little notches for them in the bulkhead plate. That was easily remedied by getting out the tin snips and the Dremel and modifying the plate a bit, widening the slots so the new core's pipes would clear. The old and new cores look identical and are clearly intended to be the same part, but it just goes to show you how interchangeable parts often aren't. 
Fig. E Dremel, for all your kitbashing needs. Accept no substitutes. Unpaid endorsement.
Once that was done, we installed fresh hoses (the cooling system is under considerable pressure and gets quite hot, so this wasn't a place for 60-year-old rubber either) for the supply and return runs... and then discovered that the heater control valve was bad. 
Fig. F Heater control valve. It controls the heater. Stock photo swiped from an online store that sells them.
This is the gizmo that sits on top of the heater box and controls how much hot coolant goes through the core, and how much bypasses it and heads straight back into the engine—and thus, how much heat you get out of the vents inside the car. In this particular car, it's about the size of a hockey puck. Unfortunately, the old one was ruined, probably by sitting for years with water in it, so we'll have to obtain a new one. This model control valve was used only in 1961 and '62 full-size Chevys with the Deluxe Heater, so, as with almost all parts of cars this old, they don't exactly stock them at NAPA. Fortunately, they can be had from a number of places online that specialize in parts for these cars. A new one costs $120. While we were at it, we ordered a new set of seals and whatnot for the rear differential, which seems to be leaking from every possible place. Total cost of all of those was a fairly reasonable $30ish. Dad didn't bat an eye at the cost of the valve or the total order, but he freaked out a little bit when the website told him shipping would be 20 bucks. He's too used to Amazon Prime, I guess. :) Unfortunately, without the heater control valve, we couldn't put the heater back together, and without the heater back together we couldn't fill the cooling system, so even after getting the fuel system sorted, we still can't start the dang car. But we're getting there! We're getting there. What else? Oh, during the investigation into what was leaking on the differential, we determined that it's fitted with 3.36:1 rear end gears. This is a nice ratio for cruising—fairly high top speed, which means lower RPMs at highway cruise—but it won't win any drag races. (By contrast, we're pretty sure Angus the Wonder Truck has 4.11:1 final gearing, which is why it would pull like a tractor dragging out a stump, but used to redline at about 50 miles per hour in top gear. :) That's just what we want in the application this car will be used for, so that's good. One fewer thing to have to mess around with. In potentially more exciting news, the new brake kit is slated to arrive early next week (right now UPS is saying Tuesday). Thus, our next session will probably still see us not starting the car, because the heater control valve is likely to take until the following week, but will instead find us dismantling the brakes all around, cleaning and remounting the rear ones, and then installing the shiny new disc brakes and power master cylinder up front. This represents a big step toward making the car actually roadable again (possibly the biggest single step after the fuel system, just ahead of repairing the hole in the floor so the car will pass inspection), so we're understandably a bit excited to be getting on with it. (It should also make for some better photos, since the brakes are right out there for everybody to see.) I'm not sure if we'll have tires on those 15-inch steelies by next weekend, but I'll probably plump for it during the week, because it would be really nice to have the car standing on its wheels on the floor for the first time in 20 years, even if the engine isn't running yet. (I also ordered some of those nice '58 hubcaps, but don't tell Dad.) --G.
-><-
Benjamin D. Hutchins, Co-Founder, Editor-in-Chief, & Forum Mod
Eyrie Productions, Unlimited http://www.eyrie-productions.com/
zgryphon at that email service Google has
Ceterum censeo Carthaginem esse delendam.
#31, RE: Session 4: Actual Notes in This One
Posted by MuninsFire on May-05-19 at 01:11 PM
In response to message #30
The prop 65 warnings are always good for a laugh - it's a prime example of something implemented with the very best of intentions but without a full understanding of what the effects would be.The likely reason for that particular sticker on that particular part is because certain chinese steels have been found to contain lead - lead being one of those things that can really screw a body up, yes, but ordinary handwashing like you'd do after working under a car all day would handle it. (The real problem with prop 65 is that the thresholding is way too low - effectively, everything that causes a tumor in a jax mouse is going to end up on the list, despite the extreme unlikelihood of it causing cancer during normal human exposures. My favorite currently is acrylamide - they figured out it's a potential carcinogen back in...wanna say '12? - and that kicked off a huge snit, because it's formed by toasting or browning food. Which is to say that -absolutely everything- other than raw foods or boiled foods has it in there, and especially so french fries and coffee beans. Which means all the fast food joints and coffeeshops have to post a prop 65 warning indicating that eating food "could" cause cancer, and assuring the consumer that acrylamide is a natural consequence of cooking foods and they do not add it to 'em. ]
#32, RE: Session 4: Actual Notes in This One
Posted by Gryphon on May-05-19 at 01:44 PM
In response to message #31
CAUTION: THE SURGEON GENERAL HAS DETERMINED THAT THE MAILLARD REACTION, ALTHOUGH INCREDIBLY YUMMY, MAY BE HAZARDOUS TO YOUR HEALTH.--G.
-><-
Benjamin D. Hutchins, Co-Founder, Editor-in-Chief, & Forum Mod
Eyrie Productions, Unlimited http://www.eyrie-productions.com/
zgryphon at that email service Google has
Ceterum censeo Carthaginem esse delendam.
#34, RE: Session 4: Actual Notes in This One
Posted by McFortner on May-06-19 at 01:46 AM
In response to message #32
CAUTION: THE STATE OF CALIFORNIA HAS DETERMINED THAT LIVING COULD CAUSE CANCER.Michael C. Fortner
"Maxim 37: There is no such thing as "overkill".
There is only "open fire" and "I need to reload".
#35, RE: Session 4: Actual Notes in This One
Posted by MuninsFire on May-06-19 at 01:00 PM
In response to message #34
Effectively, yeah. Mind you, there -are- prop 65 placards in -appropriate- places, like auto repair shops (lot of those aromatic hydrocarbons can do a number on you if you're exposed to them all the time), liquor stores (because of the birth defects resulting from alcohol consumption while pregnant) and welding supply houses. I wouldn't mind terribly if the prop 65 placards were changed to call out the anticipated amalgamated risk (e.g. coffeeshops would be ~1 in 100k per year or summat; gas stations would be 1 in 1000 per day...) so that the consumer could, y'know, make an informed risk assessment - but that'll never happen. Best intentions pave the road to hell. Such is life.
#33, RE: Session 4: Actual Notes in This One
Posted by Lime2K on May-05-19 at 05:40 PM
In response to message #31
Or, as AvE Likes to say: "This item contains chemicals known to the state of Cancer to cause California."--------------
Lime2K
The One True Evil Overlord
#39, RE: Session 4: Actual Notes in This One
Posted by Star Ranger4 on May-08-19 at 03:35 AM
In response to message #30
> Apparently whatever this hose clamp is made of is known to the State of
> California to cause both cancer and birth defects. Which is... interesting...As a resident of said state, I can attest to the fact that they put those labels EVERYWHERE. Including on the door to the local grocery market. *play rimshot.mp3*
#36, Session 5 Preliminary
Posted by Gryphon on May-07-19 at 04:06 PM
In response to message #0
I am informed that a shipment has arrived at the Project Impala Technology Center.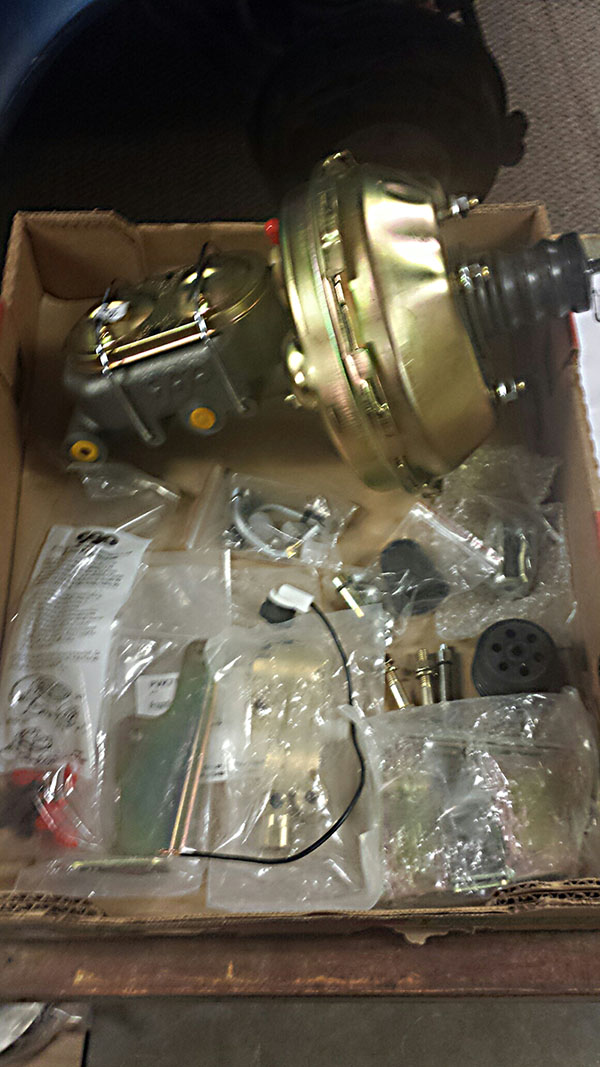
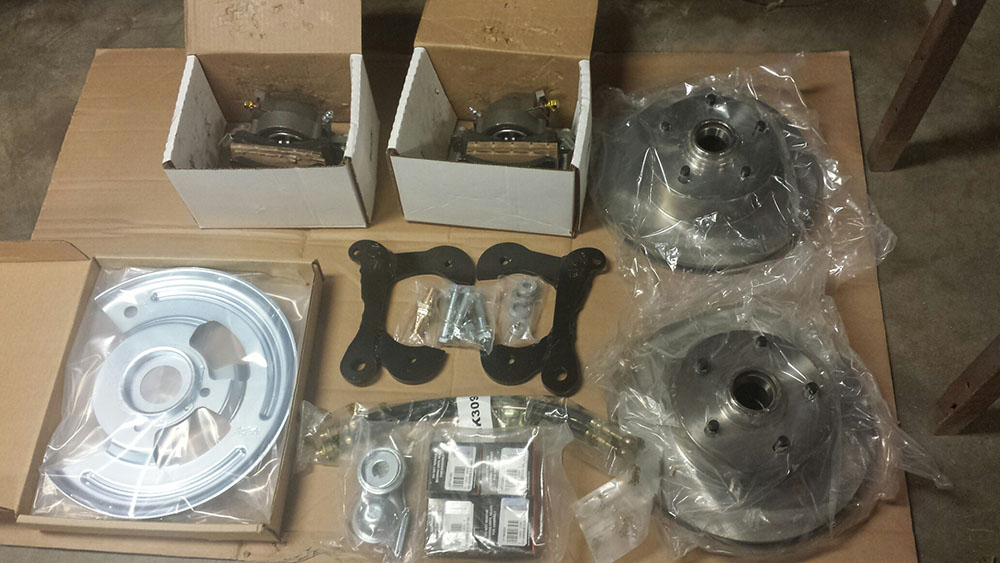
Fig. A Them's the brakes.
I am further advised that the kit came with pretty sketchy instructions, so this should be... interesting. (Also, the heater control valve and assorted seals for the rear end should be along in a couple of days, as well as a special surprise I ordered last week.) --G.
-><-
Benjamin D. Hutchins, Co-Founder, Editor-in-Chief, & Forum Mod
Eyrie Productions, Unlimited http://www.eyrie-productions.com/
zgryphon at that email service Google has
Ceterum censeo Carthaginem esse delendam.
#40, RE: Session 5 Preliminary
Posted by Gryphon on May-09-19 at 10:30 PM
In response to message #36
LAST EDITED ON May-09-19 AT 10:31 PM (EDT)
Bonus item: hubcaps get!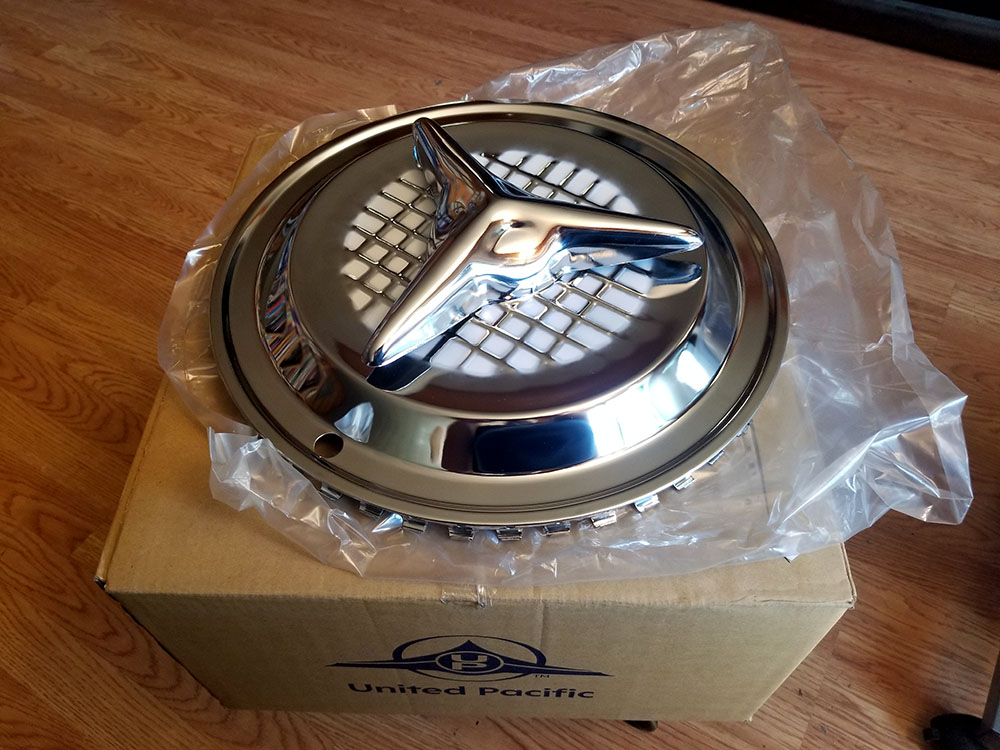
They're a slightly older style than would have been exactly current on the car—in the catalog they're shown on a 1958 model—but they're correct for the period, and I could easily see someone in 1962 putting on a set for a slightly retro touch. Mind you, the stock 1962 item is a good-looking hubcap: 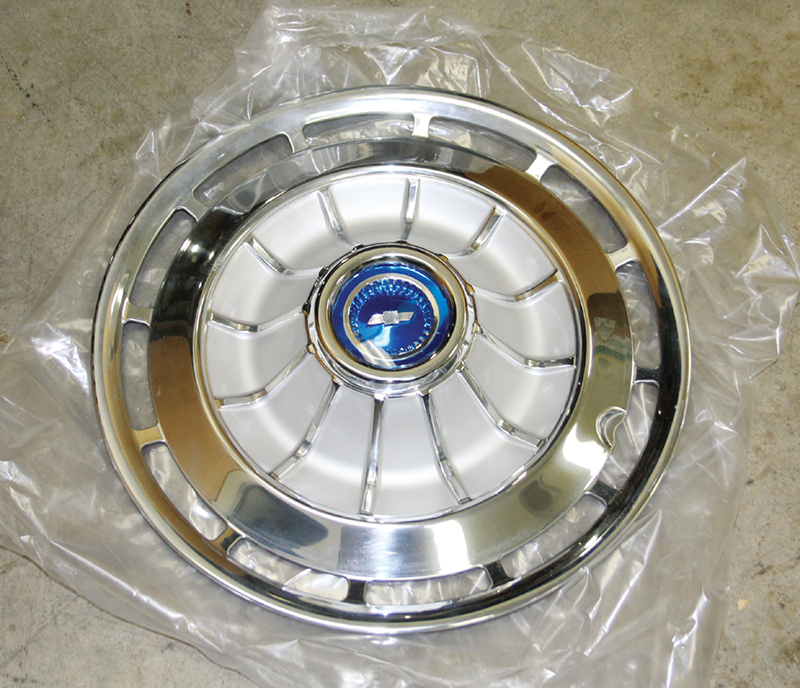
Unfortunately, it's a good-looking hubcap for a 14-inch wheel, and we need to go to 15s to clear the calipers on the new front brakes. And while I would not be at all surprised to discover that someone out there makes 15-inch aftermarket clones of the 14-inch 1962 originals, I would be quite surprised if those, should they exist, weren't hideously expensive. :) --G.
-><-
Benjamin D. Hutchins, Co-Founder, Editor-in-Chief, & Forum Mod
Eyrie Productions, Unlimited http://www.eyrie-productions.com/
zgryphon at that email service Google has
Ceterum censeo Carthaginem esse delendam.
#37, RE: Project IMPALA (hopefully not Impala 13)
Posted by Spectrum on May-08-19 at 02:26 AM
In response to message #0
I have no large comment but I did want to say that even as someone who typically has little interest in cars and next to no knowledge, this series of posts was actually quite interesting and easy to follow.(At this point I suspect you could somehow tell an entertaining story of having to plunge a toilet...)
#38, RE: Project IMPALA (hopefully not Impala 13)
Posted by Lime2K on May-08-19 at 02:37 AM
In response to message #37
Pretty sure that one's already been told...
--------------
Lime2K
The One True Evil Overlord
#41, RE: Project IMPALA (hopefully not Impala 13)
Posted by VoidRandom on May-10-19 at 06:46 AM
In response to message #37
Not quite what you asked for, but related: Well, shit.-VR
only entertaining if you weren't there
"They copied all they could follow, but they couldn't copy my mind,
And I left 'em sweating and stealing a year and a half behind."
|