#0, Project Angus Session 9
Posted by Gryphon on Apr-25-25 at 01:41 AM
Guys. Guys. Lookit lookit lookit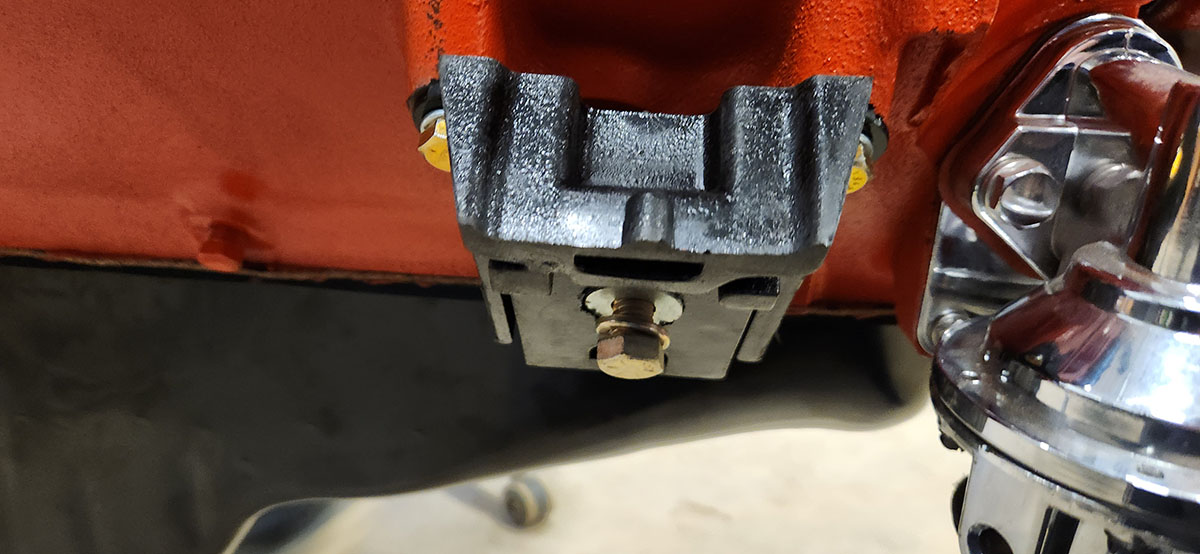
The new engine mounts came. These are steel-and-rubber winguses that go in between the brackets attached to the front subframe and the engine block. They act as vibration dampers and also provide a bit of flexibility, which allows the engine to twist slightly in its mountings in reaction to its own torque.
When those arrived, even though the engine bay isn't really ready yet, we couldn't resist hauling an old bell housing and the case from a worn-out transmission out of the storeroom and mocking up an install.
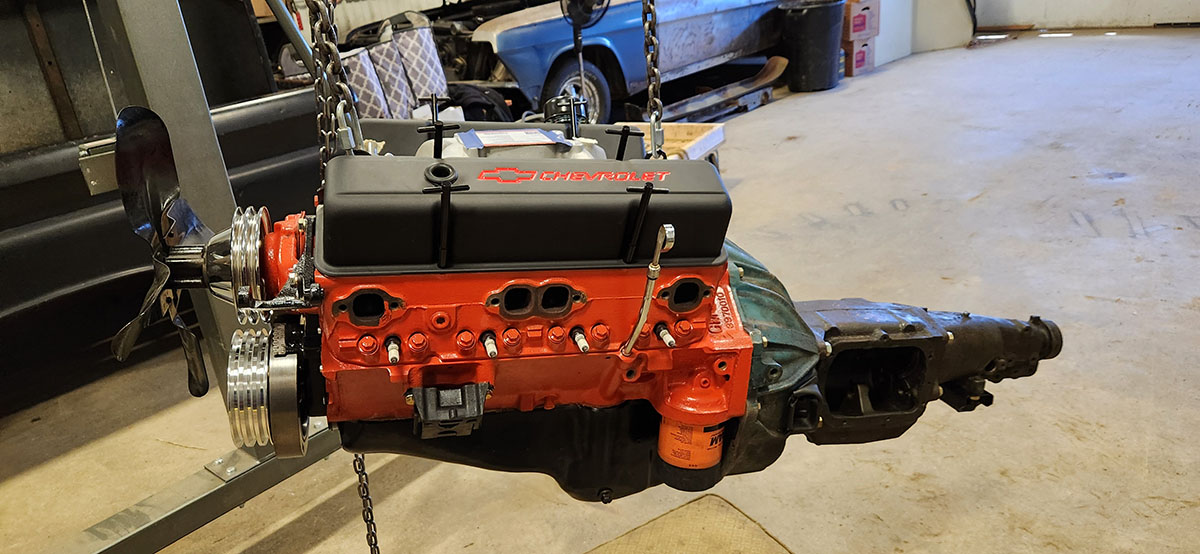
Here it is all trussed up on the crane and ready to go. Note the traces of blue paint on the bell housing, which identify it as having come from something built sometime from the mid-'70s to early '80s (probably one of the several pickups of that vintage that Dad has scrapped over the years). The transmission that was in that case used to be in this very truck, decades ago, behind the six-cylinder engine that was in there at the time.
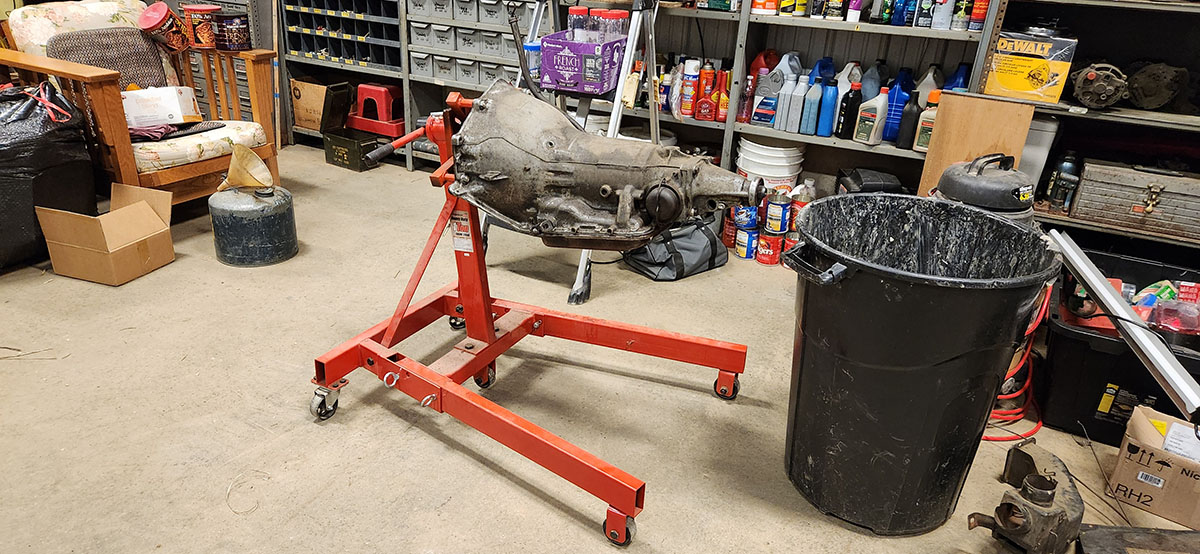
The reason we did this is because the engine is only mounted at the front in its own right; the rear mount is actually on the tail of the transmission case. Without one of those attached, it won't sit right, but since this is just a mock-up installation, we didn't need anything that actually worked and decided to save ourselves some weight. When we build it for real, it'll probably have this old Powerglide automatic in it, but it needs to be overhauled first.
Anyway!
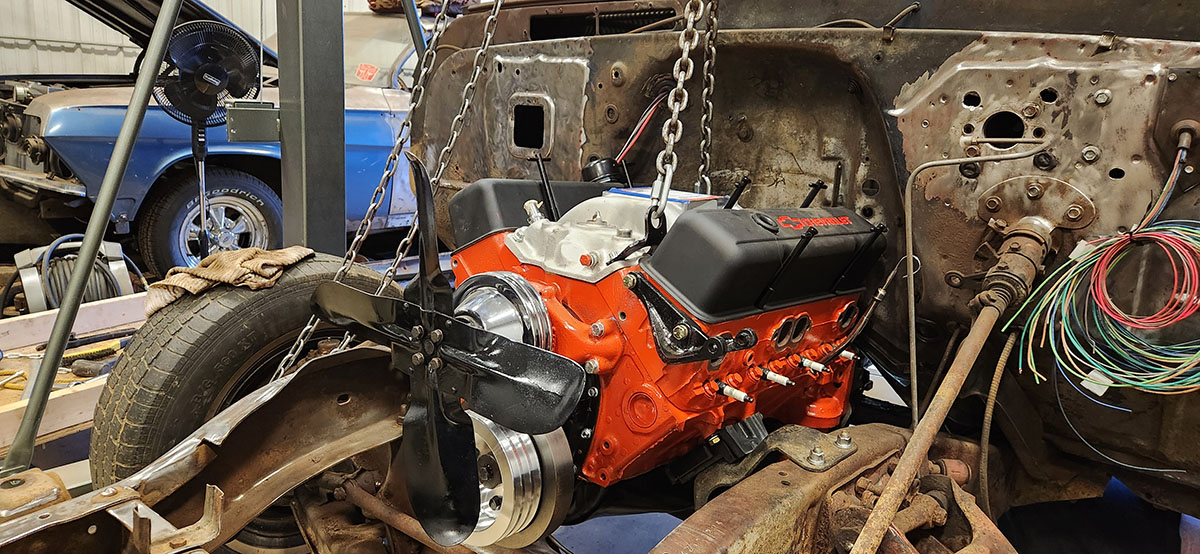
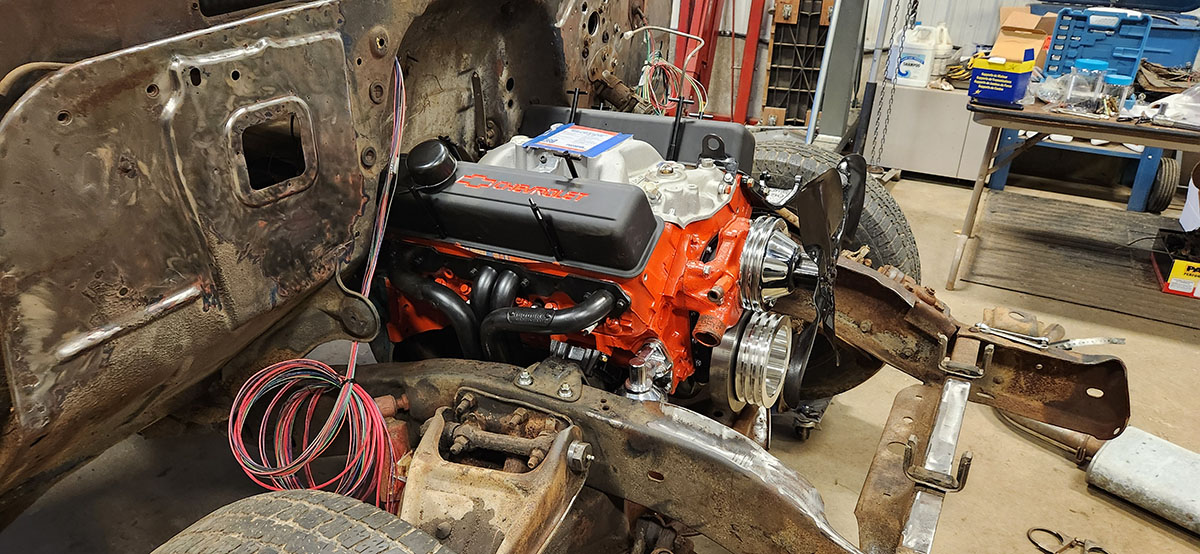
It's in there! Fits like a glove, but then that's not too surprising, given that an engine built on that exact same block was an available option in 1966. As you can see in the shot of the passenger side, the Hedman exhaust headers (excuse me, Hedman calls them "hedders", because of course they do) bolt up with no trouble at all, which is not always the case with aftermarket headers.
Next we need to tackle all the other stuff that an engine needs in order to run--fuel, electrical, cooling, exhaust--and we can find out whether it actually runs, using the truck itself as a test stand. Then it'll have to come back out so we can do the metal work on the cab, which is kind of making extra work for ourselves, but, I mean... are we going to not take the chance to hear it run? :)
--G.
-><-
Benjamin D. Hutchins, Co-Founder, Editor-in-Chief, & Forum Mod
Eyrie Productions, Unlimited http://www.eyrie-productions.com/
zgryphon at that email service Google has
Ceterum censeo Carthaginem esse delendam.
#1, Sessions 10–12
Posted by Gryphon on May-02-25 at 11:36 PM
In response to message #0
Lumping these all together because the two tasks they encompass kind of overlapped in the middle.The last three shop sessions, we've been taking advantage of the fact that the bed is off the truck to install stuff that would be a real pain to put on there if it were all together.
First, though, a note about a tool. While we were installing the engine last time, I suddenly realized that the task provided a perfect, legitimate opportunity to go out and buy a tool I've wanted to have for literally decades because of a goofy inside joke with an old friend.
For background: the summer after my year at WPI, I worked on an industrial construction site as a general laborer and firewatch. While I was there, I developed a fascination for a steelworking tool called a spud wrench. This is an open-end or adjustable wrench with a tapering cone-shaped handle, used to align the holes when erecting structural steel or fitting pipe flanges. One day my high school friend Seann (of Shadowrun GM fame) and I wrote a punk rock song about it, of which I now remember only the chorus. Imagine this screamed in a punk-metal voice with discordant, clashing guitars and a frantic drumbeat behind and you'll get the flavor:
Spud wrench!
LINES UP THE HOLES
Spud wrench!
OUT OF CONTROL
SPUUUUUUUUUUUUUD
WRENCH!!
Obviously I had no Earthly need of such a thing, so I never had one, but the memory stuck in my mind, so the other day when Dad and I were struggling to get all the engine mount bolts properly aligned, I realized a spud wrench was exactly what we needed, and would need again when the time came to take the engine out and put it back. But we didn't have one...
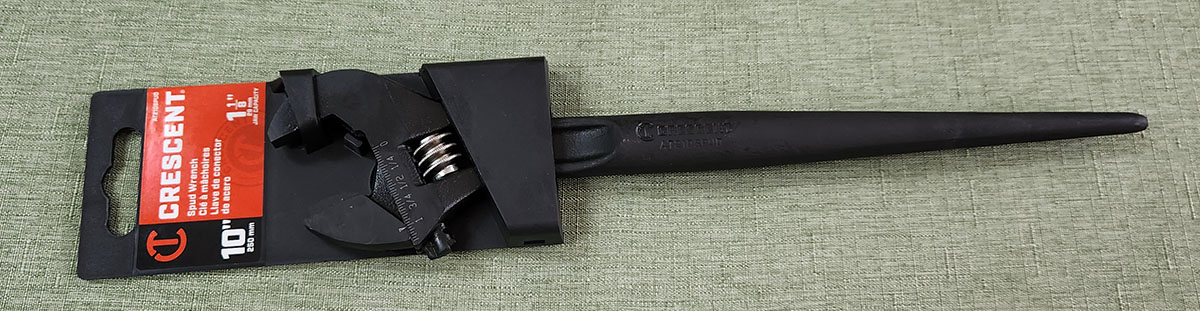
... so I bought one.
SPUD WRENCH
*ahem* Excuse me.
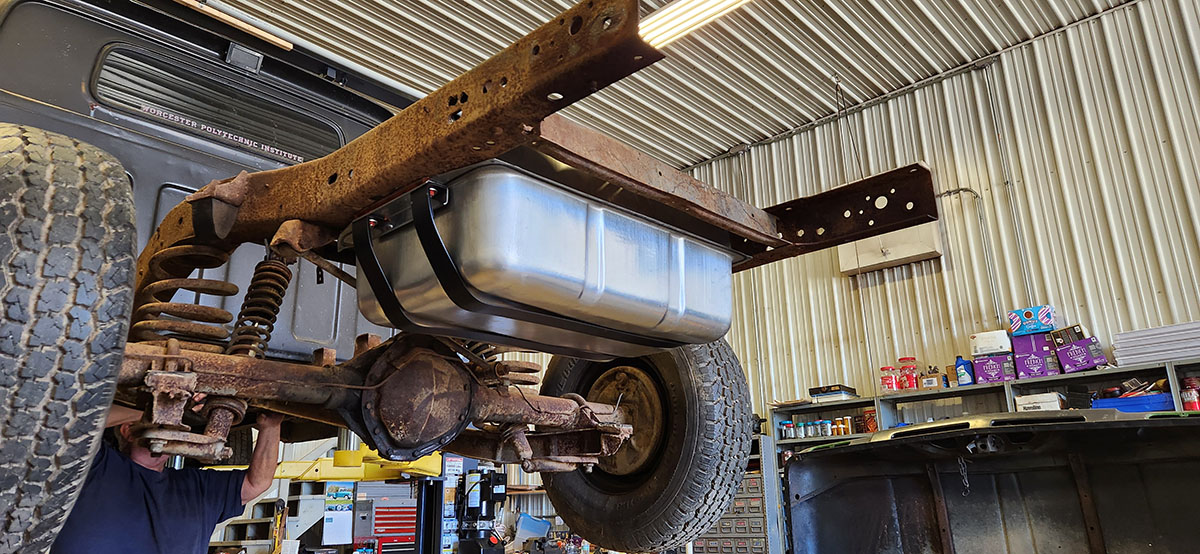
With that job done, we turned to the next task on the punch list: installing the fuel tank.
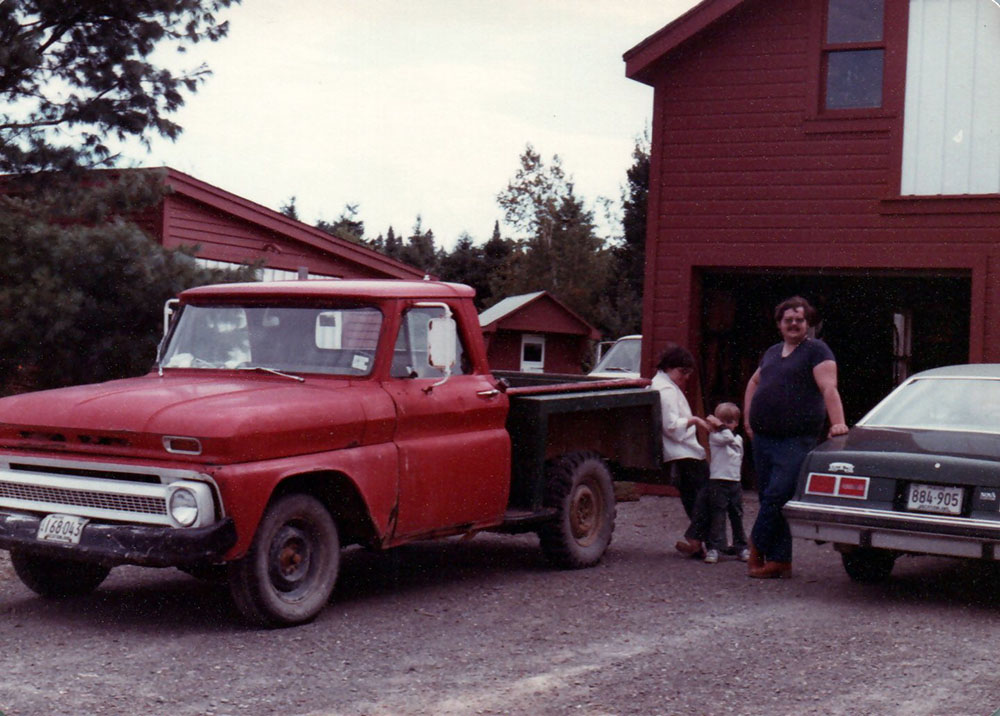
In older pickups like ours, the stock fuel tank is behind the seat, inside the cab. You can see the filler cap in this old photo of the "Christmas truck" from my childhood (also a 1966 Chevrolet), on the side of the cab right behind the handle of the driver's door.
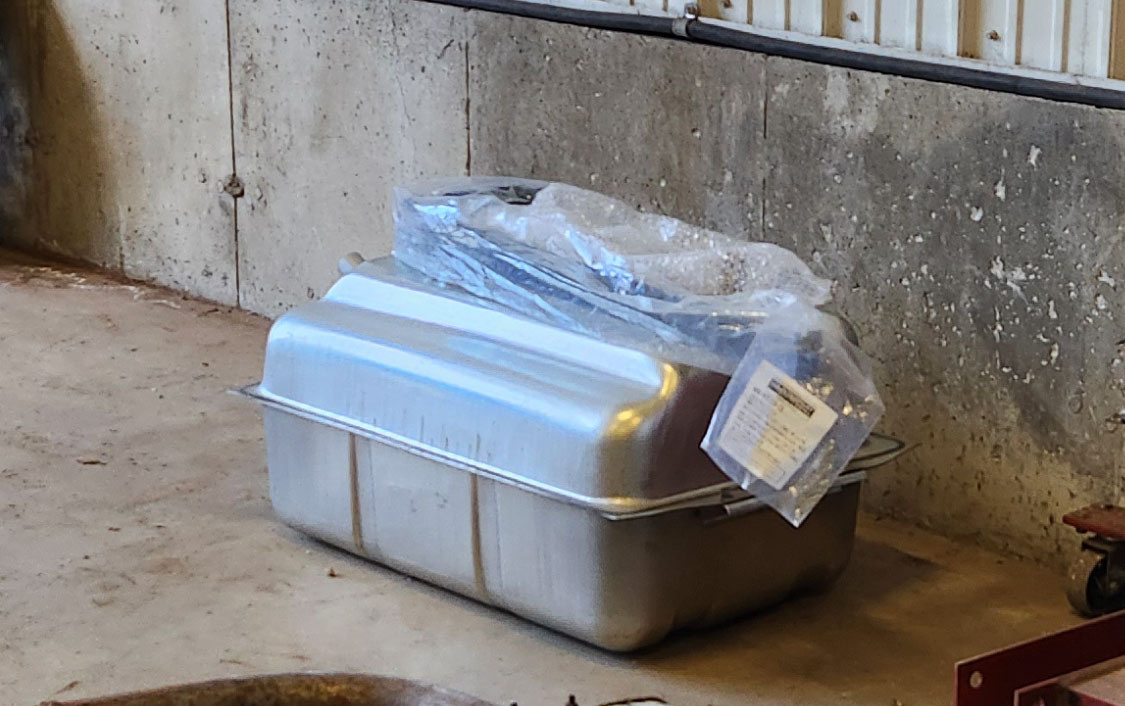
As you might imagine, this is a little disconcerting to the modern motorist. So much so that conversion kits exists to relocate the fuel supply to a more sensible location, such as inside the frame under the bed. Here's one such kit!
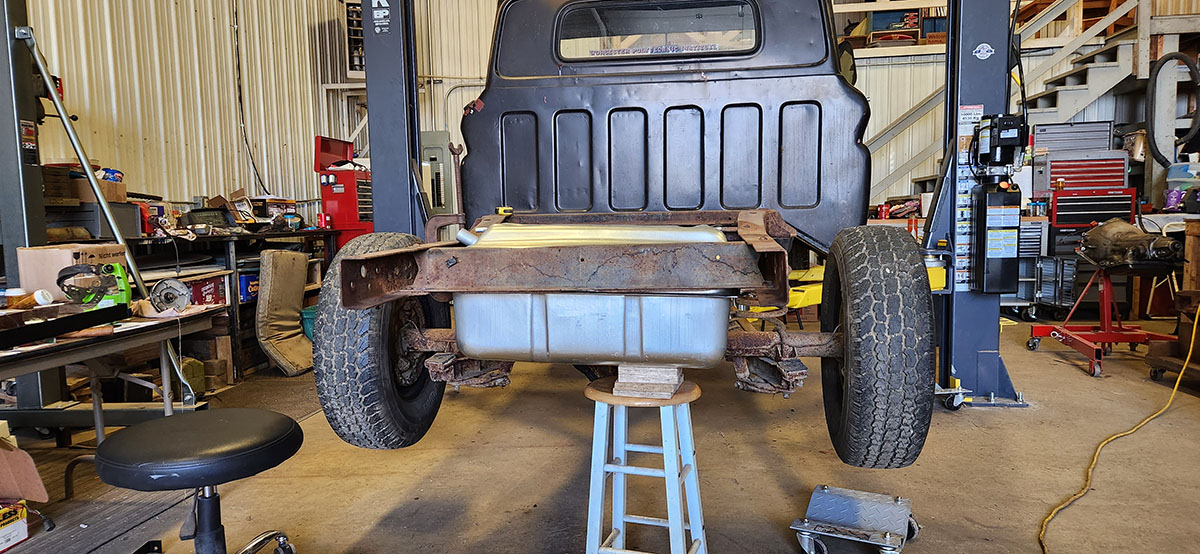
And here's where it goes. Note the field expedient work holding device...
As an aside, the day we started on this task was the first one this year on which it was warm enough to have the door open. So that's nice!
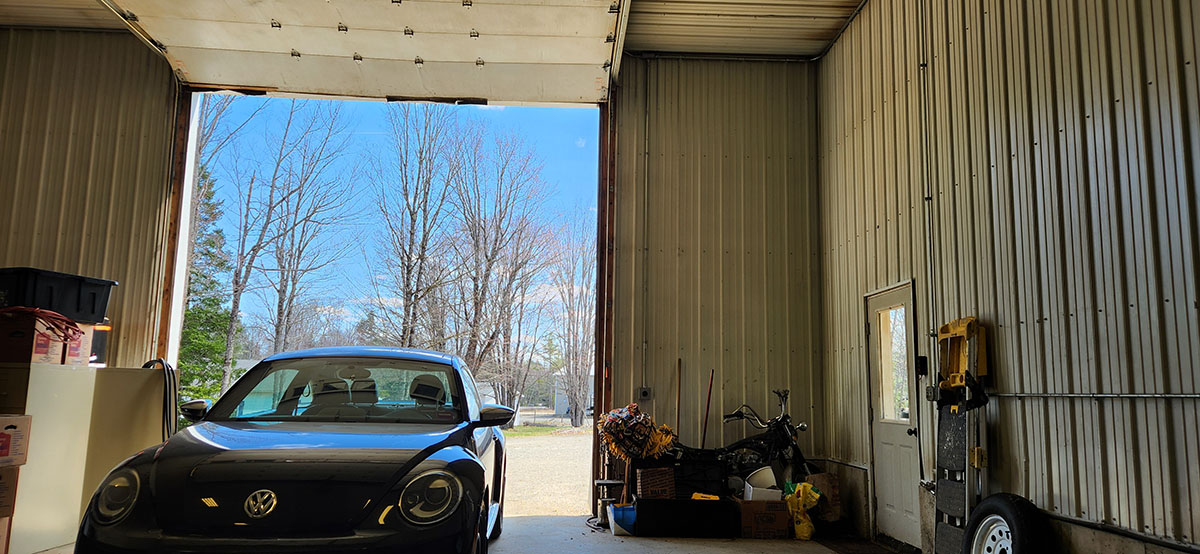
(Yes, the Volkswagen's still there. And still for sale, but for some reason book values have tanked since we first listed it. :/ )
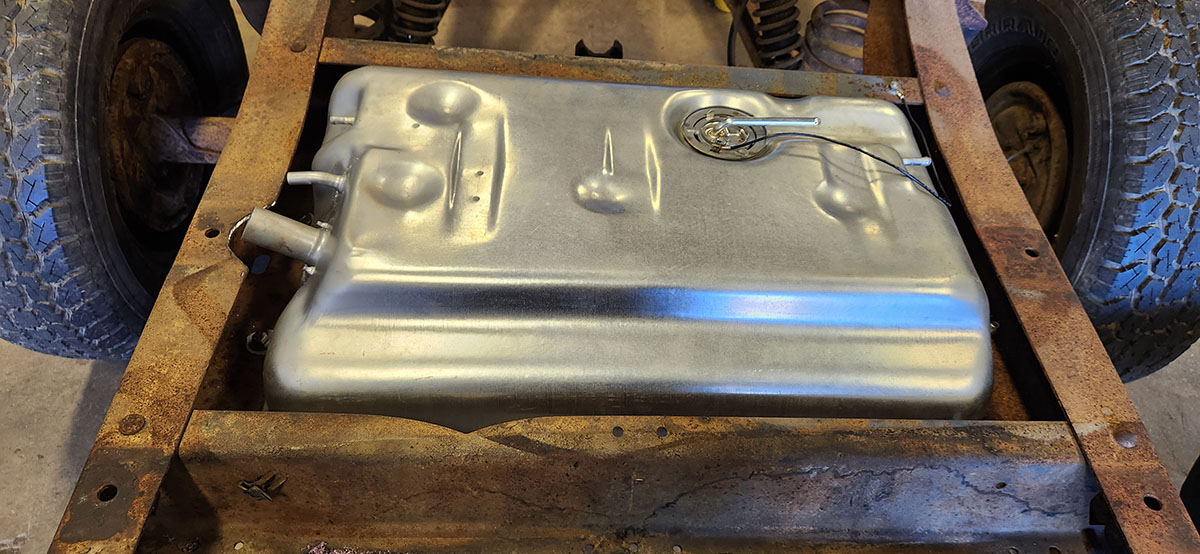
This tank location is similar to where they put it in more modern trucks, where it's protected from rear impacts by the rearmost frame crossmember (to which the rear bumper is directly attached). It does require some slight modifications to the frame. Most notably, a narrow, non-structural crossmember has to be removed from the space where the tank goes. In the original configuration, that was used to hang the spare tire underneath the truck, but who wants to do that anyway?
More notably, the driver's side frame rail has to be notched to clear the filler neck:
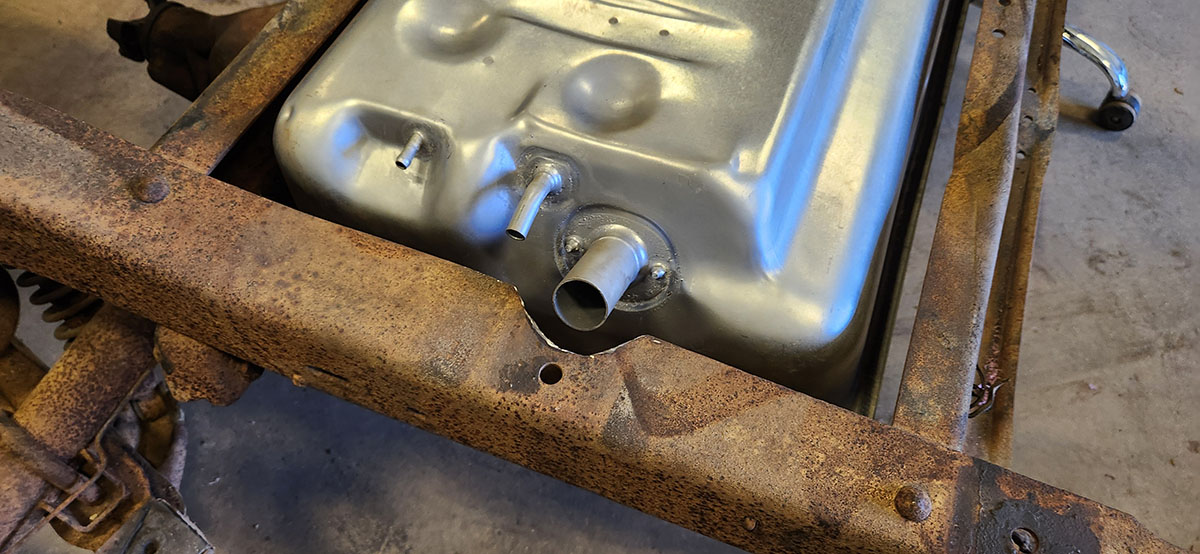
This can be avoided if you get the version of the kit with the filler neck in the middle, but then you have to get up into the back of the truck to fuel it up. Anyway, the frame has more than enough reserve strength to handle one notch that size (it's a C-beam, so the bottom flange is still fully intact. Eventually, there'll be a filler cap or flap door or some such on the side of the bed behind the wheel. We're still looking at the various options.
Once the tank is in place, it's bolted to the bottom flanges of the frame rails on both sides, which gets it properly located...

... but that's not enough to hold it once it's in service. Empty, the tank is very light, but it's a 20-gallon tank and gasoline weighs about six pounds per gallon, so when full it'll be far too heavy for those small side plates and bolts to hold by themselves.
For that, there are steel straps that are bolted on at one side and hung from J-hooks on the other, supporting the full weight without relying on just the locating bolts.
Et voilà! One shiny new fuel tank, with sending unit installed, ready to be plumbed up and supply fuel to the new engine.
With that taken care of: on to the exhaust system!
After some research, we decided to go with a complete system kit by Thrush, a well-known maker of exhaust systems for classics and hot rods. It's designed particularly to work with Dynomax headers, but our Hedmans (Hedmen?) came with adapters that will work with more or less anything and most of this stuff is standardized anyway.
Here's what's going on up front:
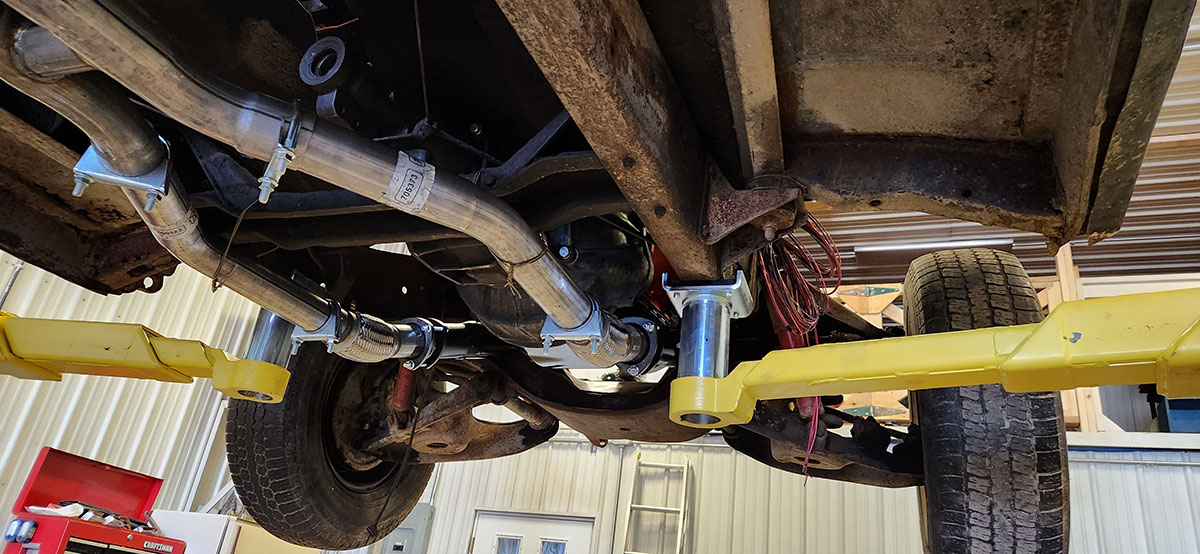
We needed to get those flexible sections in order to make everything line up properly, but with those in place, everything connects up to the Thrush system's forward pipe just fine. From there, they run back to...
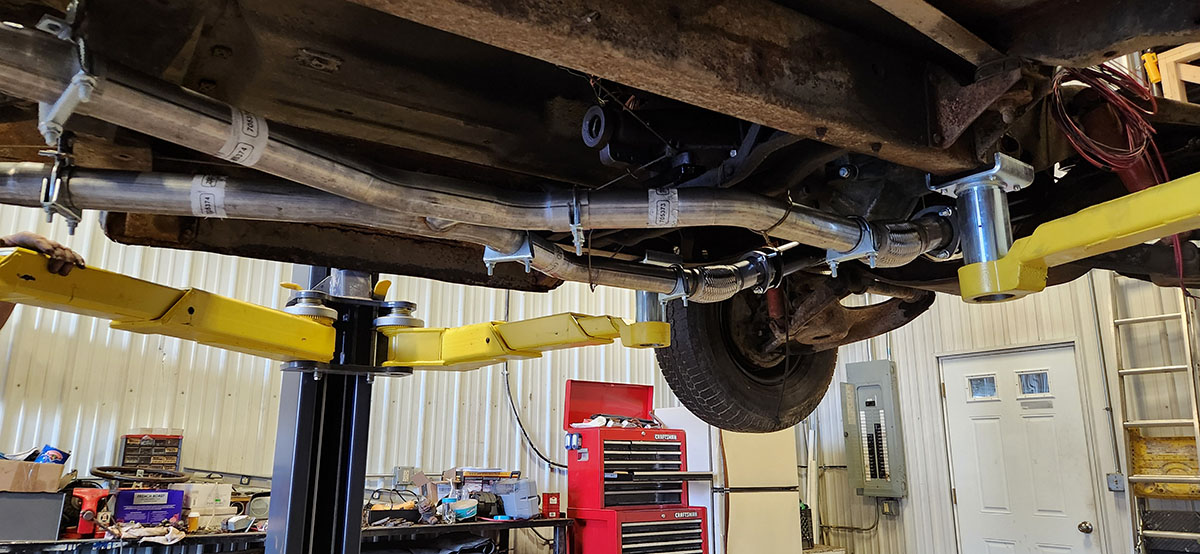
... this H-shaped section. Behind this section, there are two more connecting pipes, leading to...
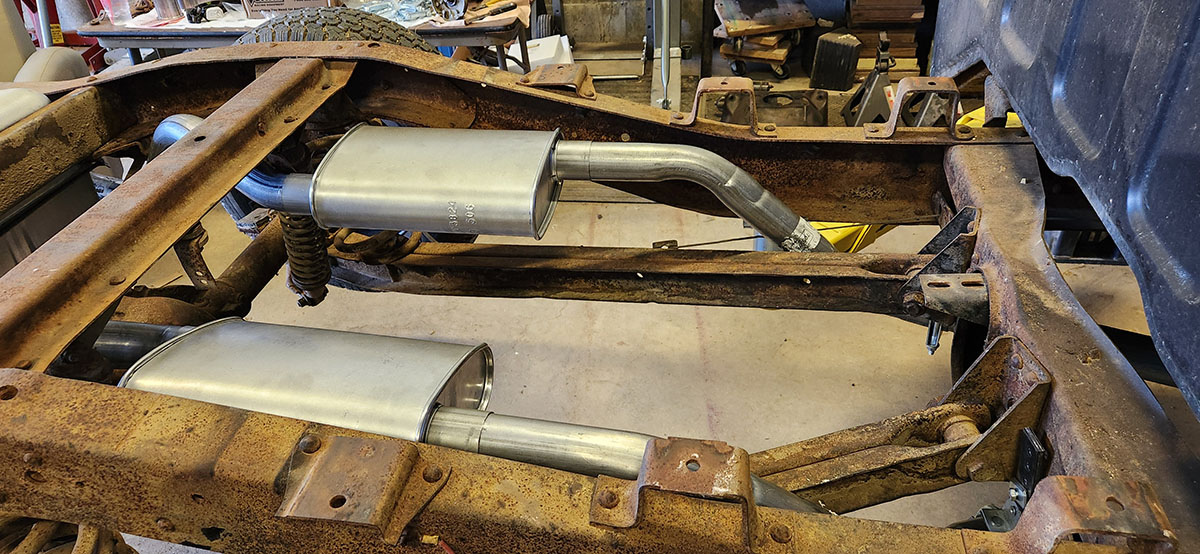
... the mufflers and...
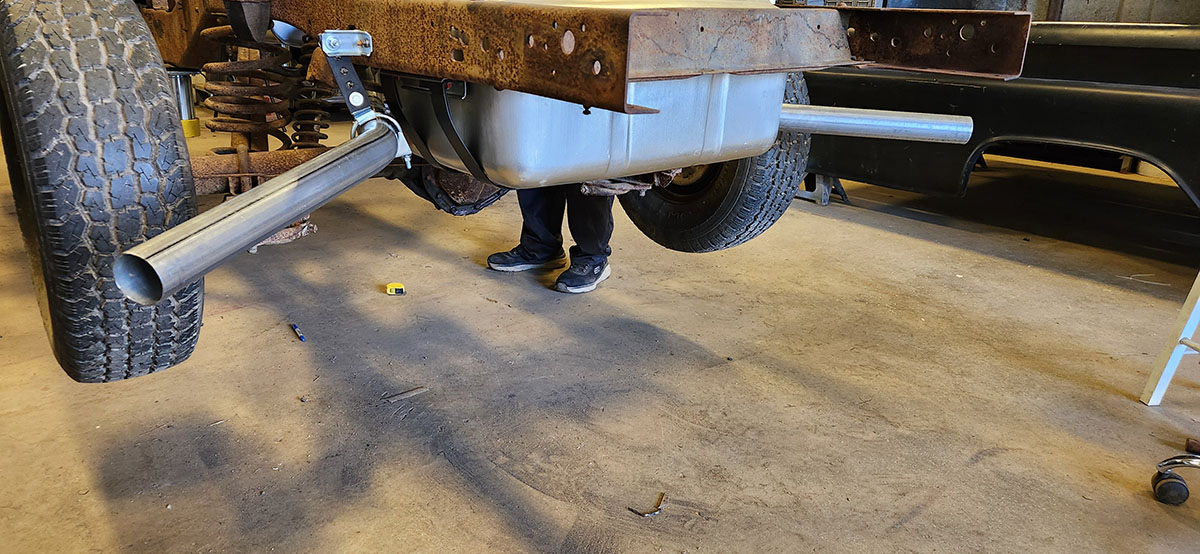
... tailpipes. This particular system has the exhaust pipes coming out from under the body just behind the rear wheels. Viewed from the back, they're slightly asymmetrical because of the paths they have to take to get around the rear suspension.
With the body on and the truck on the ground, that won't be all that noticeable.
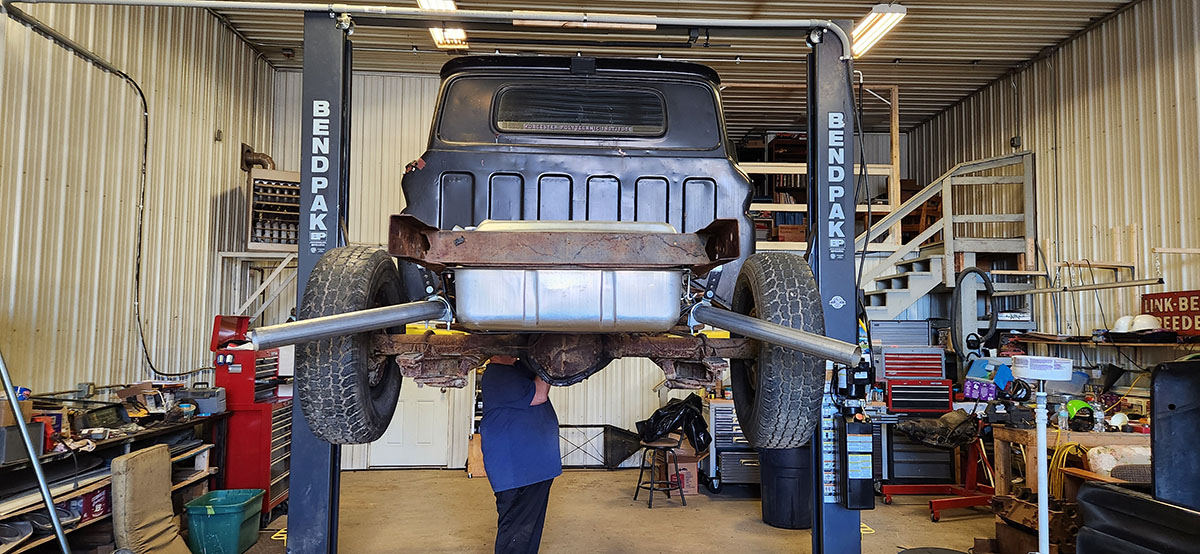
(Guest appearance by the old man, who I think was taking the temporary wire off the H-pipe when I took this one. :)
The exhaust system isn't quite finished. For... reasons?...the headers came painted in non-heat-resistant paint that was only applied to protect them in shipping, which means we have to strip them and then repaint them in the correct high-temperature paint. Why Hedman chooses to do it this way, I couldn't tell you, but there it is. Once that's done, though, the exhaust will be complete, and we can move on to finishing the fuel system, reinstalling the radiator support and cooling system, and wiring up the engine.
After all that, it'll finally be time to crank it up and see if the engine I built will actually work. Which is exciting for me, and will presumably be more exciting for you than mufflers. :)
--G.
-><-
Benjamin D. Hutchins, Co-Founder, Editor-in-Chief, & Forum Mod
Eyrie Productions, Unlimited http://www.eyrie-productions.com/
zgryphon at that email service Google has
Ceterum censeo Carthaginem esse delendam.
#2, RE: Sessions 10–12
Posted by Zemyla on May-03-25 at 00:10 AM
In response to message #1
I don't know if anyone ever asked, but will the truck be able to run on unleaded fuel once it's finished, or will you need to add lead additives when you fuel up?
#3, RE: Sessions 10–12
Posted by Gryphon on May-03-25 at 01:04 AM
In response to message #2
>I don't know if anyone ever asked, but will the truck be able to run
>on unleaded fuel once it's finished, or will you need to add lead
>additives when you fuel up? Unleaded will be fine--the cylinder heads we bought for this project are from after the changeover to hardened valve seats. (That's a big part of why we bought them; to get the ones that were original to that block rebuilt with hardened seats would have been way more expensive.)
We might want to shell out for the ethanol-free variety, but that's more a matter of being less likely to gum up the carb when the vehicle sits for a while. I'm 98% sure Dad's going to be an old lady about it and not want it to leave the garage if it's raining, never mind in winter. :)
--G.
-><-
Benjamin D. Hutchins, Co-Founder, Editor-in-Chief, & Forum Mod
Eyrie Productions, Unlimited http://www.eyrie-productions.com/
zgryphon at that email service Google has
Ceterum censeo Carthaginem esse delendam.
#4, Texts From This Afternoon
Posted by Gryphon on May-03-25 at 07:19 PM
In response to message #1
#5, Session 13-ish
Posted by Gryphon on May-26-25 at 09:14 PM
In response to message #0
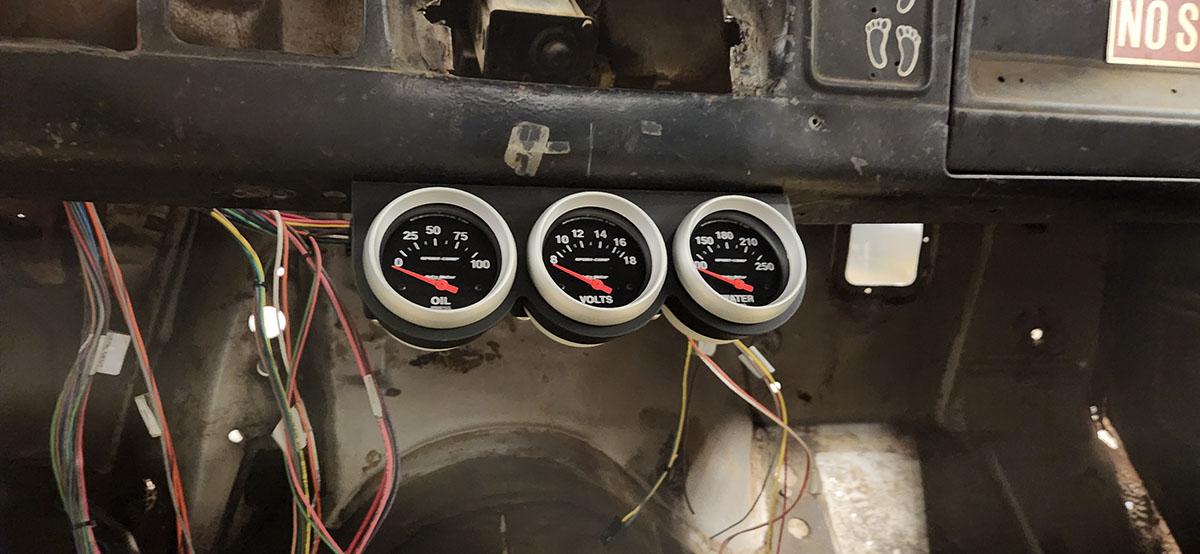
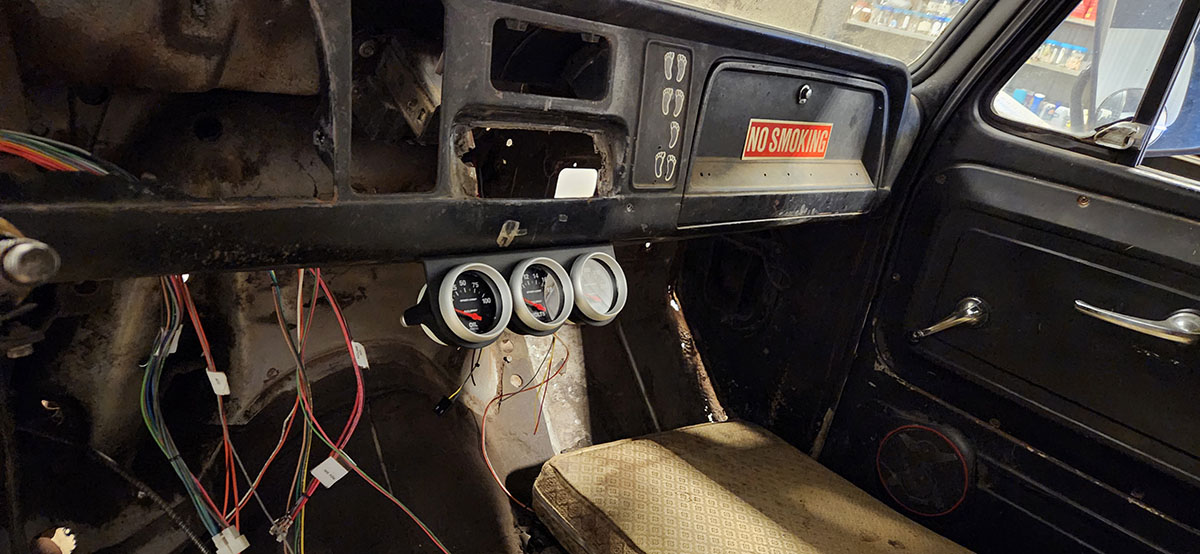
In the package of aftermarket gauges we picked up, we're switching to an electronic oil pressure gauge. In the olden days, oil pressure gauges worked by literally running an oil line to the back of the gauge. Nowadays, they use a little gadget like this, which screws in where the fitting for said oil line used to go.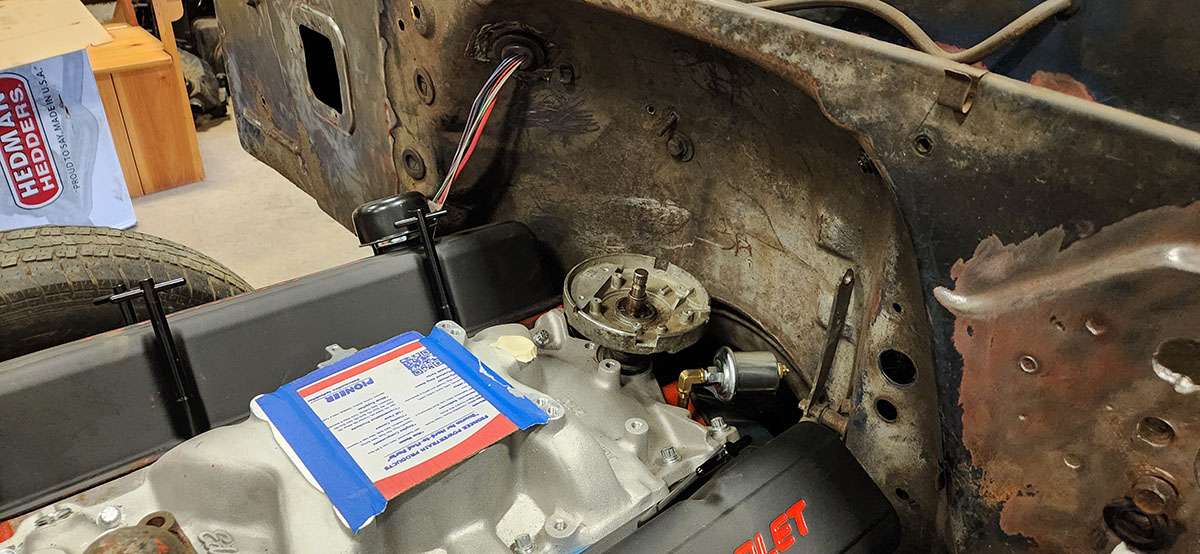
With this, we only need to run a wire to the gauge, rather than a tubing run that brings actual engine oil into the cab.
As an aside, it's a bummer no one makes "modernization" gauges that replace the stock ones with the same look and more modern insides. Unless we split up the wiring to run both temperature gauges, it seems likely that the only stock dial that's still going to be working is the fuel gauge.
On the other hand, the new ones look pretty cool now that we've mounted the bracket (more or less where the old one was, back in the day).
With those in place (but not hooked up yet--wiring comes later), on to reinstalling the cooling system. That meant re-mounting the radiator support, then the radiator.
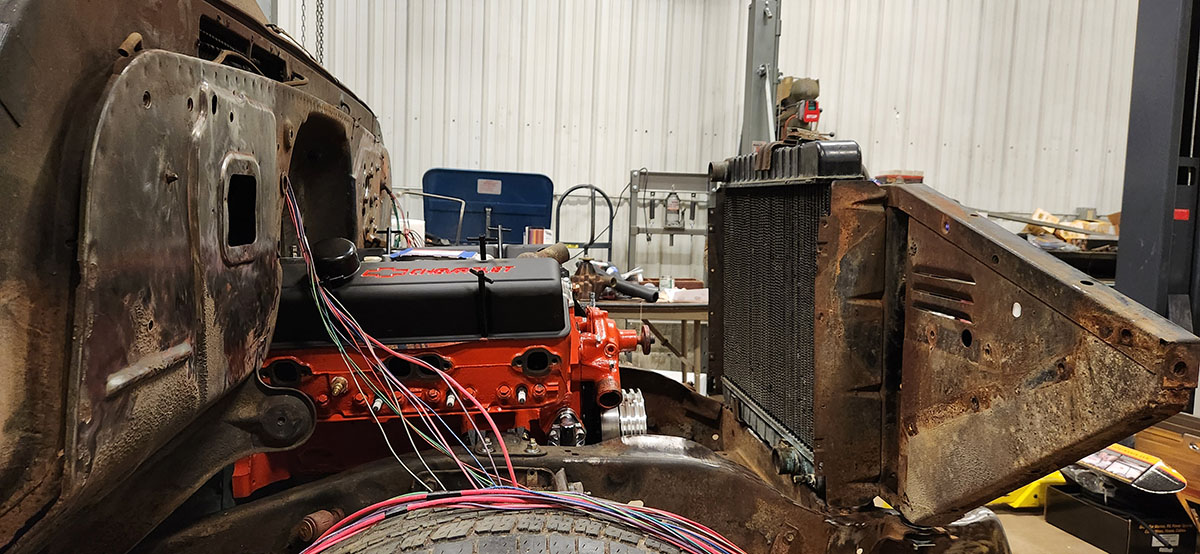
For now, we're going to use the radiator that was in it; it was new when we ran the truck in the early '90s, and it was drained for all the time it sat around in the shed, so there's a chance it's not all plugged up with rust like the Impala's was. We might as well try it and see if it works.
You may note in the photo above that the original-style steel fan is missing from the front of the water pump. That's because, against all my expectations...
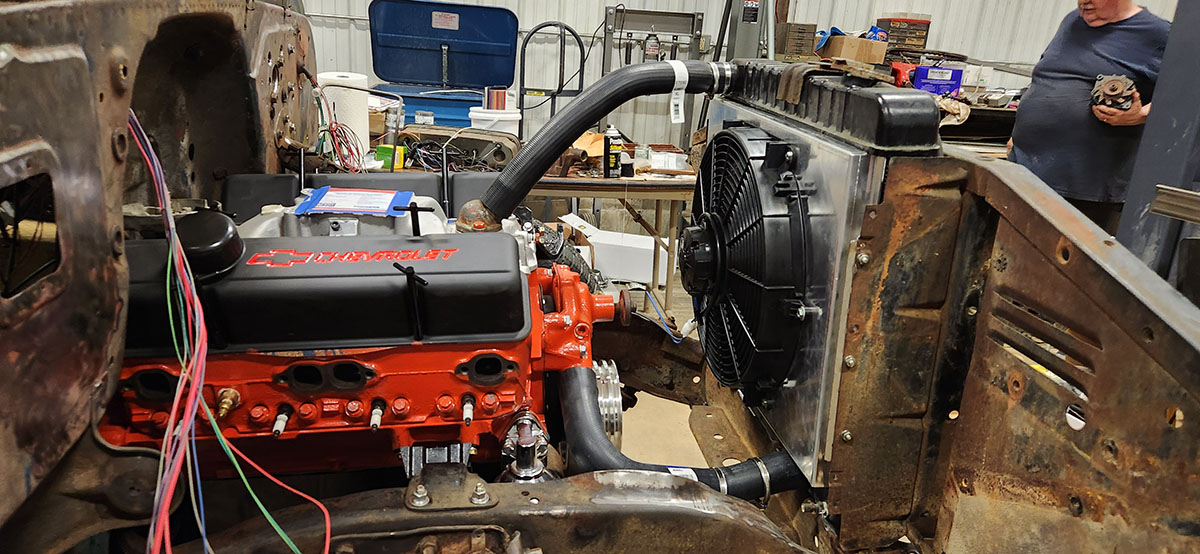
... Dad bought an electric one. These can push a lot more air through the rad than the OG metal one, and make for a safer engine compartment to boot. Plus, we didn't have the shroud that is supposed to go around the OG-style fan and connect it to the radiator, and a repro shrould would have cost almost as much as that electric fan rig after shipping.
Some fresh new hoses and we're almost good to go! Just need to clean up and paint that thermostat housing the top hose is connected to, clamp everything down, and we'll be ready to fill up the cooling system.
Unfortunately, we hit a little bit of a sidetrack at this point. Maine is in the process of retiring the license plate design we've been using since 1999, and I just got the new plates for my Ridgeline. When we brought it into the shop to put them on, the rear brakes were making an awful screeching noise. We thought one of them might be dragging, or have a rock in the caliper, or something, but upon closer inspection we discovered that what's actually going on is that the parking brake isn't disengaging properly.
The parking brake design on this vehicle is a little odd. Instead of the pedal-actuated cable just applying the regular disc brakes on the rear, it engages a second set of rear brakes, which are drums built into the rotors. Yes, that means the rear brake rotors are disc and drum brakes at the sane time.
We did some investigating and managed to get them to unlock, but didn't have the time to take them completely apart and figure out what the actual problem is. I just had to drive home and try like hell to override my ingrained habit of stepping on that pedal when I park. Tomorrow we're going to dig back into it and try again.
There's a little bit of time pressure on this, since the vehicle's annual safety inspection is due at the end of the month, and it certainly won't pass if the parking brake doesn't work properly. So, unexpectedly and a bit annoyingly, we'll be looking at that instead of the project at hand.
Ah well, it is what it is. When your newest vehicle is coming up on eight years old, issues are bound to develop...
We will return to our regularly scheduled programming as soon as possible.
--G.
-><-
Benjamin D. Hutchins, Co-Founder, Editor-in-Chief, & Forum Mod
Eyrie Productions, Unlimited http://www.eyrie-productions.com/
zgryphon at that email service Google has
Ceterum censeo Carthaginem esse delendam.
#6, RE: Session 13-ish
Posted by Spectrum on May-27-25 at 00:01 AM
In response to message #5
> On the other hand, the new ones look pretty cool now that we've mounted the bracket (more or less where the old one was, back in the day).Pretty slick, though I admit that I'm so used to modern dashboards that I would have a bit of an adjustment period getting to look there during operation.
> We will return to our regularly scheduled programming as soon as possible.
Well hey, at least you've got a relatively shiny, reasonably equipped garage to take a look at it in?
#7, RE: Session 13-ish
Posted by Gryphon on May-27-25 at 00:46 AM
In response to message #6
>Pretty slick, though I admit that I'm so used to modern dashboards
>that I would have a bit of an adjustment period getting to look there
>during operation. Fortunately, those aren't gauges you really need in your primary scan, so to speak. Sort of like how aircraft panels pre-"glass cockpit" rarely stuck the engine dials right in front of the pilot. :)
>> We will return to our regularly scheduled programming as soon as possible.
>
>Well hey, at least you've got a relatively shiny, reasonably equipped
>garage to take a look at it in?
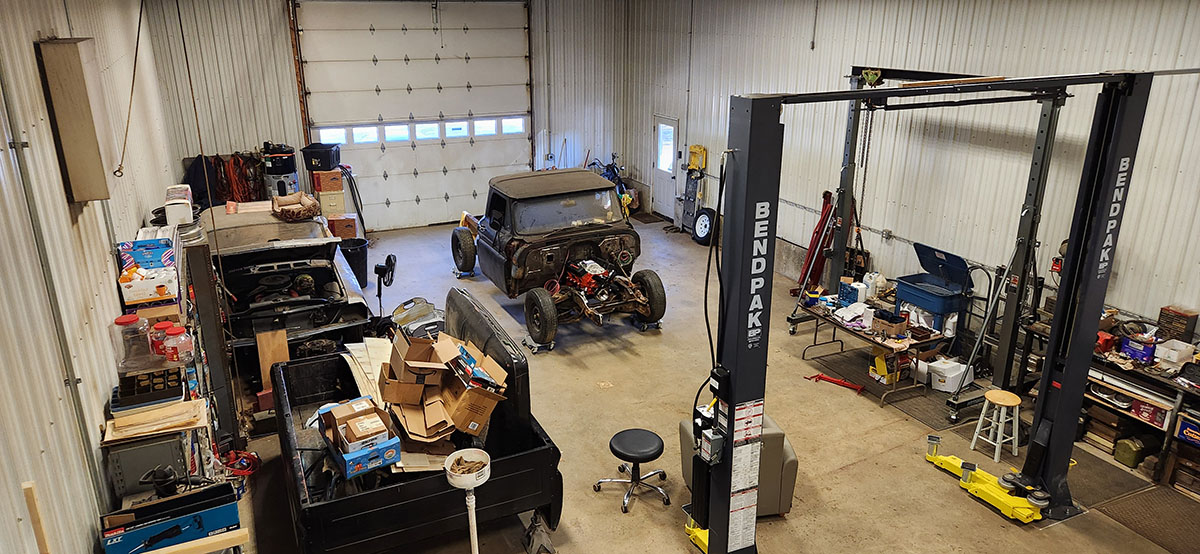
This is true. At the end of the day Friday, we were reflecting that the afternoon's activities would have been a monumental pain in the ass without the lift, and tomorrow's would be as well.
--G.
-><-
Benjamin D. Hutchins, Co-Founder, Editor-in-Chief, & Forum Mod
Eyrie Productions, Unlimited http://www.eyrie-productions.com/
zgryphon at that email service Google has
Ceterum censeo Carthaginem esse delendam.
#8, RE: Session 13-ish
Posted by MoonEyes on May-27-25 at 04:12 AM
In response to message #5
LAST EDITED ON May-27-25 AT 04:15 AM (EDT)
>As an aside, it's a bummer no one makes >"modernization" gauges that replace the >stock ones with the same look and more >modern insides.Solution: contact the engineering firm of Blackhurst & Brunning. They have ALL the knowledge of new and old gauges and how to modernize, etc. I'm sure they'd be DELIGHTED to help...
...!
Stoke Mandeville, Esq & The
Victorian Ballsmiths
"Nobody Want Verdigris-
Covered Balls!"
#9, RE: Session 13-ish
Posted by jonathanlennox on May-28-25 at 11:00 AM
In response to message #8
>Solution: contact the engineering firm of Blackhurst & Brunning. They
>have ALL the knowledge of new and old gauges and how to modernize,
>etc. I'm sure they'd be DELIGHTED to help... As long as you don't need it within the next decade!
#10, RE: Session 13-ish
Posted by MoonEyes on May-30-25 at 04:51 PM
In response to message #9
Well, yes....there is that....!
Stoke Mandeville, Esq & The
Victorian Ballsmiths
"Nobody Want Verdigris-
Covered Balls!"
#11, RE: Session 13-ish
Posted by Gryphon on Jun-03-25 at 01:25 AM
In response to message #5
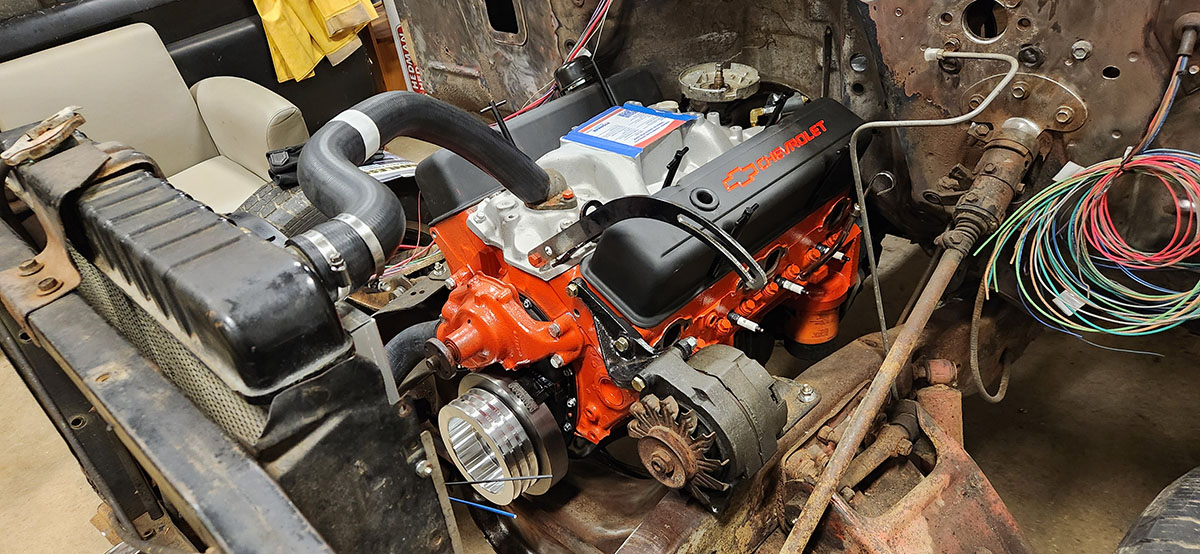
Belts!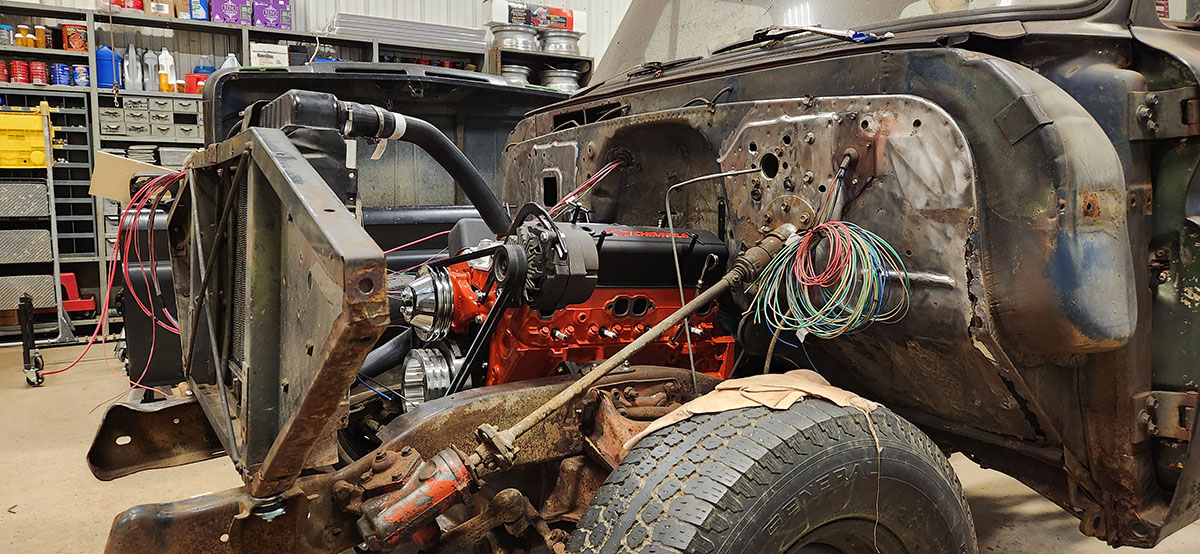
There is no technical reason why there are two belts on there. Dad just thinks it looks cool. :)
There's a third groove available on the crank pulley, which could be used to drive a power steering pump or air conditioning compressor at some later date (although I think most of the retrofit AC systems nowadays are electric).
Next up is engine compartment wiring, which is pretty complicated even on an old warhorse like this. At least there are no computers...
--G.
-><-
Benjamin D. Hutchins, Co-Founder, Editor-in-Chief, & Forum Mod
Eyrie Productions, Unlimited http://www.eyrie-productions.com/
zgryphon at that email service Google has
Ceterum censeo Carthaginem esse delendam.
#12, RE: Session 13-ish
Posted by Peter Eng on Jun-05-25 at 05:09 PM
In response to message #11
> At least there are no computers...
>Well, not as a requirement. I'm sure that if you were the sort of person to do such a thing, there's some way to make a Raspberry Pi into a useful addition to Angus.
Peter Eng
--
That way lies madness.
#13, RE: Session 13-ish
Posted by Gryphon on Jun-05-25 at 06:46 PM
In response to message #12
>Well, not as a requirement. I'm sure that if you were the sort of
>person to do such a thing, there's some way to make a Raspberry Pi
>into a useful addition to Angus. I can't imagine what such a thing would even be doing...
That said, if we ever decide to invest in an aftermarket fuel injection system (which do exist for that type of engine) or the like, that will have a computer in it. But it still won't be controlling the rest of the vehicle like they do in more modern cars.
--G.
-><-
Benjamin D. Hutchins, Co-Founder, Editor-in-Chief, & Forum Mod
Eyrie Productions, Unlimited http://www.eyrie-productions.com/
zgryphon at that email service Google has
Ceterum censeo Carthaginem esse delendam.
#16, RE: Session 13-ish
Posted by Sofaspud on Jun-23-25 at 01:22 PM
In response to message #13
>I can't imagine what such a thing would even be doing... Considering you're rebuilding a super-truck, I think there's a definite need and place for a Pi-powered doohickey. Just behind and between the seats. And it needs to be wired to a display on the center console.
SINED
SEELED
DELIVERED
--sofaspud
--bonus points if it does the bleedle-beep thing
#17, RE: Session 13-ish
Posted by Gryphon on Jun-23-25 at 09:58 PM
In response to message #16
>--bonus points if it does the bleedle-beep thing You know, now that you mention it, the HB-88 is kind of the ultimate rat rod. All that third-hand switchgear, exposed wiring, Dymo-punch labeling...
--G.
-><-
Benjamin D. Hutchins, Co-Founder, Editor-in-Chief, & Forum Mod
Eyrie Productions, Unlimited http://www.eyrie-productions.com/
zgryphon at that email service Google has
Ceterum censeo Carthaginem esse delendam.
#14, Session 14
Posted by Gryphon on Jun-20-25 at 02:00 AM
In response to message #0
"Session" is kind of a misnomer for these more recent activities. We're plugging away bit by bit on a range of tasks that have to be accomplished before we can test-run the engine, most of which are not very sexy and don't make for interesting photos. Still, I do have some progress to report!First: in the course of installing the alternator, we noticed that the radiator support bulkhead was looking a little precarious. See, when you're working behind a big metal wall-like structure, there's a natural tendency to lean against it. The problem is, that bulkhead is designed to be held up by the inner fenders, which aren't there at the moment, and we realized that we were starting to bend the bulkhead's lower attachment points, leaning it backward a bit. Some sort of temporary support structure was needed.
So, with a couple of spare brackets from somewhere and a piece of all-thread rod, we made one. That oughta hold it. Oh, and check out our shiny new battery box. The old one was still barely serviceable, but pretty rusty. Car batteries tend to offgas a bit of acid vapor.
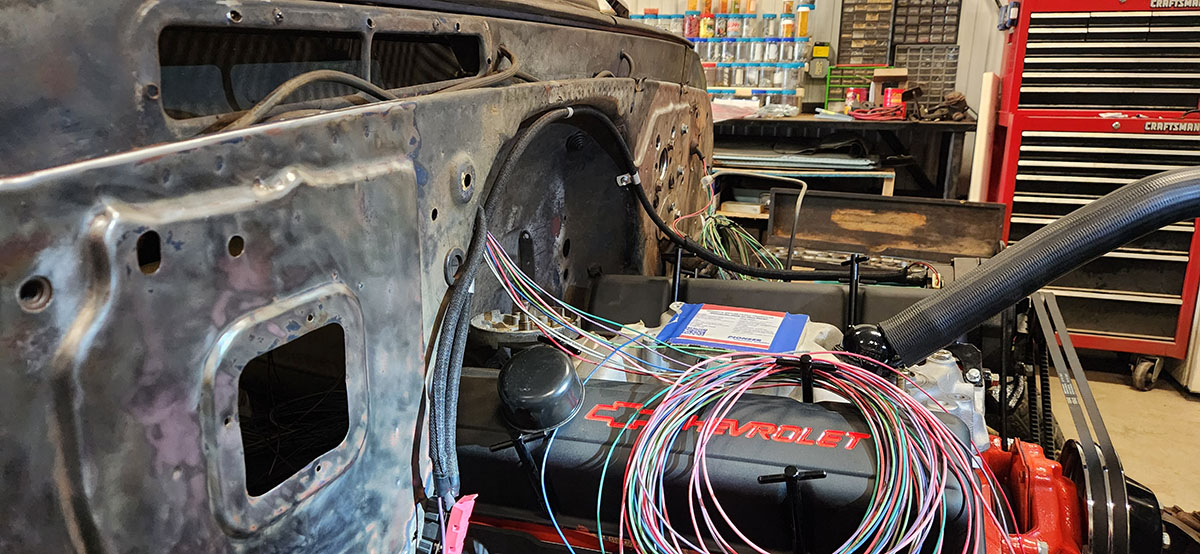
Next up: wiring, wiring, and more wiring. Most of this is hard to photograph, because at any distance it doesn't look like much.
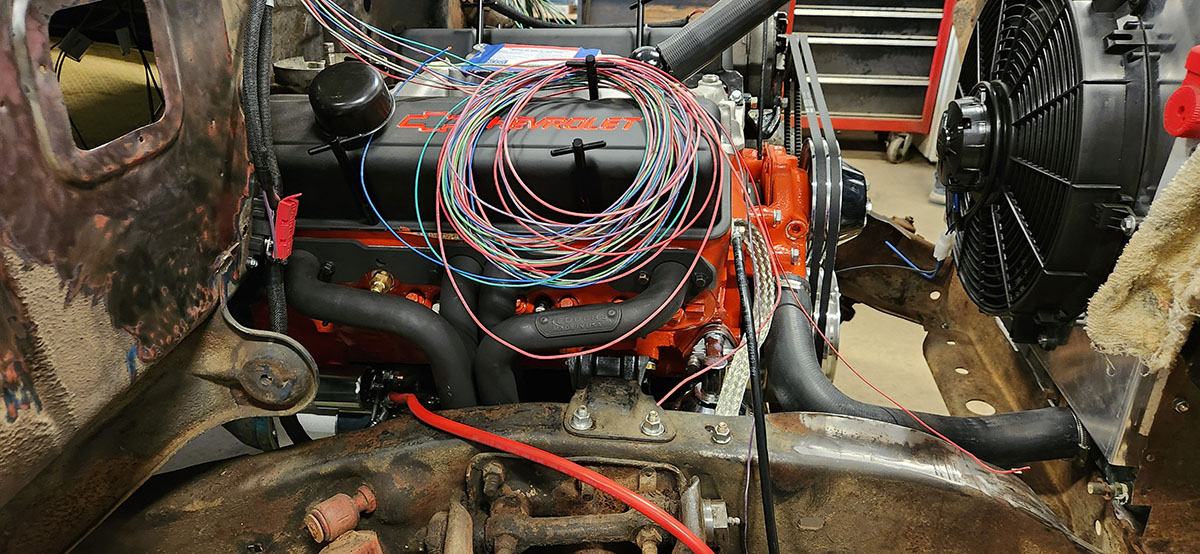
Take this view, for instance. Obviously the big coil of multicolored wires is just stuff we haven't connected yet, but you can't really see most of the things we have connected either, apart from the new battery cables (the thick black and red ones hanging down) and the engine grounding strap (that big silver flat thing hooked onto the same bolt as the black battery cable).
So I won't spend a lot of time on all this right at the moment, except for this. We're not doing a concours restoration or anything here, but we do want the wiring to look nice and not like a couple of monkeys did it, so we bought a bunch of braided wire covers to go with the new harness. Here's some of it in action:
That black braided stuff is covering, among other things, the main wire connecting the alternator to the starter and battery via a fuse mounted on the firewall (that red box in the lower left). It's heat-resistant and, in situations where you have more than one wire going to the same place, keeps them all nicely bundled together so they don't just flop around like multicolored spaghetti. We've got a bunch of this stuff in different sizes that we'll be wrapping up whatever we can with, so you'll be seeing it again.
With all the wires laid in that need to go to the starter, the next order of business was... anticlimactically, the starter. As usual, we have a range of these salvaged from various vehicles over the years. There's even one from a 1960s Pontiac up in the parts room, and Dad has no idea where it came from, as he can't remember ever parting out a 1960s Pontiac. We even found one that works, which we proved by hooking it up to a battery with jumper cables and then shorting the solenoid with a screwdriver.
And then, because of our aftermarket exhaust headers, it wouldn't fit.
Fortunately, the aftermarket has thought of this too, and electric motor technology has advanced a lot in the last few decades.
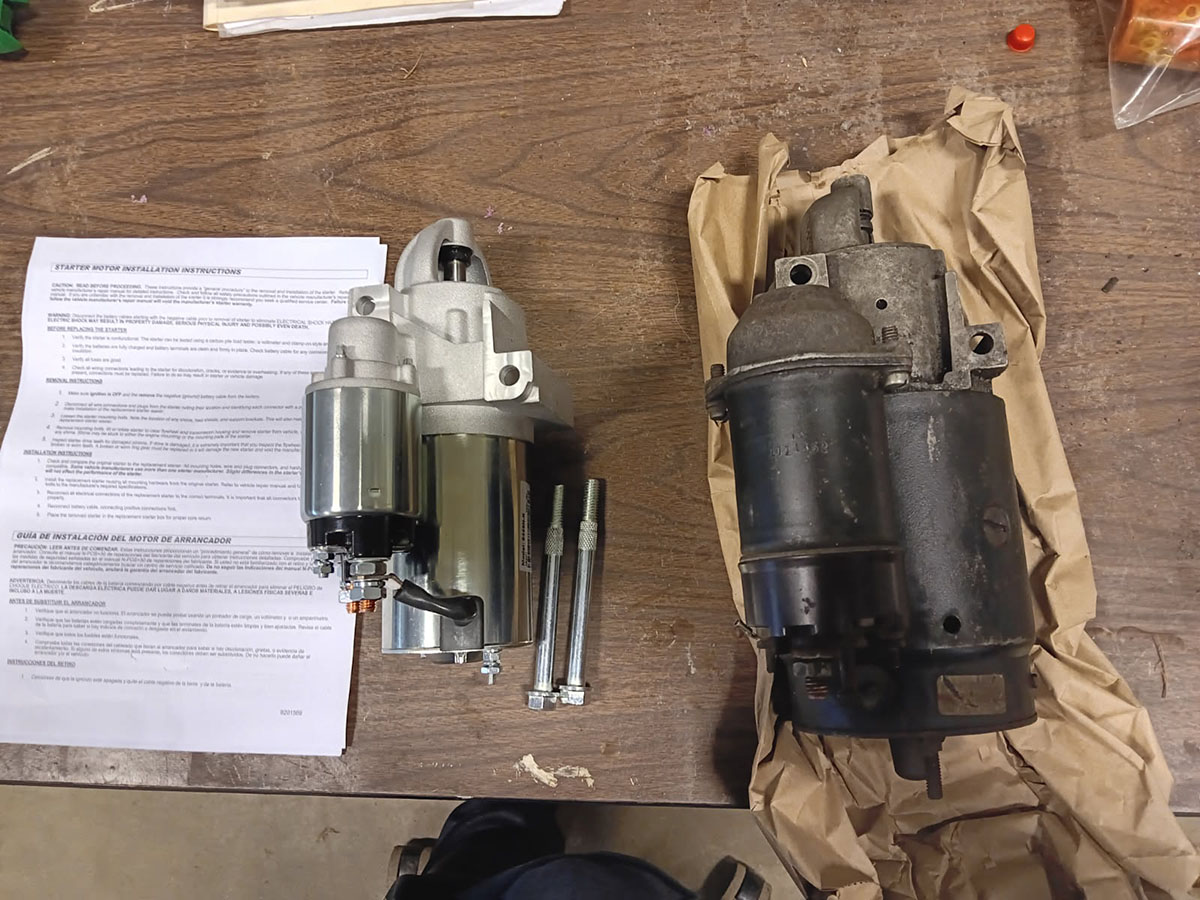
That oughta do it.
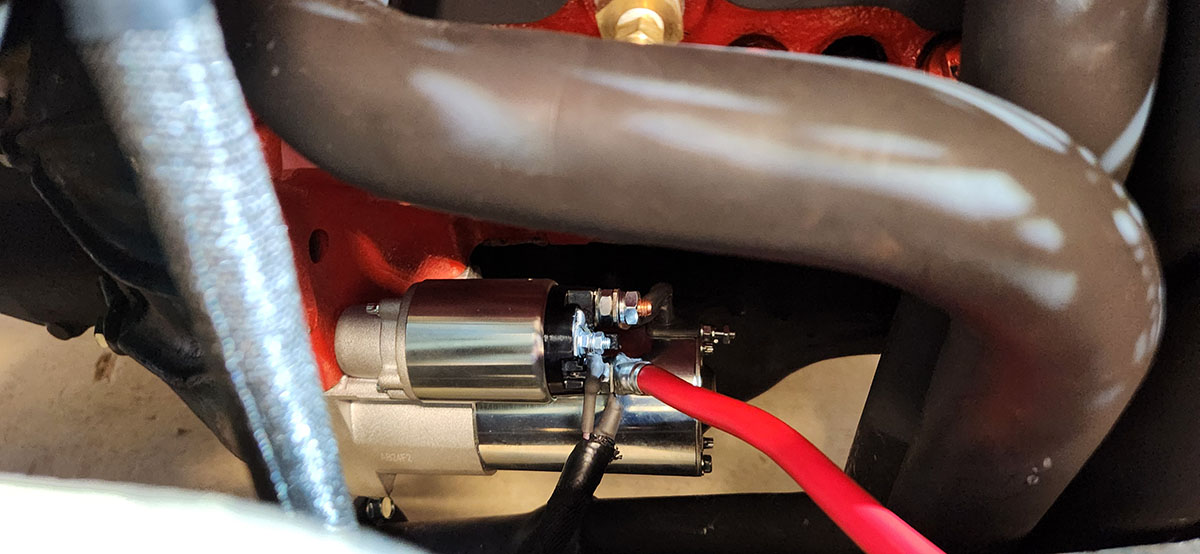
Yup, that fits just fine. I have no idea why they felt the need to chrome it, but there it is. As a bonus, it actually has significantly more torque than the original spec.
Not sure what we'll be up to tomorrow, but I suppose I'd better get to bed so I'm not zombie boy for it.
--G.
-><-
Benjamin D. Hutchins, Co-Founder, Editor-in-Chief, & Forum Mod
Eyrie Productions, Unlimited http://www.eyrie-productions.com/
zgryphon at that email service Google has
Ceterum censeo Carthaginem esse delendam.
#15, RE: Session 14
Posted by Gryphon on Jun-21-25 at 03:17 AM
In response to message #14
More wiring done today. Still not a whole lot to look at, but: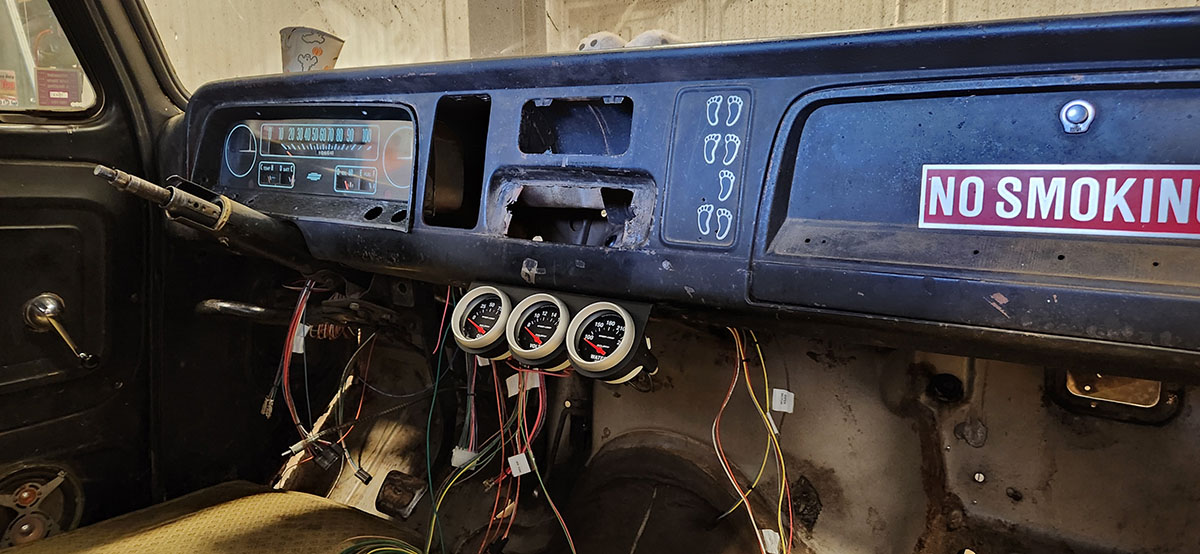
The instrument cluster's back in, and the new gauges are mostly wired up. We also put some more of that braided protective cover on the largest bundle of wires in the harness, which runs in back of the cluster, but since it's black wire covering against black painted metal, there's not much to see, so I didn't bother getting a picture before we covered it up.
We're looking into getting a tachometer, which will probably be attached to the steering column like the old Sun Super Tach that used to be in there back in the day. We'd reuse that one if we could, but, like the other classic Sun gauges that were in there before, we, uh... can't find them. They're probably in a box together somewhere...
--G.
-><-
Benjamin D. Hutchins, Co-Founder, Editor-in-Chief, & Forum Mod
Eyrie Productions, Unlimited http://www.eyrie-productions.com/
zgryphon at that email service Google has
Ceterum censeo Carthaginem esse delendam.