#0, Project Angus cont'd
Posted by Gryphon on Jan-20-26 at 11:18 PM
Sorry I've kind of fallen behind on reporting. We've been doing stuff, slowly, and I have a few photos to upload. It's a minor pain in the butt to do that, though, and I haven't even felt up to deal with minor pains in the ass lately, so I haven't done it. :(Soon! Update soon. --G.
-><-
Benjamin D. Hutchins, Co-Founder, Editor-in-Chief, & Forum Mod
Eyrie Productions, Unlimited http://www.eyrie-productions.com/
zgryphon at that email service Google has
Ceterum censeo Carthaginem esse delendam.
#1, RE: Project Angus cont'd
Posted by Gryphon on Feb-07-26 at 10:08 PM
In response to message #0
We spent all day today getting two washers for the front brake assemblies sorted out. This included two trips to a hardware store 10 miles away.The funny part: Both times, as I was sitting in the parked Ridgeline waiting for Dad to finish up inside the store, I saw the same dude come out and walk past on the way to his vehicle. So we weren't the only guys having that afternoon. :) --G.
pictures soon™, I promise
-><-
Benjamin D. Hutchins, Co-Founder, Editor-in-Chief, & Forum Mod
Eyrie Productions, Unlimited http://www.eyrie-productions.com/
zgryphon at that email service Google has
Ceterum censeo Carthaginem esse delendam.
#2, RE: Project Angus cont'd
Posted by Nova Floresca on Feb-08-26 at 01:02 PM
In response to message #1
>The funny part: Both times, as I was sitting in the parked Ridgeline
>waiting for Dad to finish up inside the store, I saw the same dude
>come out and walk past on the way to his vehicle. So we weren't the
>only guys having that afternoon. :) I've witnessed about the only way it could be worse- my dad's cousin Slim was trying to repair his truck and needed to go to the parts store, so he had to fire up his only other vehicle: A drag car. Not the top-fuel type that destroys the engine in 4 seconds, but still with the massive sticking-out-the-hood supercharger and shakes-the-whole-block engine. "This is probably a stupid question, but . . ."
#3, RE: Project Angus cont'd
Posted by Gryphon on Feb-08-26 at 02:58 PM
In response to message #2
>Not the top-fuel type that destroys the engine in 4 seconds, but still
>with the massive sticking-out-the-hood supercharger and
>shakes-the-whole-block engine.You know you're having a special shop day when the only vehicle you have available for a run to the store is the one that's not street legal. --G.
-><-
Benjamin D. Hutchins, Co-Founder, Editor-in-Chief, & Forum Mod
Eyrie Productions, Unlimited http://www.eyrie-productions.com/
zgryphon at that email service Google has
Ceterum censeo Carthaginem esse delendam.
#4, RE: Project Angus cont'd
Posted by Nova Floresca on Feb-08-26 at 07:39 PM
In response to message #3
>You know you're having a special shop day when the only vehicle you
>have available for a run to the store is the one that's not street
>legal. In fairness, this was small town Midwest around 1990, so it fell in the range of "you can get away with it", but yeah. "This is probably a stupid question, but . . ."
#5, RE: Project Angus cont'd
Posted by Gryphon on Feb-09-26 at 02:15 PM
In response to message #1
With the engine installed and tested, most of the engine bay and cab rewiring completed, and the fuel and cooling systems online, it was finally time for us to bite the bullet, pull the wheels off, and start on the brakes.Like most everything else on the pickup, this system requires a complete overhaul. First, GM vehicles didn't have dual brake master cylinders (one circuit for the front wheels, the other for the rear) until later in the 1960s, so for safety that needs to be updated. We went through this on the Impala as well, and the updated parts are readily available, so that's not a big deal. It does mean the lines to the wheels need to be replumbed, but we wanted to replace them anyway. We are, however, not installing an update kit to convert the front wheels to disc brakes as we did on the Impala, and that means we must now confront the ineffable horror that is drum brakes. These are so called because instead of rotor discs with calipers that pinch them, drum brakes have a metal drum over the wheel hubs, like so: 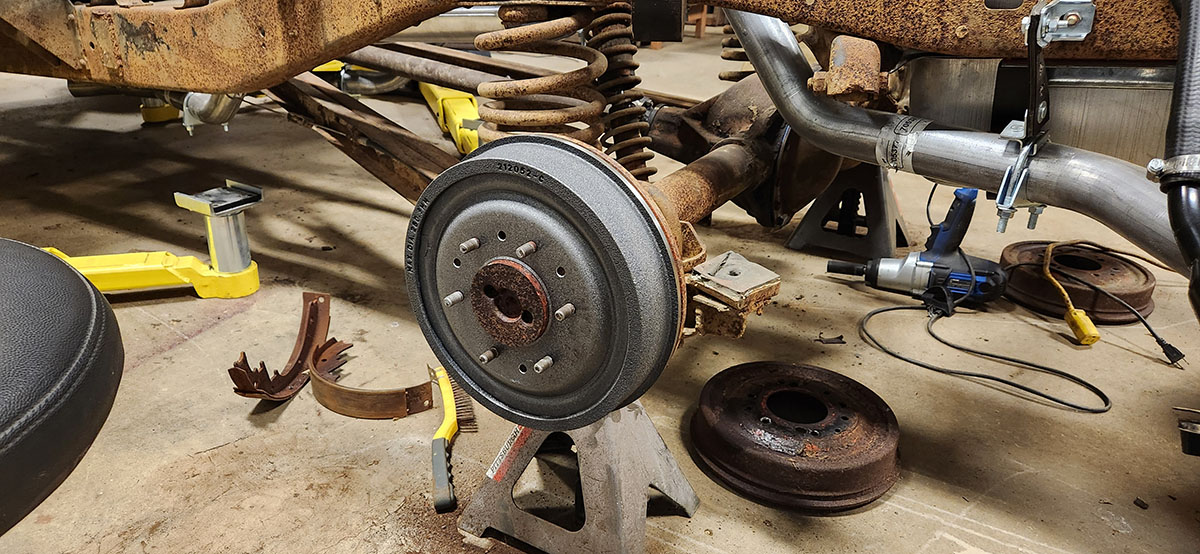
(This is a bit of a sneak preview, since that's a new drum. You can see the rusty old one on the floor under the truck.) Inside the drum, check out... this fuckin' thing. 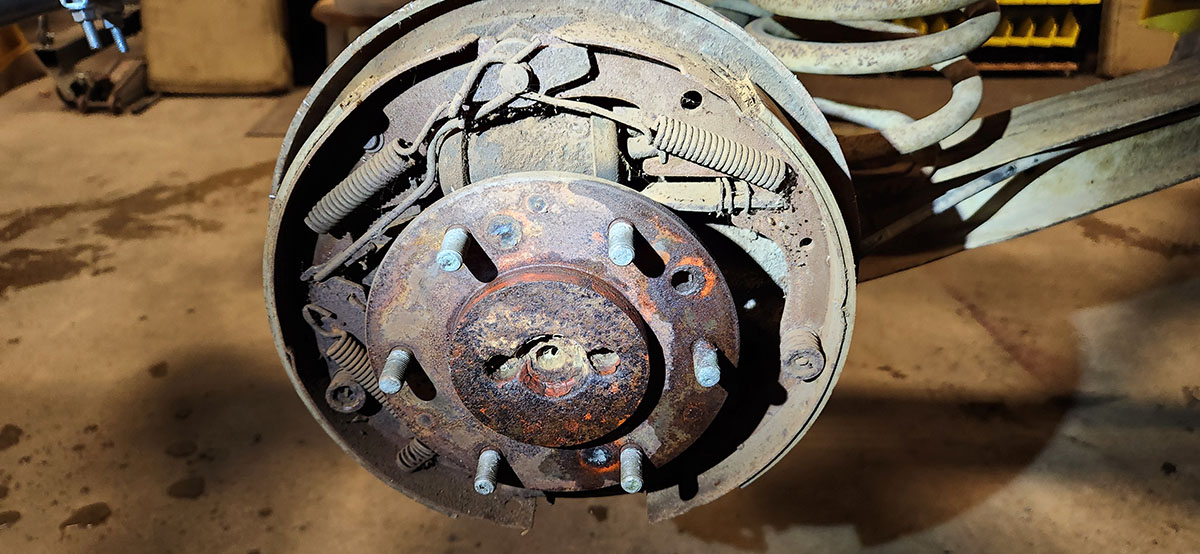
In principle, a drum brake is pretty simple. Pressure on the brake pedal, relayed hydraulically by the master cylinder, causes the wheel cylinder (that barrel-looking object mounted sideways near the top) to push outward on the two shoes, which makes their bearing surfaces drag against the inside of the drum, converting the wheel's rotational energy into heat. In practice, even a relatively simple brake like this one from the mid-1960s is a maze of return springs, retainer springs, levers, self-adjusters, manual adjusters, and, on a rear wheel like this one, the mechanisms that make the parking brake work independently of the hydraulics. Putting one together is like that stage of a LEGO build where to seat one brick, you have to exert pressure against some other part that is then inclined to pop off. It's ever so slightly maddening. 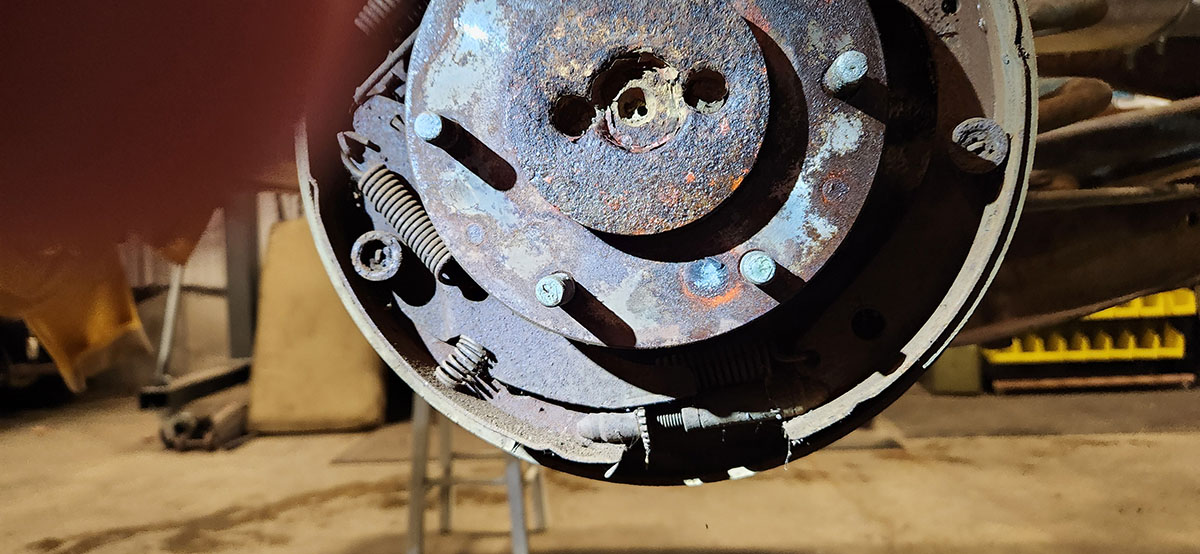
In this lower view, you can see the adjuster (at the bottom, with the gear teeth on it) and the arm that makes it work (on the left, with the long spring on its face and the shorter spring standing it off from the bottom). The p-brake actuator, basically a sprung cable running up to the front of the cab, is hidden behind that. This is a self-adjusting brake system, so with the drum on, that arm engages with the gear teeth on the adjuster. When the brakes are applied, if they have to travel farther than one sweep of the arm to engage with the drum, the bottom of the arm trips the adjuster, advancing its cog one tooth and forcing the shoes apart a little bit. This compensates for wear on the shoes and keeps the brakes effective until the shoes are too worn to work at all. You can see from all the extended threads on the adjuster that this set of shoes is just about done--the extender is almost all the way out. Another anatomical note: those circular objects at roughly four and eight o'clock are the retainers that hold the shoes in place. They have a pin that runs through from behind, with a spring behind them that keeps the retainer cap tense against the end of the pin. To remove and install them, you need a special tool like a screwdriver with a little cage at the end instead of a point. My father and I have never known the name of this tool, and it's the canonical example in my head of his long-standing habit of putting his hand out and saying, "Gimme the....... thing, willya?" Learning which "thing" he meant was my earliest education in working on cars. :) 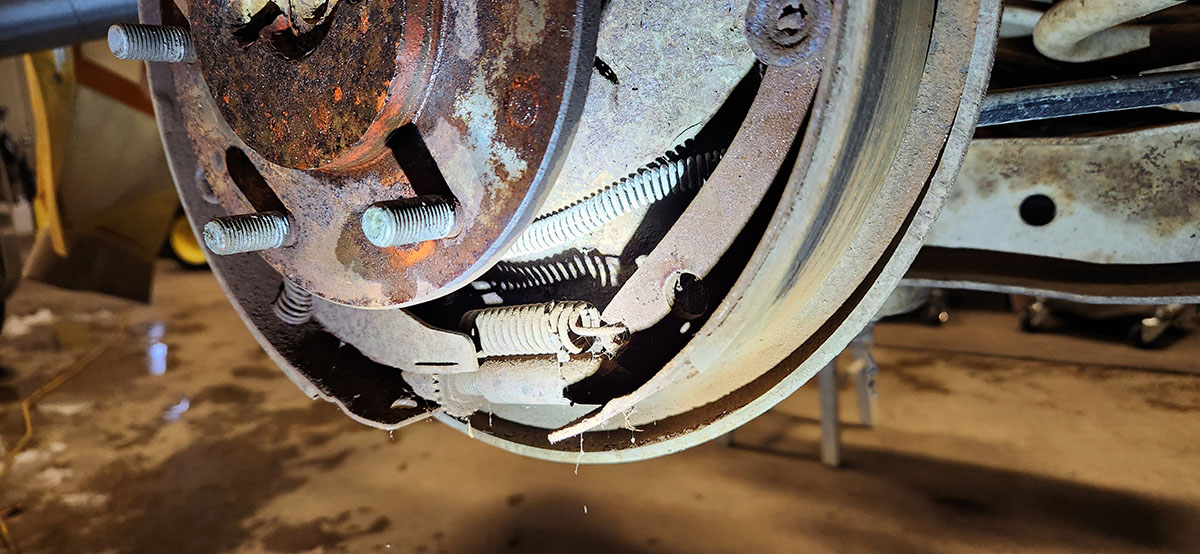
Here's another view of the adjuster mechanism and the spring that holds the shoes together at the bottom. From this angle you can see that other spring running across in back, which is the sprung end of the parking brake cable. There's one of those on each rear wheel; they join together farther forward, and the single cable they merge into then runs up to the hand lever in the cab. 
With new shoes and springs installed, the whole business looks a lot cleaner. The makers of the new hardware kit we used were kind enough to color-code the springs to make telling which one goes where a little easier. Note the yellow one on the rear retainer pin. Up front, things are mostly a bit simpler, since there's no p-brake mechanism to worry about, but one thing is significantly different in a way that threw us off a bunch. On the rear wheels, since this truck was made long before independent rear suspension was a thing in pickups, the rear wheel cylinders are connected directly to hard lines, so they're screwed directly to the backing plates and the whole system is rigid. Up front, where the wheels have to be able to steer the vehicle, the wheel cylinders are connected to the hard lines with short sections of rubber tubing. I guess for this reason, the way they're retained on the backing plates is a little different. 
See that shiny washer behind the nut at the top of the cylinder? That's called a French locking washer. It's basically a normal washer, only a bit thinner. Once the nut (which is actually a complicated peg thing with a nut-like hex surface on part of it, but anyway) is in place, part of the washer is folded backward over the mounting boss behind it, and part is folded forward over one flat of the nut, which keeps anything involved from rotating in either direction. Except here's the thing: it doesn't appear that you can get French locking washers in the correct size any more. We ordered what we thought were new ones from a parts supplier, but when they came, both the inside and outside diameters were too small. Dad's theory is that they're actually for a passenger car's slightly smaller, lighter front brakes. This meant we had to try and make our own, but normal washers are way too thick for the bending part to work. We hit on the idea of tracking down some wide, thin washers of a type commonly called "fender washers" because they used to be used in attaching auto body panels back in the day, but the problem with those is that the holes are quite small for the large size of the washer. This meant we had to find a pair that had the right OD and then drill out the holes to the correct ID using a step drill. There were two problems with this. One was that we didn't have any fender washers. The other was that we didn't have a step drill. Oh, and the third of two was that the hardware store a mile away was closed on Saturday, so we had to go to the one ten miles away... twice, because someone got the wrong size washers the first time. :) Still, perseverance wins out, and we did eventually get the dang washers figured out. By then we were out of time for the day, so reassembling the front wheels will have to wait a bit longer. --G.
-><-
Benjamin D. Hutchins, Co-Founder, Editor-in-Chief, & Forum Mod
Eyrie Productions, Unlimited http://www.eyrie-productions.com/
zgryphon at that email service Google has
Ceterum censeo Carthaginem esse delendam.
#6, RE: Project Angus cont'd
Posted by Peter Eng on Feb-10-26 at 11:27 PM
In response to message #5
> Putting one together is like that stage of a LEGO build where to seat one brick,
> you have to exert pressure against some other part that is then inclined to pop
> off.Perhaps I'm imagining it, but this sounds similar to reassembling one of the more finicky Guns of the Week. Peter Eng
--
Insert humorous comment here.
#7, RE: Project Angus cont'd
Posted by Gryphon on Feb-11-26 at 00:34 AM
In response to message #6
>> Putting one together is like that stage of a LEGO build where to seat one brick,
>> you have to exert pressure against some other part that is then inclined to pop
>> off.
>
>Perhaps I'm imagining it, but this sounds similar to reassembling one
>of the more finicky Guns of the Week. Now that you mention it, I may in fact have used that same simile before. The experiences are much the same. --G.
-><-
Benjamin D. Hutchins, Co-Founder, Editor-in-Chief, & Forum Mod
Eyrie Productions, Unlimited http://www.eyrie-productions.com/
zgryphon at that email service Google has
Ceterum censeo Carthaginem esse delendam.
#8, RE: Project Angus cont'd
Posted by Gryphon on Feb-26-26 at 10:15 PM
In response to message #0
At last, we're done with the brakes.* The wheels are back on the truck and it's on the floor. Next time we'll need to pick it up again to put the exhaust system back on it, but at that point, in theory, it'll be a running chassis. Engine, transmission, brakes.I'm not sure what's next after that. Probably the wiring of the back end, although that will require putting the body back on, which in turn will mean we'll have to have a plan for the relocated fuel fill... ... and we still need to come up with a plan for dealing with the, uh, non-spec cab ventilation... ... but with this system being complete, a lot of the biggest mechanical jobs are done. There's still a hell of a lot of other stuff that needs doing, but still, this is a pretty significant milestone, on par with when we got the engine running. --G.
* except we need to readjust the handbrake cable and replace the return spring on the brake pedal
-><-
Benjamin D. Hutchins, Co-Founder, Editor-in-Chief, & Forum Mod
Eyrie Productions, Unlimited http://www.eyrie-productions.com/
zgryphon at that email service Google has
Ceterum censeo Carthaginem esse delendam.
#9, RE: Project Angus cont'd
Posted by Gryphon on Mar-04-26 at 01:09 AM
In response to message #0
LAST EDITED ON Mar-07-26 AT 02:10 PM (EST)
Exhaust system's back together. Then we took the rest of the afternoon off to do something different.You see... 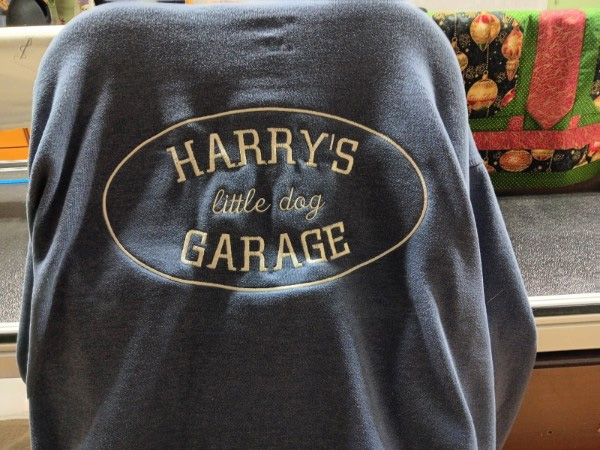
... Dad has an embroidery machine. So we played around with that for a while. (That's the back of the sweatshirt I was wearing today, which became an impromptu test subject.) Oh yeah, did I ever post a photo of the new floor shifter? We put that in back in December. 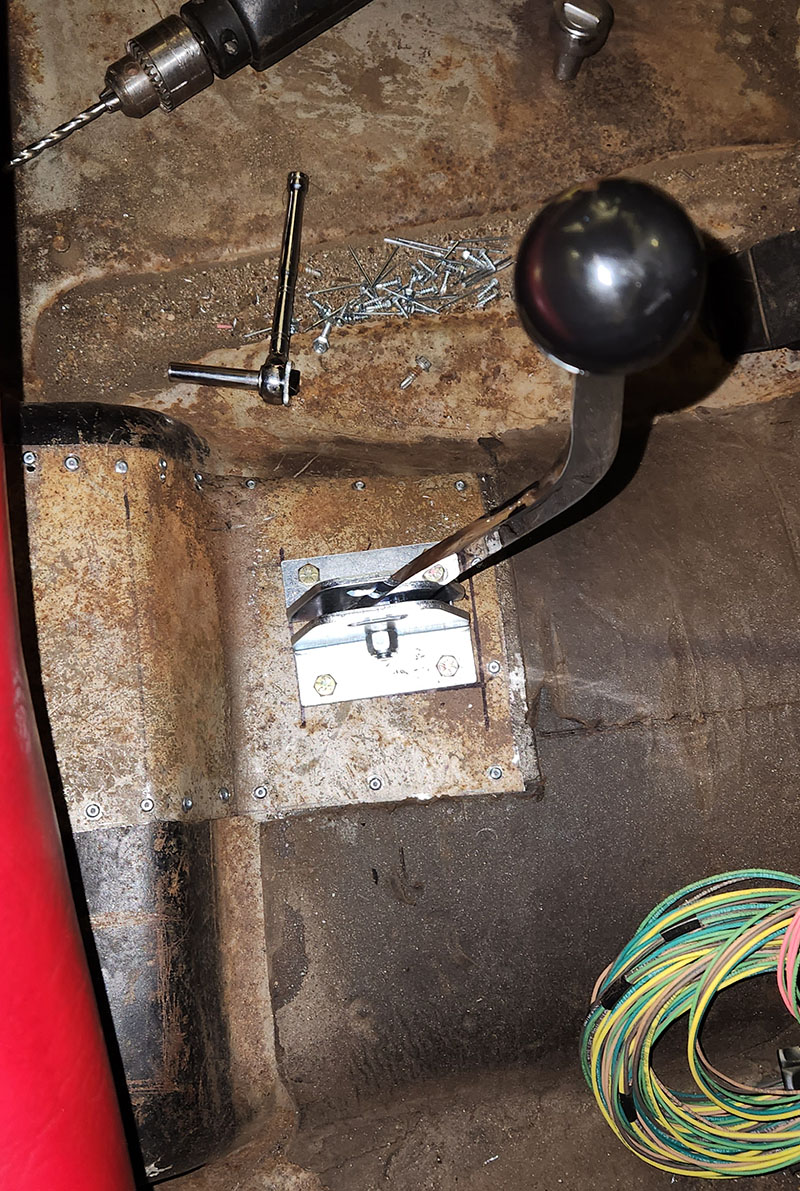
It's kind of obvious that it's for an automatic right now, since it can only go straight fore and aft, but once the floor covering is in and the boot is installed, it'll be hard to tell from a standard shifter from the outside. Unless you look over and see that there's no clutch pedal, I suppose. But anyway. (Note the patch panel, which had to be put in because there was already a hole for a floor shifter... but it was in the wrong place. Because of course it was!) Also, while we've had the rear body off, I've noticed some oddities about the structural steelwork in the back. Nothing that compromises anything, but it's... strange, and we can't figure out for certain why it's there. I'll try to remember to get some photos next time. --G.
-><-
Benjamin D. Hutchins, Co-Founder, Editor-in-Chief, & Forum Mod
Eyrie Productions, Unlimited http://www.eyrie-productions.com/
zgryphon at that email service Google has
Ceterum censeo Carthaginem esse delendam.
#10, Mysterious Ways
Posted by Gryphon on Mar-07-26 at 02:29 PM
In response to message #9
>Also, while we've had the rear body off, I've noticed some oddities
>about the structural steelwork in the back. Nothing that compromises
>anything, but it's... strange, and we can't figure out for certain why
>it's there. I'll try to remember to get some photos next time. So let's talk mysteries. This vintage of Chevrolet pickup has a fairly sophisticated for the time) coil spring rear suspension, with trailing arms connecting the rear axle to the midline of the frame in lieu of the leaf springs that earlier (and, weirdly, later) models had. At some point in the truck's prior life, someone attached something strange to both of Angus's trailing arms. I know they're not factory fittings because a) they serve no purpose and b) they're extremely crudely made: 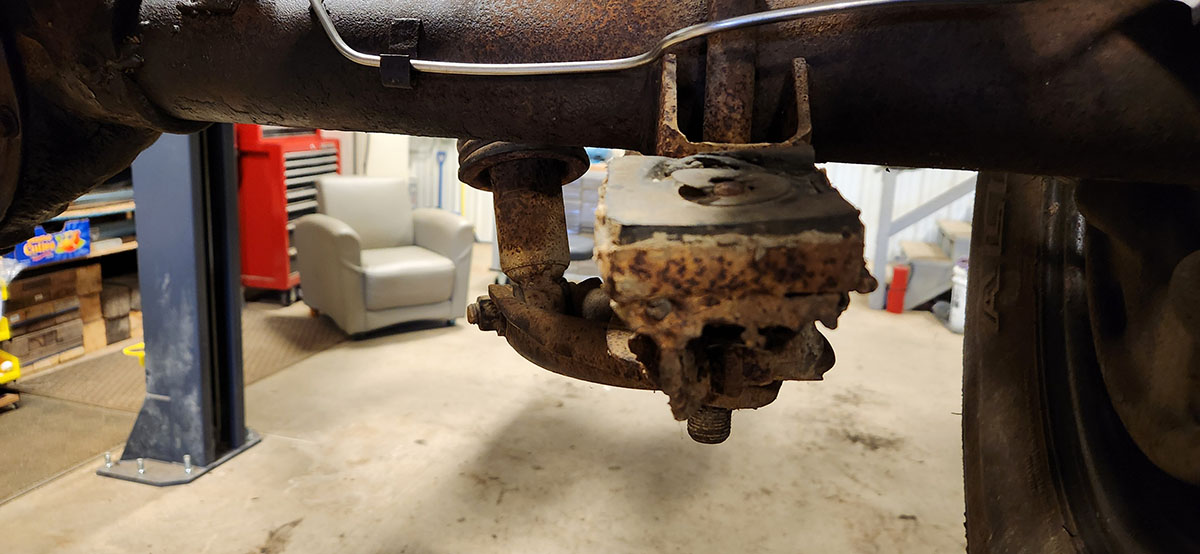
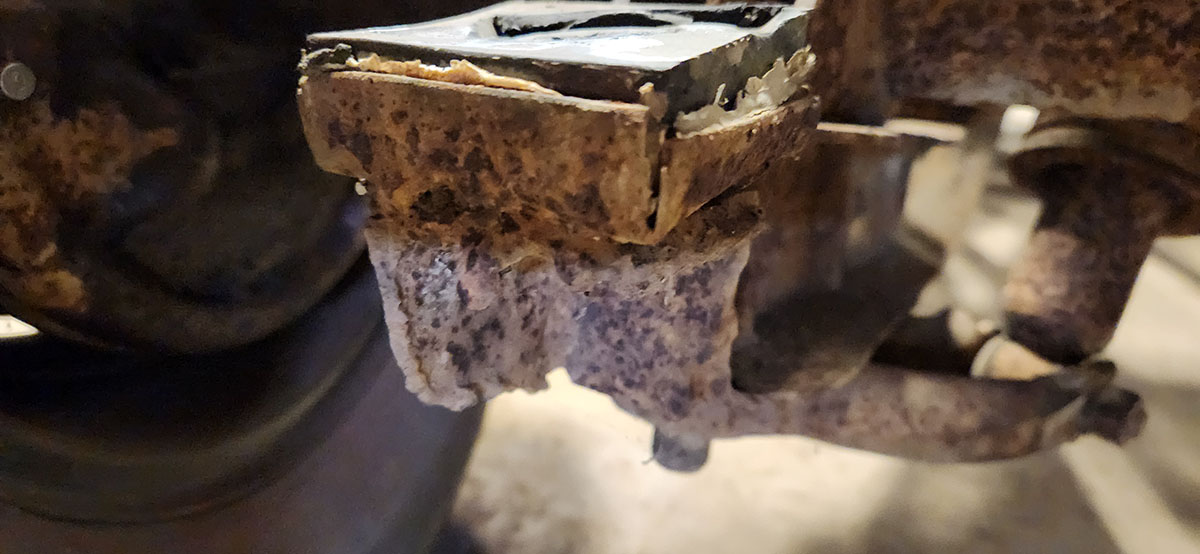
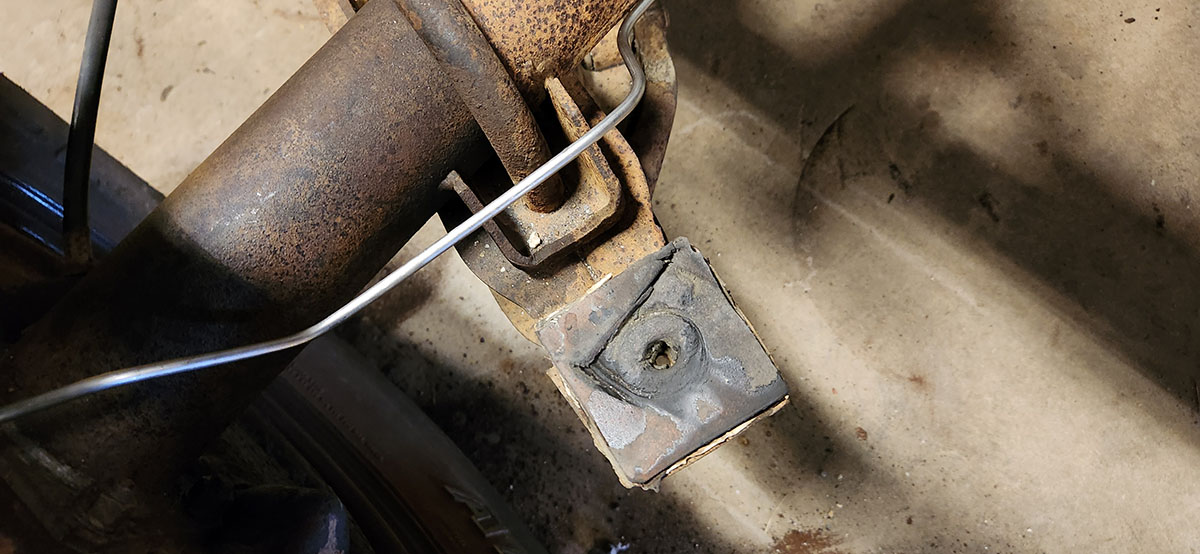
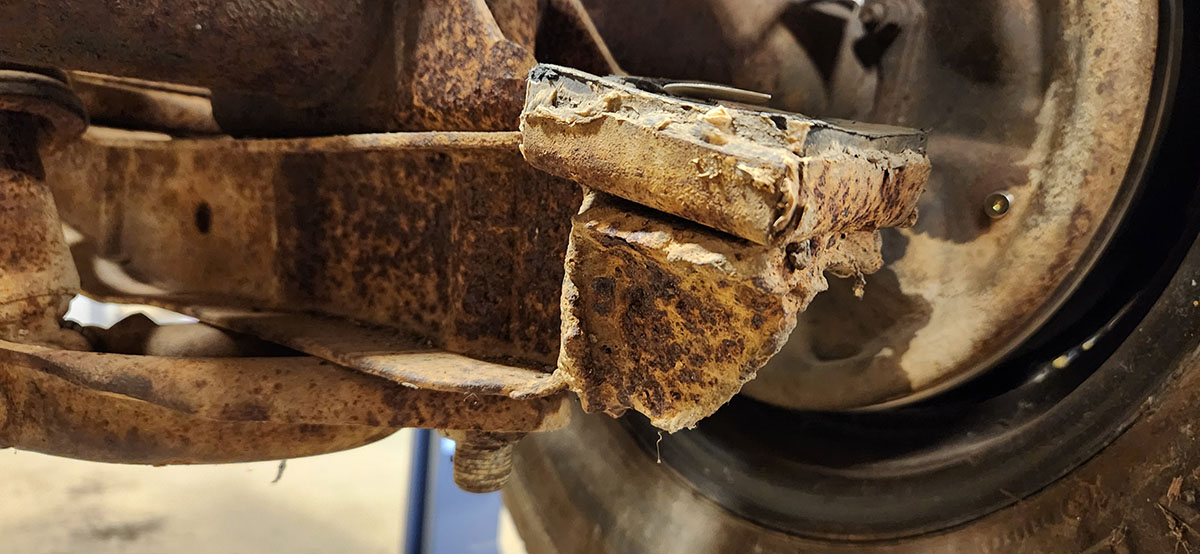
My photos aren't the best and the rust scaling may make detail hard to see, but even so, it should be obvious that whatever these things are, they're a real hack job. The welding looks like I did it, and the welded pieces seem to have been chewed off larger steel plates by some kind of cyborg squirrel. But beyond the crudity of the world... what in the world were these for? They have rubber pads on them that clearly had something heavy resting on them for years to deform permanently like that, but there's nothing back there on the stock body that comes even close to touching them. Also, up forward a bit on the frame rails just abaft the cab, we find these: 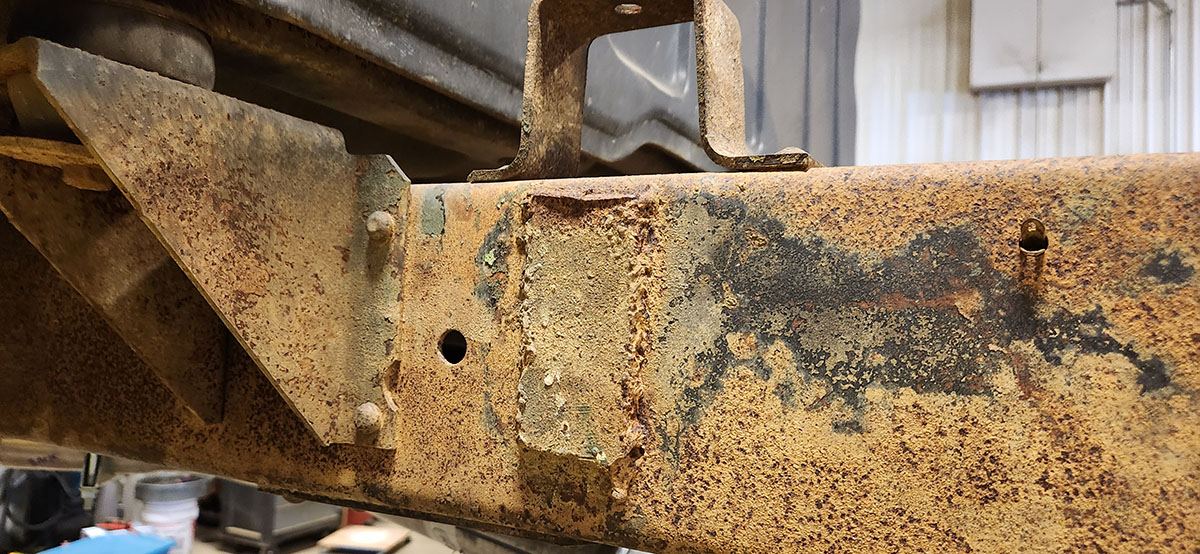
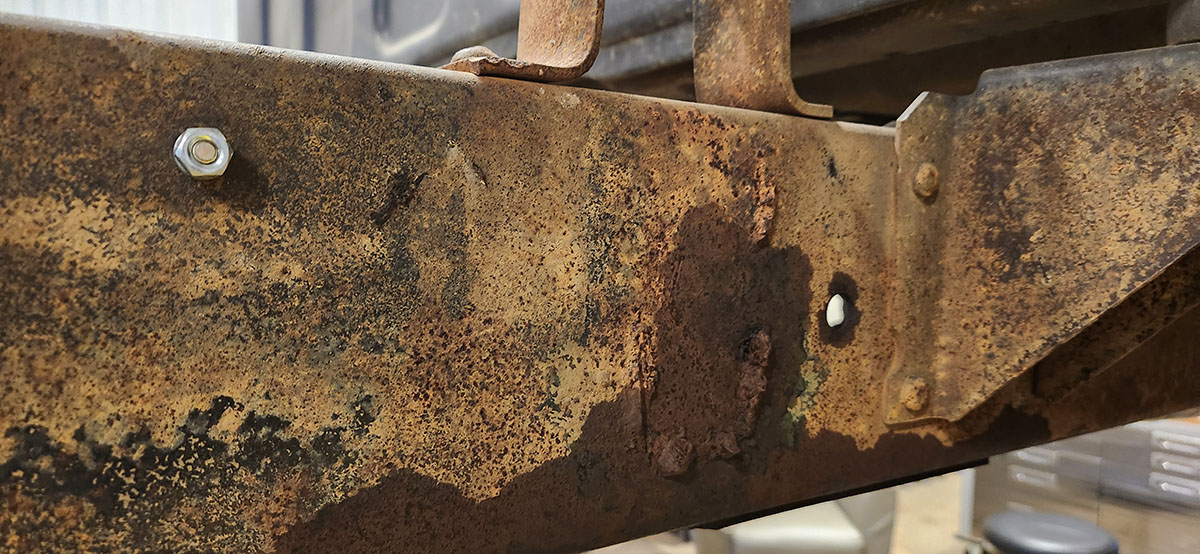
The second one, on the right-hand side, is mostly gone; only the remains of the weld line around it remains where the actual plate broke off. Over on the left-hand side, though, the plate parallel to the rail remains--and it looks like it was originally L-shaped, with the horizontal part broken off at some point in the distant past. Again, you can see from the welds and cuts that these are not factory parts, and again, there's no discernible reason for them to be there. I have a hypothesis about this, which I'll get into in a moment, and it ties into another mystery we found up in the engine compartment. I'm not sure if I took photos of them back during the engine phase of the build, but there are a couple of weird cuts in the engine bay frame rails as well, the reason for which Dad and I couldn't figure out. They're up forward of the engine, right about where the front of the inline six-cylinder that was originally in there would have been, and they serve no obvious purpose. I suspect all of these strange modifications are related, and I think what was going on was: this truck had a dump body on it at some point. The plates attached to the frame up forward probably had pads for the body to rest on when down, the things on the trailing arms are a similar kind of thing for the rear, and the cuts up front were to accommodate the hydrauilics, which back then would have been belt-driven off the engine rather than electrical like they usually are today. Now, I admit there are problems with this hypothesis. Foremost among them: Why would anyone have put a dump body on such a light truck? The half-ton C10 was the lightest-duty pickup Chevrolet made for 1966, and this particular one seems to have had a six-cylinder engine in it from the factory. You would think someone looking to make even a homebrew dump conversion would have started with at least a one-ton C30. I also have no actual evidence, just a mental picture of what I think is the most likely explanation for these ancient mods. It doesn't really make sense for this pickup to have had a dump conversion in the distant past, but any other possibility I can think of--wrecker? camper?--makes less sense. It's also unclear when and why it would have been changed back. Now I wonder if the pickup bed we have for it is original. Again, like so much else in this picture, that's probably unknowable now. Update on some work we did yesterday in a second post a bit later. For now, submitted for your consideration. --G.
-><-
Benjamin D. Hutchins, Co-Founder, Editor-in-Chief, & Forum Mod
Eyrie Productions, Unlimited http://www.eyrie-productions.com/
zgryphon at that email service Google has
Ceterum censeo Carthaginem esse delendam.
#11, RE: Project Angus cont'd
Posted by Gryphon on Mar-07-26 at 04:51 PM
In response to message #0
Yesterday was one of those "oh wait, we have to do this before we can do that" kind of days. Our intention was to replace the worn-out return spring for the brake pedal, so the brakes... you know... turn off when you take your foot off the pedal. Kind of important!So we took the seat out for the (n+1)th time, and this time it actually occurred to us to take it apart so it wouldn't be so dang heavy. That didn't stop me from dropping the heavier part on my foot, but I'm OK. Anyway, with that out of the way, I was reminded that the cab still contained... these fuckin' things. 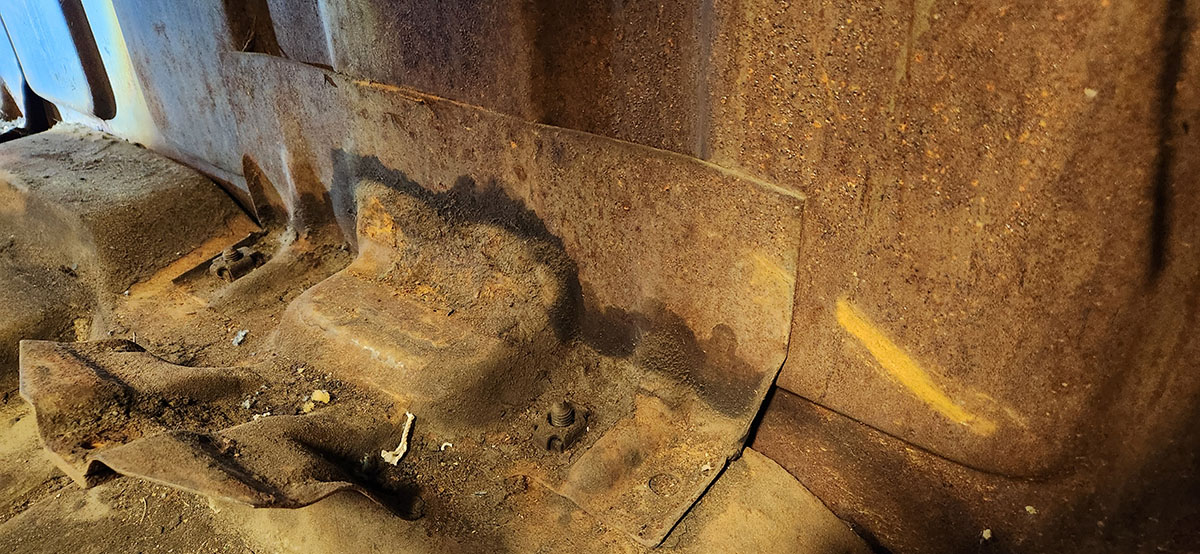
There were two of these attached to the floor and the back bulkhead of the cab. They were originally supports for the fuel tank, which was behind the seat, but since we relocated the tank to the back between the frame rails, they're no longer necessary. I proposed that we take them out before one of us, rolling around in there trying to get at the brake pedal mechanism under the dash, managed to perform impromptu spinal surgery or a field nephrectomy on those flanges sticking out in front. There were two problems with this. One is that those captive nuts they're attached to the floor with are also the tops of the cab mounts! That's right, the cab on a 1960 through '66 Chevy pickup is attached to the frame with four bolts. So with those brackets removed, we'd have to come up with some new way of attaching those. Fortunately, that's why the gods (specifically Hephaestus, I assume) gave us nuts and washers. Anyway. The other, bigger problem is that, for reasons we don't entirely understand, GM decided to spot-weld them to the vertical bulkhead. With a dozen spot welds apiece. So Dad got out his die grinder and set about cutting out the welds. 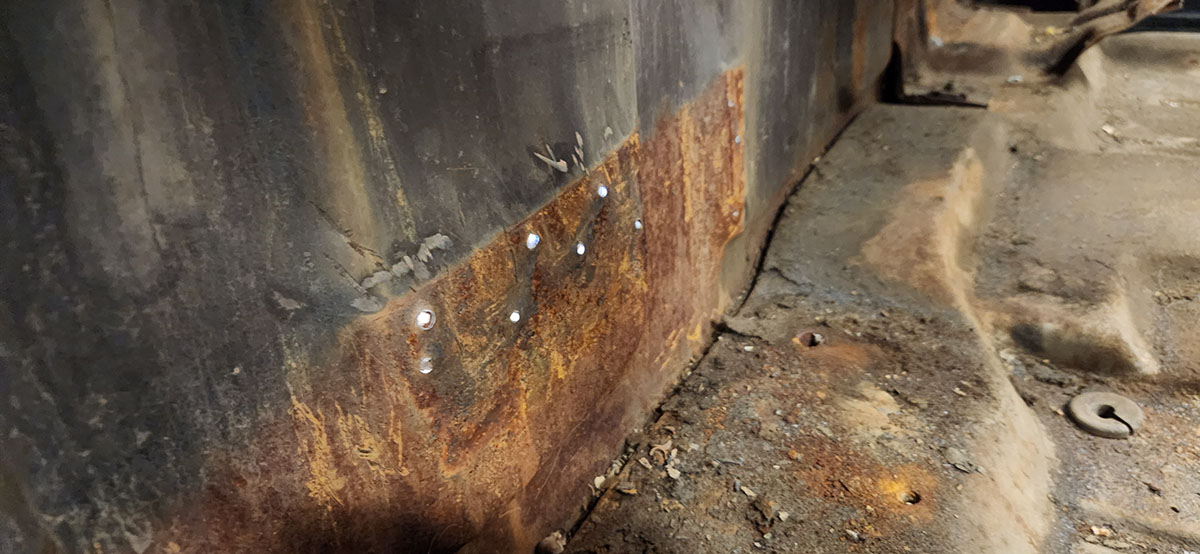
Unfortunately, the bulkhead is so thin that there wasn't really anyway to do that without leaving some holes. And bending the panel quite a bit prying on the bracket to break the edges of the welds free. We tried drilling them rather than grinding for the driver's side one, but it didn't really work any better. So that panel will need some repairs, but hell, the whole cab needs repairs. You've seen the holes in the floor pan and lower firewall already. With the brackets gone, we replaced the cab mounts. This was a mild annoyance, since the new non-captive nuts had to be held with a wrench while someone tightened the bolts from underneath, but we got it done. 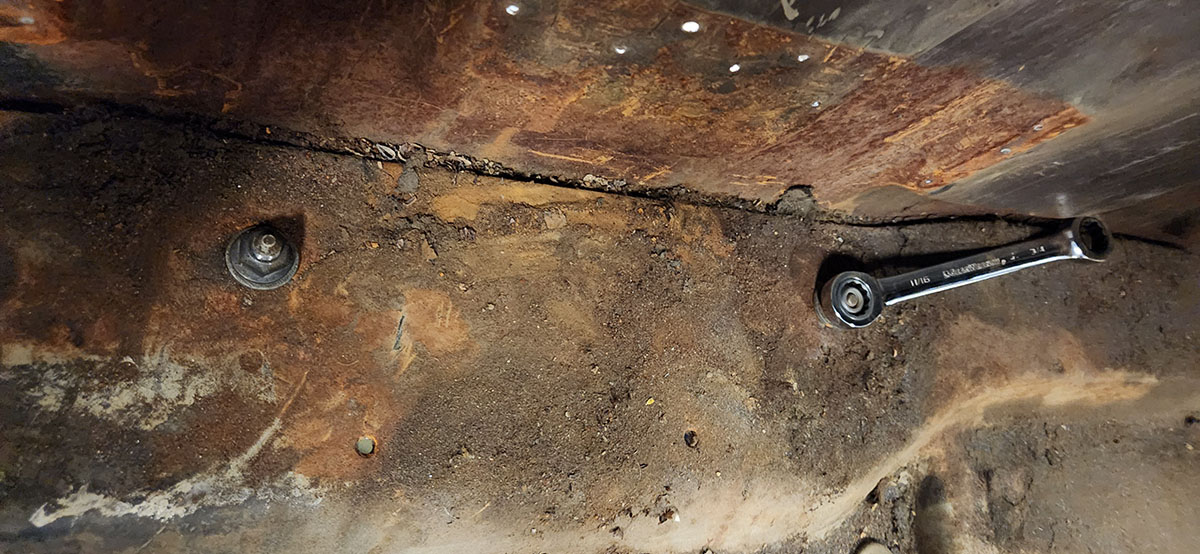
I forgot to take a picture of the bolts themselves. They have big conical rubber bushings on them to provide a tiny bit of vibration damping between the chassis and cab, and amazingly, they still had some squish to them! Rubber things that old are usually rock-hard by now. Finally, we got out the wet-dry vac and vacuumed up all the crud on the floor back there. Most of it was rust flake and general dirt, but there was also some sandblasting grit in there from when Dad sandblasted the truck circa 1988. 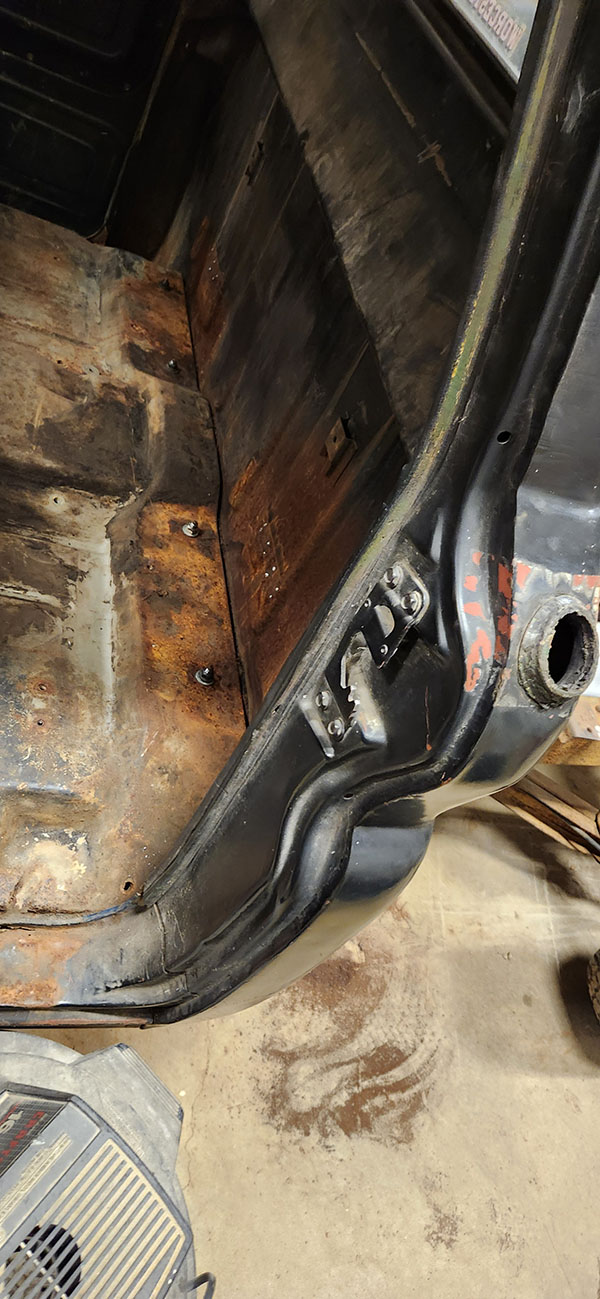
"You know your cab is in bad shape," Dad observed, "when you can vacuum holes in the floor." We're still trying to figure out what we're going to do about that. The level of work involved really should be done by a proper body shop, but the thing about proper body shops is that they're busy with jobs that insurance companies are paying for. They don't really have the time or the incentive to take jobs for random folks who come in off the street with rusted-out 1966 pickup cabs. That's a future-us problem, though. Immediate-future-us's problem is still the brake pedal spring. We also need to adjust the handbrake, since we had to disconnect it to do the brake job in the back. After that, I'm not sure. It might be warm enough to open up the door and run the engine so we can finish filling the transmission and test it, maybe go out and jalopy around the yard a little. :) --G.
-><-
Benjamin D. Hutchins, Co-Founder, Editor-in-Chief, & Forum Mod
Eyrie Productions, Unlimited http://www.eyrie-productions.com/
zgryphon at that email service Google has
Ceterum censeo Carthaginem esse delendam.
#12, RE: Project Angus cont'd
Posted by Gryphon on Mar-11-26 at 01:57 AM
In response to message #0
Nothing too exciting today. Fixed the brake return problem (by spraying so much silicone lube into the pedal mechanism that the old spring is now adequate to the task), finished riveting down the plate around the base of the shifter. Today was really pleasant and springlike, almost warm enough to have the door open, and we were tempted to put the seat back in and go jalopy around the yard some, but there's still snow out there and the ground was boggy enough that we would almost certainly have gotten stuck. Which would be very embarrassing. So we spent the rest of the afternoon figuring out how the wiring to the back of the truck works.Still, we're just about ready to do some preliminary run tests, including finding out if that old TH350 transmission we thought was a Powerglide actually works. Which is exciting. Of course, having said that, the weather is being traditionally March-y right now. Tuesday was sunny and mild with a high of 65 °F, just a perfect spring day. Wednesday's forecast is for one to three inches of sleet plus some ice, followed by Thursday's forecast of freezing rain, and one day next week is currently showing highs in the 20s and overnight lows back down in the teens. Like the old saying goes, don't like the weather in Maine? Give it a couple minutes, it'll be something different. --G.
-><-
Benjamin D. Hutchins, Co-Founder, Editor-in-Chief, & Forum Mod
Eyrie Productions, Unlimited http://www.eyrie-productions.com/
zgryphon at that email service Google has
Ceterum censeo Carthaginem esse delendam.
#13, a mystery solved... at what cost?
Posted by Gryphon on Mar-15-26 at 11:15 PM
In response to message #0
The bit of the steering column that has the directional signal lever on it has always been a little weird in Angus. It could rotate a couple inches either way, which made operating the lever a little weird. I never thought much about it, chalking it up to yet another peculiarity of an old machine.Today, as Dad and I were looking through the parts of the disassembled column to make sure we had everything, we decided we ought to order a new directional switch, since the old one is pretty worn out. Then we got to looking at ways of mounting aftermarket steering wheels like the one we recently ordered, again to make sure we either had all the bits we needed or knew what we needed to order. That, in turn, got us to looking at the main part of the column that was still in the truck... and we noticed something. 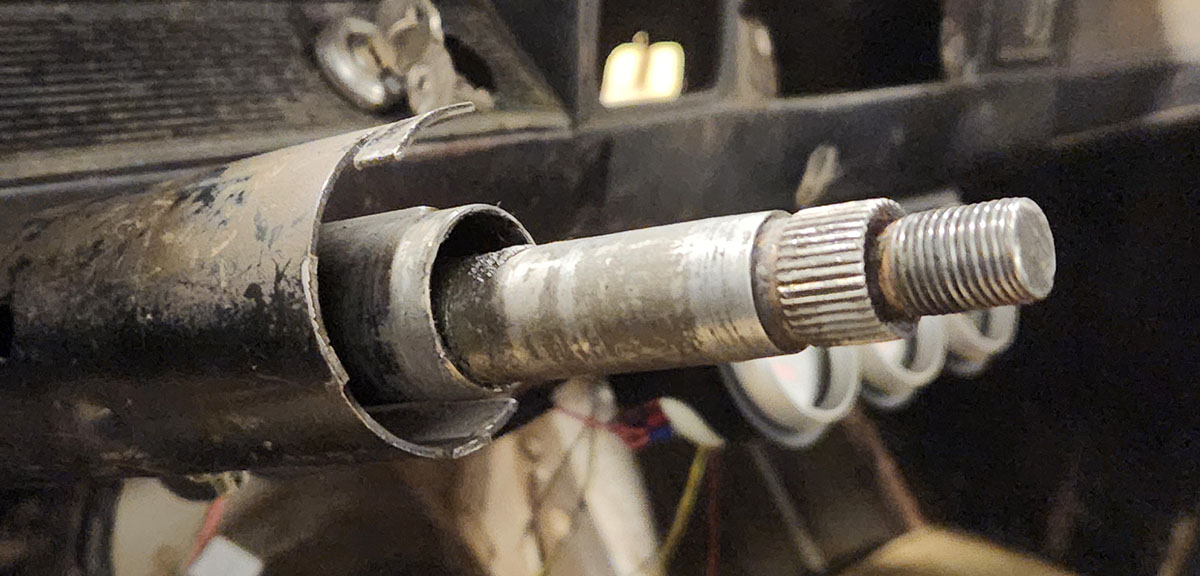
See that tab on the outer jacket? That's there to stop the collar with the directional signal lever on it from moving around. See the other two that go with it? No? Well, that's because they're not there. In fact, see the shinier bits of the edge? That's where they were, and it looks very much to me like someone cut them off on purpose. Why? I have no idea. Maybe it was part of fitting some earlier steering wheel mod or something. But, well, that'll be why that part of the column never seemed to work properly. Because it didn't! A look around various pickup forums revealed several threads of people asking about this same thing--apparently there was some now-forgotten fad that involved cutting those tabs off, or they just broke easily. Unfortunately, that part seems to be pretty much unobtanium. Nobody makes a repro of it that I could find, and even as a used part it's nowhere to be found unless you get lucky in a junkyard and find a complete column you can salvage. Which means we'll probably end up buying a whole new aftermarket steering column. On the plus side, every new-made retrofit column I can find for those trucks is modernized with useful features like tilt wheel and a collapsing center shaft (as opposed to the stock one, which is a solid metal spear connecting the left front frame rail to the driver's heart in the even of a forward impact). On the minus side, they're expensive, and to get them to work you have to buy a conversion kit that replaces the lower end of the works where they connect to the steering gearbox and another conversion kit to attach an aftermarket wheel. The latter, we were going to buy anyway. The rest of it is to the tune of $800–$1,000. So, uh, Dad needs a little time to absorb our new reality. I feel a little bad about that, since when we realized what was going on with the tabs I said, "Well, nothing for it, we'll have to buy a whole new one." I meant it as a joke, since I thought we'd be able to find just that outer jacket somewhere, but then the Schrödinger wave function collapsed and reality became "you can't get one of those". So now I kind of feel like a jerk. He'll get over it, though. Might already have, since we proceeded to take the old one completely out of the truck, and that was his idea. Ordering parts when you intended to reuse the old ones, as ever with this kind of project... --G.
-><-
Benjamin D. Hutchins, Co-Founder, Editor-in-Chief, & Forum Mod
Eyrie Productions, Unlimited http://www.eyrie-productions.com/
zgryphon at that email service Google has
Ceterum censeo Carthaginem esse delendam.
#14, RE: a mystery solved... at what cost?
Posted by Nova Floresca on Mar-16-26 at 08:57 AM
In response to message #13
I was going to joke that at the rate parts are going, you could buy a new truck for what you're putting into Angus, but looking at modern truck prices you really can't.Plus, if you bought a new truck, you'd be stuck driving a new truck, and those are all horrific. "This is probably a stupid question, but . . ."
#15, RE: a mystery solved... at what cost?
Posted by Gryphon on Mar-16-26 at 04:54 PM
In response to message #14
>I was going to joke that at the rate parts are going, you could buy a
>new truck for what you're putting into Angus, but looking at modern
>truck prices you really can't. Yeah, you do tend to get into kind of a "truck of Theseus" situation with builds like this. Heck, if we wanted we could buy a whole new cab instead of replacing just the rusty bits, and then about the only original things on there would be the frame and some of the suspension pieces. We're not going to, but we could. :) --G.
-><-
Benjamin D. Hutchins, Co-Founder, Editor-in-Chief, & Forum Mod
Eyrie Productions, Unlimited http://www.eyrie-productions.com/
zgryphon at that email service Google has
Ceterum censeo Carthaginem esse delendam.
#16, RE: a mystery solved... at what cost?
Posted by Spectrum on Mar-17-26 at 03:00 AM
In response to message #13
I'll ask a stupid question. It'd obviously be beyond me, but would it be possible to somehow fab new tabs and just weld them onto the column?
#18, RE: a mystery solved... at what cost?
Posted by Gryphon on Mar-17-26 at 04:06 PM
In response to message #16
>I'll ask a stupid question. It'd obviously be beyond me, but would it
>be possible to somehow fab new tabs and just weld them onto the
>column? In theory yes, but we don't have the tools or the skills for that. The metal is thin enough that it would take some pretty exacting welding to make the joints both neat and strong enough to work. --G.
-><-
Benjamin D. Hutchins, Co-Founder, Editor-in-Chief, & Forum Mod
Eyrie Productions, Unlimited http://www.eyrie-productions.com/
zgryphon at that email service Google has
Ceterum censeo Carthaginem esse delendam.
#17, RE: a mystery solved... at what cost?
Posted by MoonEyes on Mar-17-26 at 04:39 AM
In response to message #13
>On the plus side, every new-made retrofit column I can find for those trucks is modernized with useful features like tilt wheel and a collapsing center
>shaft (as opposed to the stock one, which is a solid metal spear connecting the left front frame rail to the driver's heart in the even of a forward impact).Making them, as with the Mini 1000,very popular in Third Dynasty Egypt for trepanation purposes?
...!
Stoke Mandeville, Esq & The
Victorian Ballsmiths
"Nobody Want Verdigris-
Covered Balls!"
#19, RE: a mystery solved... at what cost?
Posted by Gryphon on Mar-17-26 at 11:16 PM
In response to message #13
>He'll get over it, though. Might already have, since we proceeded to
>take the old one completely out of the truck, and that was his idea. Yup, he ordered one. In fact, he ordered an entire kit. It's probably going to take a while to get here. On the plus side, this cool retro steering wheel we ordered did arrive today. It's perfectly flat! The Superior Performance 500 that was on there when we got it is a great classic wheel, but it has a nearly-five-inch dish, meaning it reduces the wheel-to-ass clearance for the driver quite a bit. We could also address this with a smaller wheel, of course, but without power steering, you really need the moment arm of at least a 15-inch wheel to drive it comfortably, and power steering kits run close to a grand on their own if you need one with the pump and everything, so... that'll be a while. Besides, old pickups look weird with small steering wheels. It's just a thing. I haven't talked him into putting an appropriate shifter knob on there yet, but... I'll wear him down. --G.
deadbeats represent
-><-
Benjamin D. Hutchins, Co-Founder, Editor-in-Chief, & Forum Mod
Eyrie Productions, Unlimited http://www.eyrie-productions.com/
zgryphon at that email service Google has
Ceterum censeo Carthaginem esse delendam.
#20, RE: a mystery solved... at what cost?
Posted by MoonEyes on Mar-18-26 at 04:02 AM
In response to message #19
Just going to note that that site might be US-only or similar because "You don't have permission to access "www.oreillyauto.com/";in any sort of variation on this server."Just in case it happens to someone else and they're confused. Would not even let me go there through a Google search. ...!
Stoke Mandeville, Esq & The
Victorian Ballsmiths
"Nobody Want Verdigris-
Covered Balls!"
#21, RE: a mystery solved... at what cost?
Posted by Peter Eng on Mar-18-26 at 06:22 PM
In response to message #20
In case anybody else has similar issues:Chrome skull with red eyes. Peter Eng
--
Insert humorous comment here.
#22, RE: a mystery solved... at what cost?
Posted by Gryphon on Mar-18-26 at 07:05 PM
In response to message #20
>Just going to note that that site might be US-only or similar because
>"You don't have permission to access "www.oreillyauto.com/";in any sort
>of variation on this server." Huh. Weird. Anyway, it's this. 
--G.
-><-
Benjamin D. Hutchins, Co-Founder, Editor-in-Chief, & Forum Mod
Eyrie Productions, Unlimited http://www.eyrie-productions.com/
zgryphon at that email service Google has
Ceterum censeo Carthaginem esse delendam.
#23, session 18? I guess? that's what I'm calling it
Posted by Gryphon on Mar-26-26 at 01:25 AM
In response to message #0
The new steering column and associated parts have arrived!We took them up to the shop, unpacked them, inventoried all the bits, and got started test-fitting everything. First up: 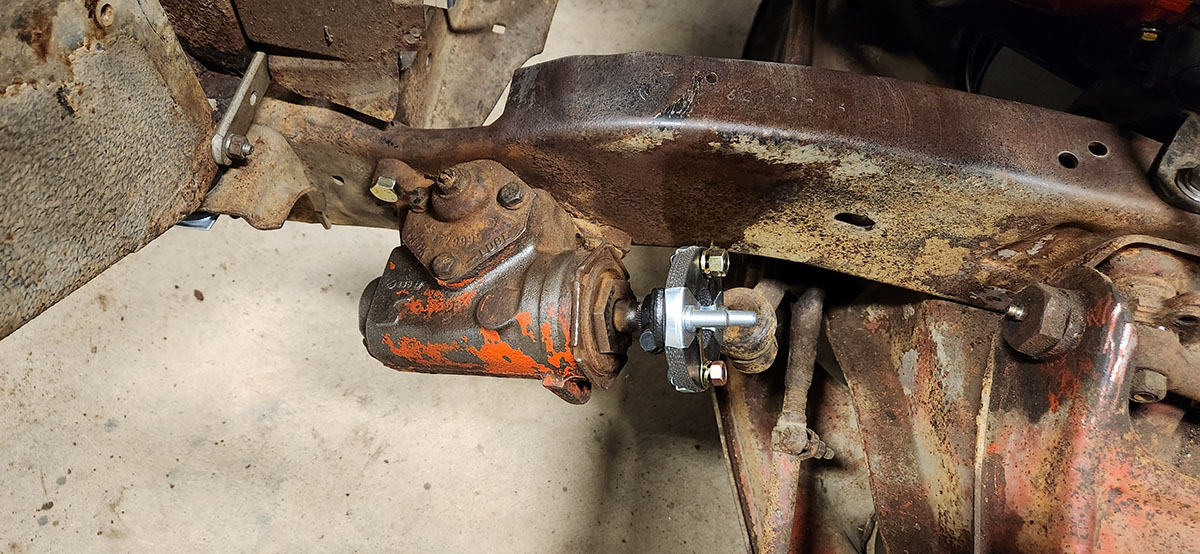
This is the flexible joint between the lower steering shaft and the gearbox. It's called, I kid you not, the "rag joint", I think because the flexible disc sandwiched between the two metal parts is made from what looks to be layers of rubberized fabric. Then we test-fit the upper column, to make sure it would line up correctly and all. Since this fancy new tilt column is wider at the steering wheel end, this has to be installed from the cab side out through the firewall. 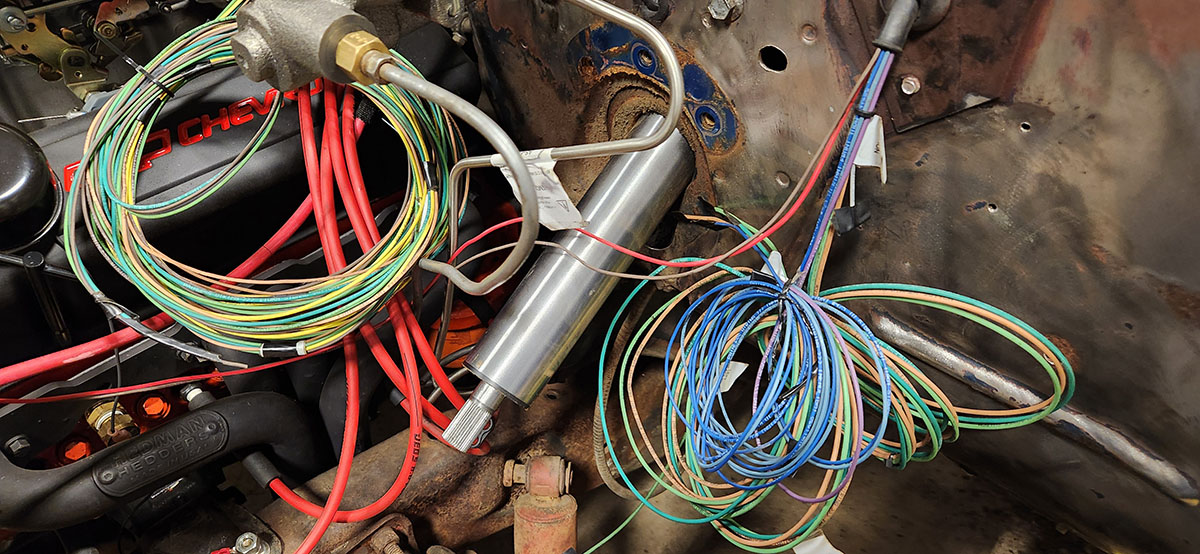
On the inside, the fit looks good: 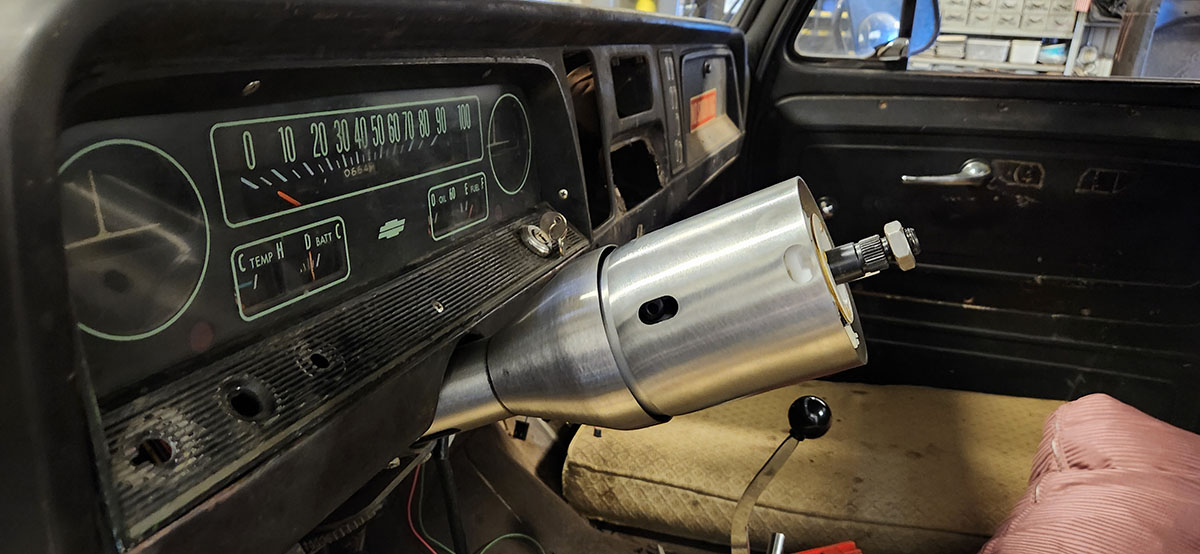
Following this, we put together a dry fit (just fitted together without tightening anything) of the lower end to make sure everything lined up and connected properly. 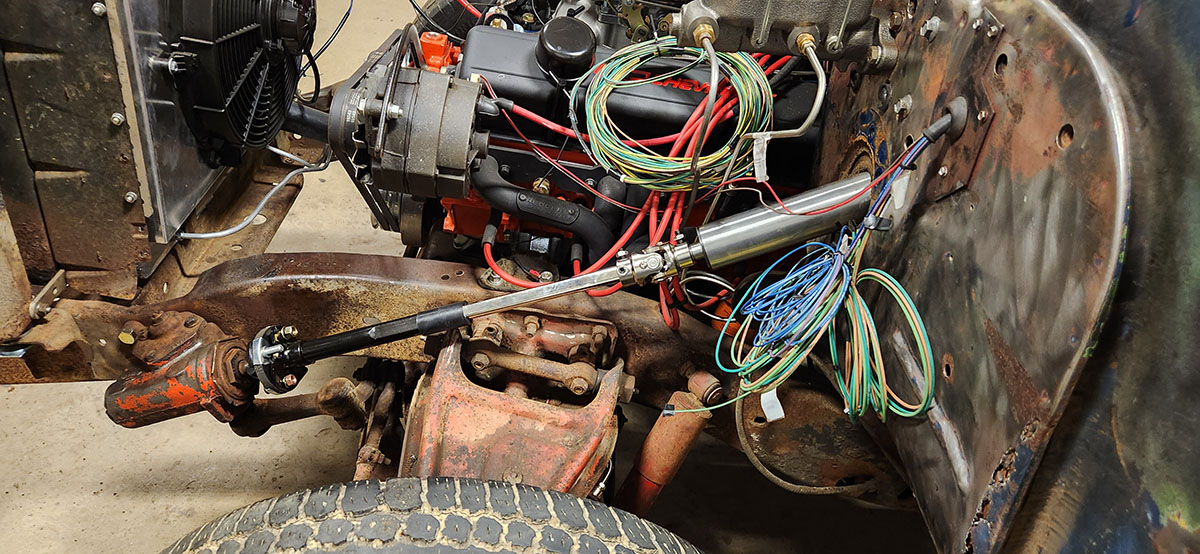
Looks good! This is a much-improved setup over the stock one, which was built around a one-piece shaft reaching all the way from the rag joint to the wheel. In this version we have, from left to right: - The gearbox. This is totally stock. There are kits available that adapt this to hydraulic power, or even totally replace the gearbox and associated levers with a modern rack-and-pinion system. Those are really expensive and a lot of work to install, so we probably won't be doing that any time soon. - The rag joint, as seen before. - The black section of the lower shaft is the part that's designed to collapse in the event of a collision, reducing the chances of the column impaling the driver. - The silvery lower shaft leads up to - A universal joint, which collects the lower shaft to the upper column and provides a little extra flexibility. - The upper column. It all looks good, so now we have to take the upper column out and paint it. As shipped, it's just brushed plain steel, which would rust pretty quickly in service. They can be bought painted, or even chrome-plated, but those versions cost a lot more than a can of paint. We don't have a paint booth, but we do have a chain hoist and some plastic sheeting. 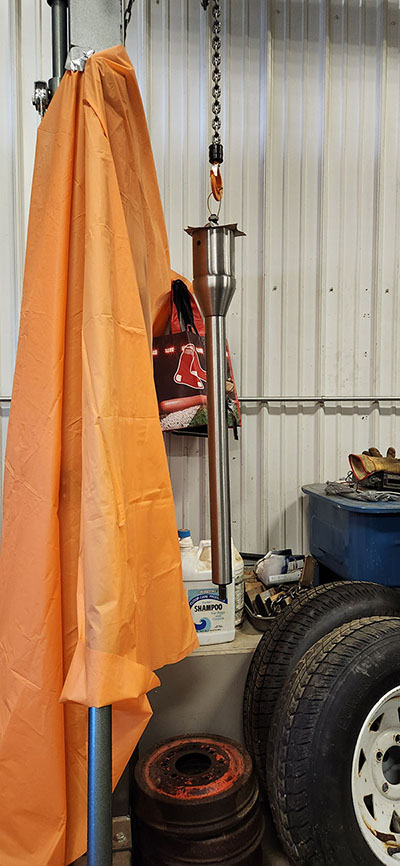
Hung up like a fish and ready to paint! 
A lick of Rust-Oleum and it's ready to go. Or it will be once the paint dries. I decided to go with white because we're planning to have the truck painted in the original medium-dark blue, and every photo I've seen of this model in that color had a white interior. Plus, I think it'll be a lot less Black Hole of Calcutta in there if we repaint the interior white, maybe with a body-color dash, instead of the all-over flat black it is now. At the last moment, we remembered that the cap for the end of the steering column in the steering wheel adapter kit we bought was black, so we painted that too. 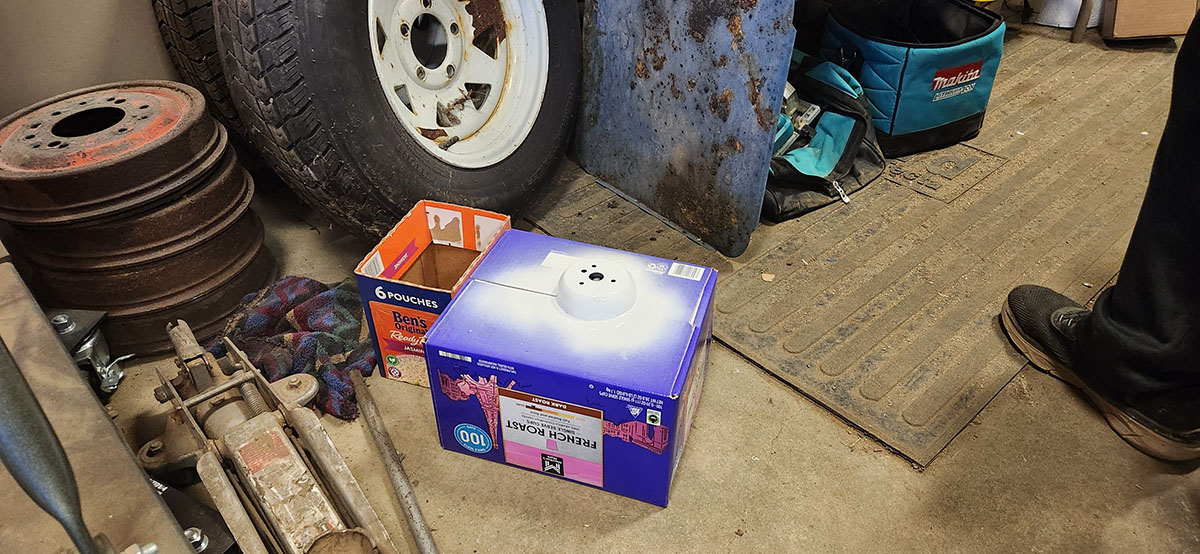
Next time, we should be able to put all this together and see how the new column and wheel fit. Which is pretty exciting! --G.
-><-
Benjamin D. Hutchins, Co-Founder, Editor-in-Chief, & Forum Mod
Eyrie Productions, Unlimited http://www.eyrie-productions.com/
zgryphon at that email service Google has
Ceterum censeo Carthaginem esse delendam.
#24, RE: session 18? I guess? that's what I'm calling it
Posted by Gryphon on Mar-26-26 at 01:28 AM
In response to message #23
Oh yeah, I forgot to mention: the lower shaft doesn't need to be painted because it's not plain steel like the upper column--it's actually nickel-plated.--G.
-><-
Benjamin D. Hutchins, Co-Founder, Editor-in-Chief, & Forum Mod
Eyrie Productions, Unlimited http://www.eyrie-productions.com/
zgryphon at that email service Google has
Ceterum censeo Carthaginem esse delendam.
#25, RE: session 18? I guess? that's what I'm calling it
Posted by Gryphon on Mar-31-26 at 09:01 PM
In response to message #23
The new steering column and wheel are officially in!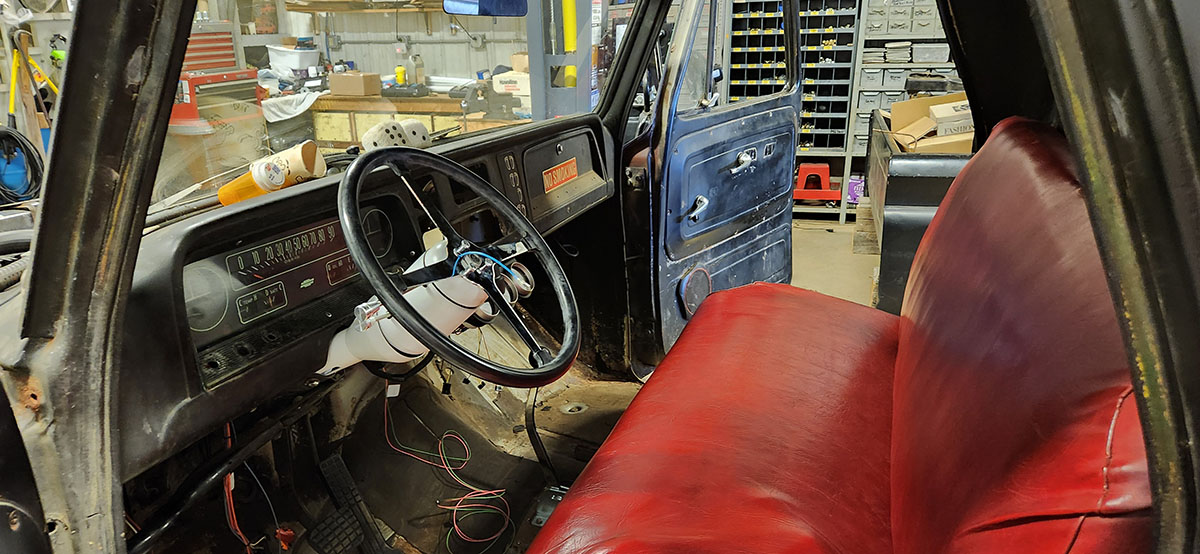
I think that flat wheel looks very cool. Even though it doesn't really look much like the stock wheel, I feel like it fits the truck's overall style really well. The Superior Performance "500" wheel that was in it when we bought it is an absolute classic, but it's got a little too much of the hot-rod style for the kind of restomod we're building now, and its extreme 4½" dish takes up a lot of real estate in that relatively cramped cab. As noted earlier, that white column will look less out of place once the whole interior's been repainted to match. The seat will most likely be blue at that point, to go with the blue exterior we have planned. It's gonna be sweet! Next up, it's probably time to put the bed back on the rear so we can do the wiring back there and figure out how we're going to handle access to the new gas tank location. By then the weather should be warm enough that we'll be able to open the big door and run the engine without either freezing or setting off the carbon monoxide alarm. Might even be able to go out and jalopy the rig around the yard some! We'll see. Our next session probably won't be until next week, on account of we're currently forecast to receive eight straight days of frozen mix, freezing rain, and other such bullshit. Maine: the economy is terrible, but at least the weather is bad! --G.
-><-
Benjamin D. Hutchins, Co-Founder, Editor-in-Chief, & Forum Mod
Eyrie Productions, Unlimited http://www.eyrie-productions.com/
zgryphon at that email service Google has
Ceterum censeo Carthaginem esse delendam.
#26, RE: session 18? I guess? that's what I'm calling it
Posted by dbrandon on Apr-01-26 at 08:09 AM
In response to message #25
In other, completely irrelevant news, I think you're the only person I've ever seen use "jalopy" as a verb. I'm going to spend way too much time chasing that rabbit hole this morning.--
dbrandon
#27, RE: session 18? I guess? that's what I'm calling it
Posted by Zemyla on Apr-03-26 at 07:18 PM
In response to message #26
Verbing weirds language....I like it weird.
|