LAST EDITED ON Apr-14-19 AT 06:18 PM (EDT)
Session 1: April 13, 2019Fair warning up front: This session was mostly reconnaissance and strategizing, and nothing particularly exciting happened. I'm going to note it down anyway, just for the sake of keeping a record.
The first order of business was to actually find the car under the mass of empty boxes and random garage kibble that it had accreted over the years. After diligent excavation, we found the driver's side.
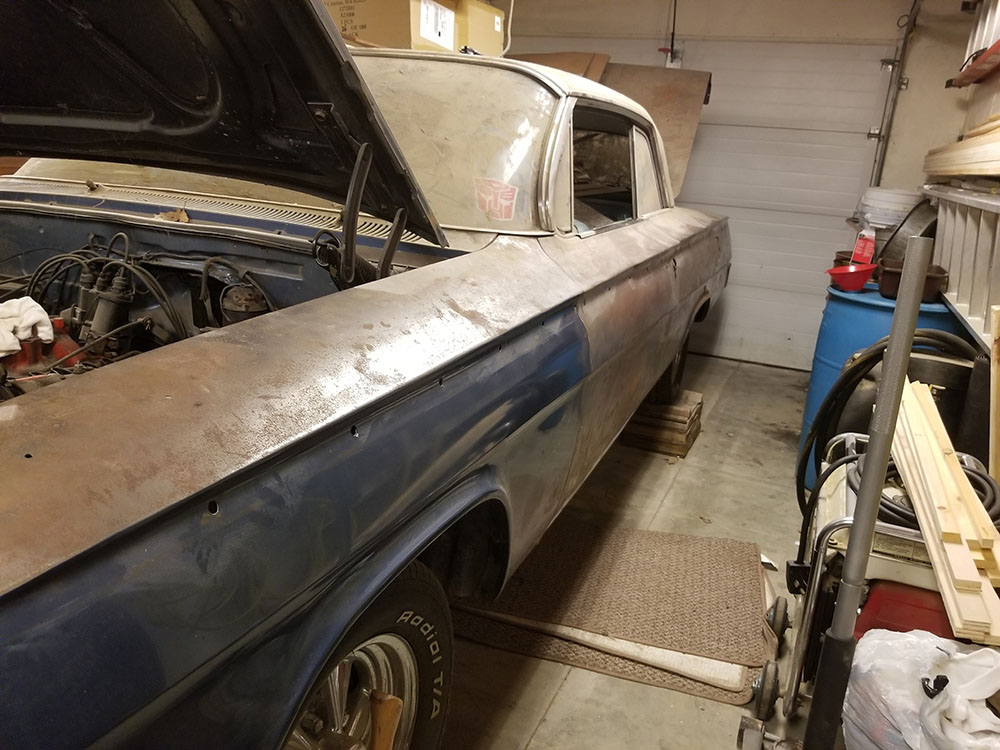
Fig. A Hopefully, we won't need the generator.
Just as a reminder, this is what the driver's side looked like when I first bought the car.
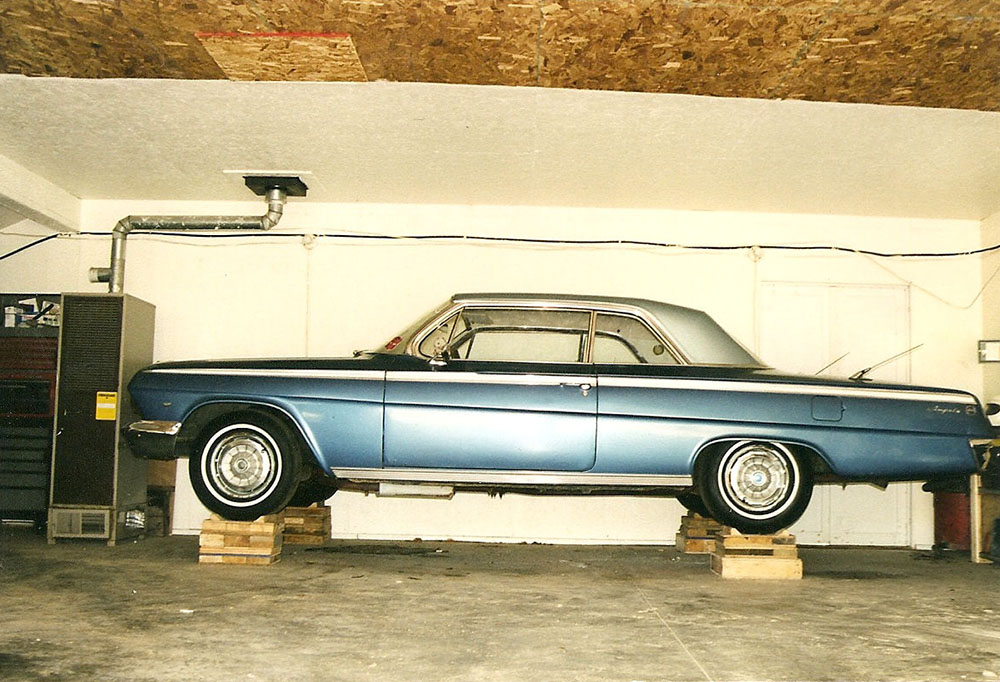
Fig. B Also, look how empty Dad's garage was back then!
As you can see, there was nothing wrong with the driver's side. Dad stripped it anyway, thinking there might be damage and/or shoddy repairs hidden under the paint. If you will refer back to the first photo, you might be able to see (despite the bad camera angle) that there wasn't. So, there's that.
Meanwhile, on the passenger side, things are about like they were last time.

Fig. C Yes, there are still some boxes, it's a work in progress.
This side did have a bit of repaired damage, although in that shot I've cleverly positioned the door cards to hide it. The right rear fender area looks to have been hit and sort of haphazardly straightened at some point; it looked fine with paint on it, but there was a lot of Bondo* smoothing out a panel that was probably crumpled and then only approximately straightened.
Unfortunately, that part of the car is not as easily replaced as, say, a front outer fender. Front fenders are just bolted on; the rear ones are part of the car's main body, along with the roof, cabin bulkheads and firewall, front inner fenders (i.e., the sides of the engine compartment), and so on, which is all welded together from four or five pieces at the factory. So to replace that part, we'd have to buy the appropriate reproduction panel(s), then cut the old ones off, weld on the new ones, sand down and fill the seams, and repaint. Or, well, we'd have to have a body shop do that, because we don't have the tools or the skills for auto body welding. The replacement panels themselves are not hideously expensive—they range from around $100 to $300, depending on how big and complicated they are—but the labor is likely to go high. So, we're not sure if we're going to do that yet, or just try to make what's already there as good as we can.
Of more immediate note is the one—and only one, which is surprising for a car of this vintage in Maine—patch of serious rust on the car. This is in the floor on the passenger side in front, just in front of where the seat rails are mounted. Somehow, and we're not sure how, that corner of the cabin got wet enough and stayed that way long enough to rust holes in the floor, the inner rocker panel (the piece of the body that goes along the bottom of the door opening on the inside), and that end of the under-body crossbrace that runs athwartships just in front of the seats. There's also a bit of damage to the outer rocker panel, though it isn't rusted through, and the bottom edge of the door on that side.
Again, this is not going to be prohibitively costly to fix, but it will take some work. The most involved part will be replacing the crossbrace, since it goes all the way across the underside of the car and is still sound on the driver's-side end. It looks like four replacement pieces will be needed, plus the labor to cut out and replace the old ones. The good part there is that except for the outer rocker panel, all of these pieces are where no one can see them, so they don't need to be fitted as exactingly as outer skin panels would.
This damage is more significant than whatever happened to the rear fender because it would cause the car to fail a safety inspection. You can't be driving around with a hole in the floor. Besides, once a panel like that starts to go, it's like a Southeast Asian country falling to Communism—the others are sure to follow shortly and you have to nip the whole situation in the bud as soon as you can.
After assessing the condition of the body, we moved on to the interior. I didn't take any photos of that because it's still full of stuff, although in this case it's not random boxes and junk from the garage like were piled on the outside; it's other parts of the car, like the exterior trim, the carpets (which had to be taken up to assess the state of the floor), and so on. It's also filthy and full of sawdust, because the car has been sitting with its windows open for 19 years in a garage where Dad does carpentry projects. Apart from that, though, it doesn't seem to be in too bad a shape, besides the door cards.
1962 Impala door cards, like those found in most cars of the period, were made by wrapping upholstery around a piece of stiff fiberboard (basically really heavy cardboard), stapling it at the edges, and then adding bits of chrome trim, maybe some decorative stitching, and what the industry calls windlace, but which the rest of us would probably think of as weather stripping. This is then clipped to the inside of the door and the various inner bits (arm rests, latch handles, door glass regulator handles**, and so on) are installed.
The upholstery and chrome on this Impala's door cards are in decent shape, but as you can see in the photo above, their inner boards are pretty rough. They got wet at some point (the passenger side worse than the driver, which makes sense given the state of the floor and rocker panel on that side), and like I said, that stuff is basically just thick cardboard. When it gets wet, it swells and loses most of its structural integrity, which it then does not recover when it dries.
Annoyingly, you can buy complete replacement door cards, or replacement skins for door cards, from various places online (complete replacements are around $400 for the set), but I couldn't find anywhere that sold just the cards. Of course, the cards are a reasonably simple shape, so it's presumably possible to make your own replacements without too much trouble. I think what we should do is take the old ones to someplace like a glass shop and have them copied in something like heavy Plexiglas, then glue the old skins to that. Let's see water damage that. We also need to source new windlace and such, which should be possible.
Beyond that, the passenger side of the front seat has the same split in it that was there when I bought the car, but the rest of the upholstery should clean up decently. Apart from maybe putting a seat cover on there, I don't see where we need to do much to the rest apart from clean it. Of course, that may not be as easy as I would hope. For instance, the headliner is pretty grubby. It's still in good physical shape, not sagging or torn like a lot of vintage headliners get after a while, so I really don't want to try and replace it.
In terms of interior modifications, the car has a cassette player someone installed, probably in the '80s or early '90s, in place of the original radio, although the person who installed it took the interesting step of putting the stock knobs on it. (They are thus all that remains of the stock radio, which was not with the car when I bought it.) I'd like to replace that with one of those modern units that look like the stock radio but due Bluetooth or something, but that's not part of the current project. Nor is adding air conditioning, which the car did not come from the factory with (that was pretty rare and expensive in 1962, and didn't work very well anyway). There are kits that can add good modern AC with an original look to cars like that, and again I'd like to have one in there sometime, but they're quite expensive and we're not looking at that now.
Right now, the car has an aftermarket steering wheel in it; we do have the original wheel and it's in good shape, so that may go back in.
With the structural and cosmetic assessments finished, we moved on to the mechanicals. This car did run when I bought it; it was delivered to my mother's home by the dealer, and then my father went and drove it to his house from there. The engine in it is a 283-cubic-inch small-block V8, which is what it would have had from the factory, although oddly it's not the same 283 it left Detroit with. At some point it was replaced with one from, according to the casting number on the block, a 1966 Chevelle. No telling why nowadays, but there it is.
Another interesting thing turned up by a casting number investigation is that the cylinder heads that are on it are not original to that engine either. They were manufactured in the early '70s, and the production run they came from were sold to dealer service departments to be used in a modernization program GM was offering on their cars at the time. If you had a car from before the introduction of unleaded gas, you could have a dealer install a new set of cylinder heads with hardened valve seats so that your car could burn it without ruining the valves. I assume this service was not offered for free, as a recall or warranty matter, but it appears whoever owned this particular Impala took them up on it anyway.
Anyway, Dad reported that while the car did run, it didn't run very well, and he thought we should start the mechanical overhaul by either replacing the carburetor or having it rebuilt. The default 283 in Chevrolet passenger cars at the time came with a two-barrel carb made by GM's Rochester division—not a spectacular piece of performance hardware, but adequate for the relatively mild version of the engine used in that application.
We spent a couple of hours kicking around options and looking up what they would cost on the Internet. Do we get a nice medium-grade four-barrel for it and see about upping the horsepower? Do we buy a new(ly reconditioned) replacement of the same type? Should we send the existing one away to be rebuilt? Should we buy a rebuild kit and try to rebuild it ourselves? Should we stick the one really-too-big-for-a-283 four-barrel we already have on it and see if we can detune it to the point where it works? So many options.
(They make drop-on electronic fuel injection kits for these cars nowadays, but once again they're about a $1,500 proposition, plus you have to replace the fuel pump and do a bunch of wiring. So, not today, I think.)
Eventually we decided to pull the old carb off and take it apart, see if we could assess its condition, and find out if it would be worth trying to rebuild it ourselves—by far the cheapest option. And this leads us into an enduring lesson of working on these old automobiles.
Mechanically, structurally, and electrically (especially electrically), American cars of the 1960s are vastly simpler than their modern descendants, but that can lead people into a false sense of security. Simpler doesn't necessarily mean easier, and the sheer age of these cars now, plus the number of hands they will necessarily have passed through in that time, means that each one presents unique challenges that are hard to anticipate.
For instance: The carburetor on small-block Chevy V8s is affixed to the top of the intake manifold by four threaded studs. These studs have a coarse thread at one end and a fine thread at the other, and are screwed into the carb flange on the top of the manifold with the coarse end. The carb is then put in place with four holes on its corresponding flange over the studs to locate it, and secured in place with four nuts. It's a clever design, because it means if you break one of the studs you haven't just ruined the whole intake manifold; with the right tools, you can unscrew the broken stud and replace it.
The carburetor on this small-block Chevy V8 was secured by three nuts and... a bolt. Where the righthand front stud and nut should have been, there was just the head of a hex bolt. Moreover, it was a slightly larger hex bolt than the 1/2" nuts on the three remaining studs. After some experimenting (and some cursing), Dad discovered that it was in fact a thirteen-millimeter bolt. (One-half inch is about 12.7 millimeters, for those of you keeping score at home.) Evidently, someone broke that stud, removed what was left of it, and didn't have a suitable replacement on hand. Why a 13mm bolt I don't know, but it came out with very shiny threads of a slightly different pitch than those remaining on the length that hadn't been screwed into the manifold. It must have taken considerable force to screw it in there.
We really, really didn't want to take that manifold off the engine. It's a pain in the butt.
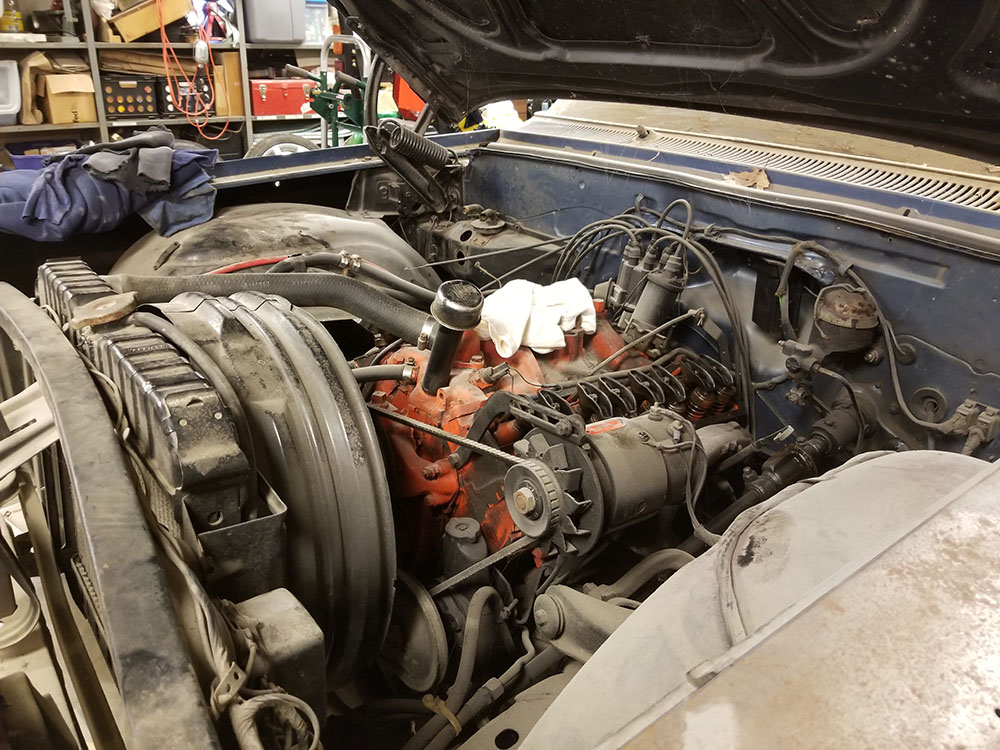
Fig. D You might say we were feeling manifold pressure. I'm not sorry.
The intake manifold is that orange part on top of the engine, between the cylinder heads. Replacing it with the engine in the car is possible, but really annoying.
(Note the white cloth. It's covering the carburetor flange, and thus the opening in the manifold where the fuel and air flow into it from the carb. Important shop tip: Whenever you take the carb off one of these engines, you should always stuff a cloth in there, so you can't accidentally drop, say, one of the stud nuts in there. Engines don't run on nuts.)
So, being unwilling to screw the 13mm bolt back in there, we had to find another stud, and hope the incorrect bolt hadn't damaged the threads in the manifold. Fortunately, Dad had a random other 2-barrel small-block manifold off an engine he junked years ago. When he dug it out of the parts room, we found that some previous owner of that one had broken the same stud and replaced it, in this case, with a length of all-thread rod. They must have had to remember to use a coarse thread nut on that one, but otherwise, a more elegant solution than the 13mm bolt idea. We removed one of the normal studs from that manifold and screwed it into the one on the car, and it seemed to go in fine; evidently swaging that 13mm bolt's threads to suit it hadn't bothered the hole any. Sometimes you get the elevator, as they say.
With that little sidetrack out of the way (time spent identifying and solving that unexpected problem: maybe an hour), we took the carb over to the bench and took it apart.
A Rochester 2GV two-barrel carburetor is not a particularly sophisticated piece of performance equipment, but it is still a surprisingly complicated and clever little machine. Basically, its job is to draw in air, mix it with atomized fuel, and spray it into the intake manifold, where the valve train can do the job of distributing it to the cylinders for burning. It has to do this very precisely, and the conditions under which it operates change all the time, so it also has to be able to react to those changes and adjust what it's doing.
Early carbs couldn't do any of that and had to be fiddled with manually all the time—most cars in the '30s, for instance, had manual mixture controls and spark advance-and-retard controls and all sorts in the cockpit, for the driver to manage the operation of the top end of the engine by hand and ear. The big aviation engines of the '40s took so much managing that most multi-engined aircraft had a crewman whose principal job in flight was making sure the carbs were working properly. By the '60s, however, even a humble everyday sedan engine's carb like the 2GV could manage most of that stuff by itself. Most of the time.
In internal function, an automotive carb resembles nothing so much as, weirdly enough, a flush toilet. It has a reservoir very like a toilet's tank, complete with a float valve that opens to admit fresh fuel when it's empty, and another valve that lets it out in response to a call from the throttle. Toilets aren't designed to aerate the water and deliver it as a spray through a set of Venturi nozzles, of course, but the feed mechanism is strikingly similar.
I mention all of this A, because I think it's interesting, and B, because upon dismantling the Impala's carb, we discovered that the filter basket between the fuel input and the rest of the works, the bottom of the reservoir (properly known as a "float bowl"), and the channel from there to the delivery jets were all choked with a very fine orange powder.
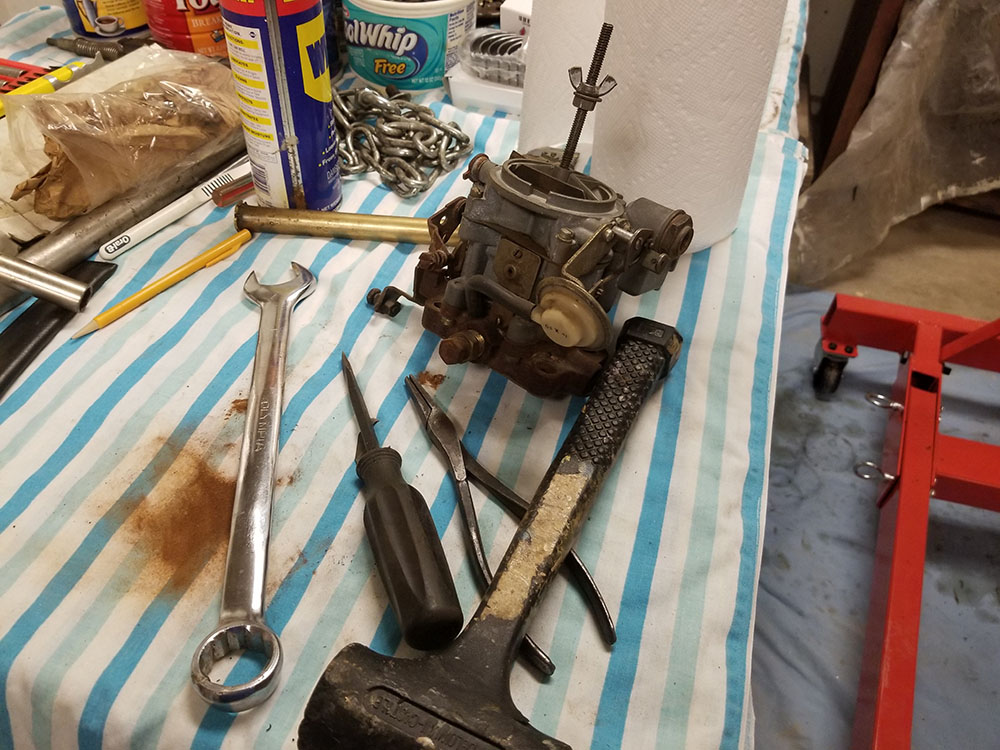
Fig. E CARB FOR THE CARB GOD
You can see a bunch of it in a pile on the table there, by the wrench, after we put the carb back together. That's very fine dried rust.
As they used to say on Mythbusters, "Well, there's yer problem."
The rest of the carb seemed to be in good shape. Sometimes the floats degrade and don't float properly any more, or the passages to the jets, or what have you, but the float in ours seems fine. A bath in carb cleaner and a blow-out with compressed air, and we figure it should be good to go, so when I got home I ordered a rebuild kit (fresh gaskets, new needle jets, etc.) for it. Next session, we'll give rebuilding it ourselves a shot. If it works, we spent $30 instead of a minimum of $200. If not, we're only out an extra $30. It seems worth a try to me.
This, though, is another example of how one thing can lead you to another with these cars. Carburetors aren't made of something that rusts, so it didn't come from the float itself. Fuel lines, likewise, are not made from ferrous metal (the feed line in the Impala seems to be copper, but it's probably a homemade replacement; the stock ones were usually rubber). This means that the rust blocking the fuel filter and piled up in the float bowl must have come from the fuel tank.
When fuel tanks rust out, they usually do so from the outside. They're just slung there underneath the car where the road salt and crap can get at them all the time, after all. Sometimes, though, they get rusty on the inside. Gasoline isn't particularly corrosive, but if it's left long enough, it can decay into substances that are. More often, though, it happens because weather conditions cause moisture in the air on top of the fuel to condense on the inside walls of the tank. This is something you don't want for several reasons, most prominently that gasoline with water in it doesn't burn very well, but also because over time it can cause rust scale to build up on the inside of the tank. That's probably what happened to this one.
So now we have a couple of choices. We can take the existing tank somewhere and try to get it cleaned out. Sometimes radiator places can boil out tanks the same way they boil the crud out of the inside of old radiators. We could try to clean it out ourselves, although that would involve playing with chemicals I'd really rather not get involved in. Or we can fork out between $100 and $200 and just put in a new one. I'm leaning toward option C, but we'll see how it goes.
For now, the carb rebuild kit and a good reference book on Rochester carbs are on their way. Next time, we'll rebuild it and put it on, at which point we'll have to tackle the fuel tank problem before we can find out whether it helped.
I was kind of hoping we'd be able to get the car at least nominally running in session 1, but that was always a pretty ambitious hope. For the reasons explored above (and almost certainly others we'll run into along the way), these things always, always take way longer and cost more than you thought they would when you started.
But! After 19 years, we're on the way. We've done a bunch of investigative and diagnostic work, researched what we'll need to do to fix problems we've found, and generally made a start. It's nice to be under way.
--G.
* other auto body fillers are available
** with apologies to Nick Moran
-><-
Benjamin D. Hutchins, Co-Founder, Editor-in-Chief, & Forum Mod
Eyrie Productions, Unlimited http://www.eyrie-productions.com/
zgryphon at that email service Google has
Ceterum censeo Carthaginem esse delendam.

 Printer-friendly copy


