LAST EDITED ON May-13-19 AT 08:36 PM (EDT)
Session 5: May 12, 2019
or, The Truth About Old CarsWhen last we left the Project Impala Technology Center, our heroes were about a quarter of the way through the Before Startup Checklist:
- Install an Oil Pressure Gauge
- Change the Motor Oil & Filter
- Install the Gas Tank and Plumbing
- Bring Up the Oil Absorbant [sic]
- Install the Heater Coil [sic]
- Install New Heater Hoses
- Fill the Coolant System
It's only seven items because Dad vetoed my proposals to include things like "Find the Key to the Car" and "Open Garage Door" on the list.
Anyway, when we reconvened, we decided to crack on toward getting the engine started before we tackled the huge and vaguely intimidating job of completely rebuilding the braking system.
While I was out, Dad rearranged and tidied up the work area a bit, partly in anticipation of the aforementioned brake work.
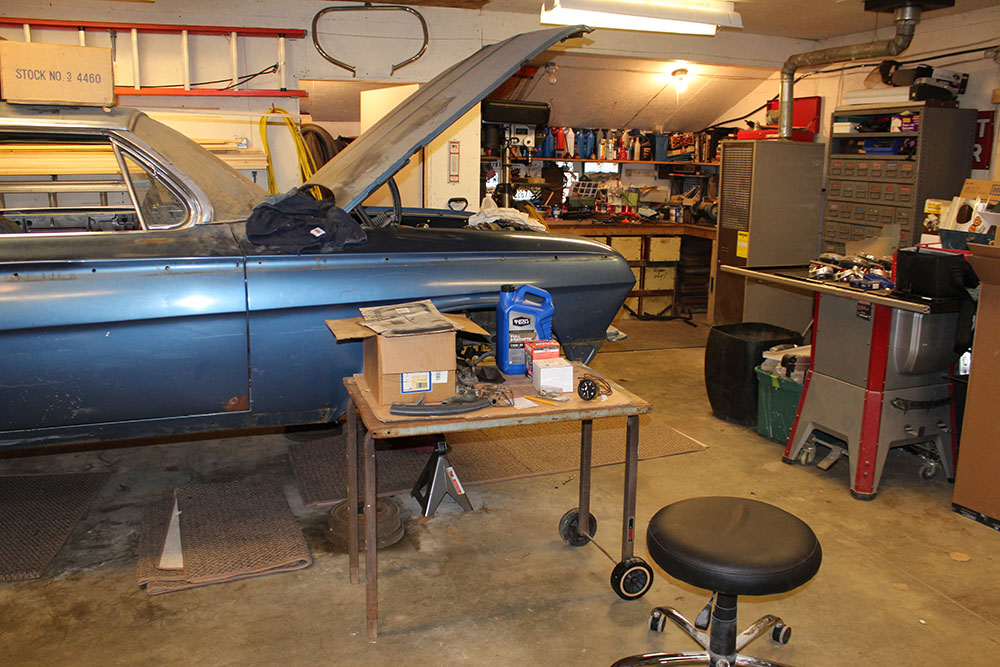
Fig. A be it ever so humble
Note the work cart, cunningly made from the carriage of an old barbecue grill and a piece of disused metal shelving that used to be part of one of Great Northern Paper's mills.
That door beyond the car leads to a storeroom. I keep having an urge to get some stencils and paint FUEL STORAGE on the wall next to it. (Double punchline: the oil tank for the furnace is in there, so it partially is for fuel storage. Mostly it's full of old engine parts and random stuff, though.)
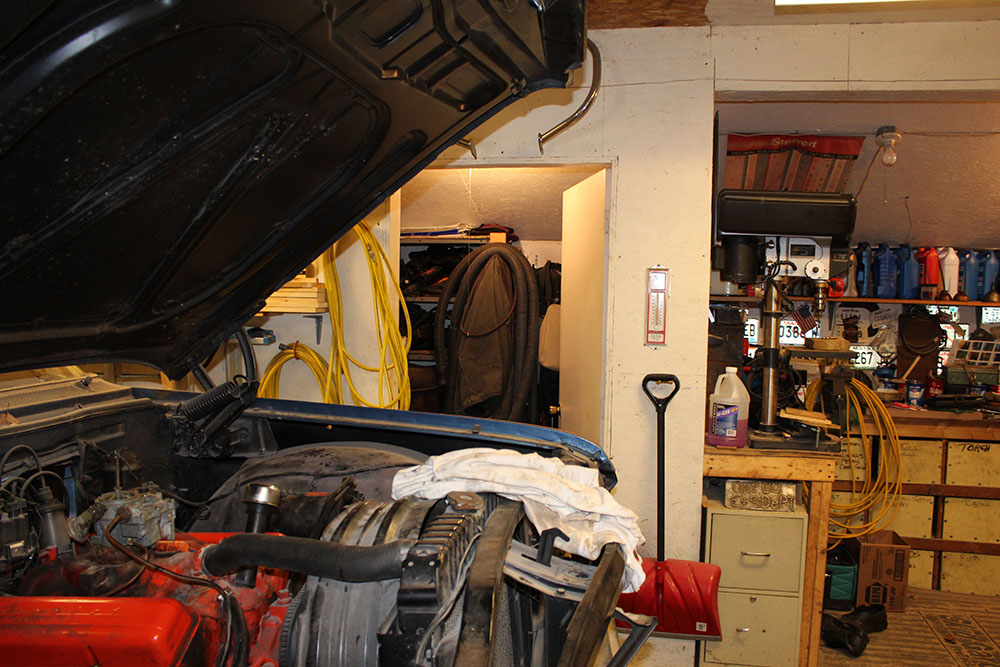
Fig. B FUEL STORAGE
Our first order of business was to get the cooling system back into operation, which meant reinstalling the cabin heater. Right away, we ran into this session's manifestation of the It's Always Something phenomenon, which we really should have anticipated. Remember last time, when we had to modify the mounting plate for the heater core so the pipes would fit? That ought to have clued us in that the replacement heater core wasn't quite made to the correct specifications.
It started out promisingly enough. During the downtime between sessions, Dad cleaned up and repainted the heater core enclosure, which is mounted on the passenger compartment side of the firewall, up under the dash.

Fig. C Shiny!
He also painted the plate we modified last time, and the first thing to do was attach the core to said plate with the two little bronze brackets provided for that purpose.
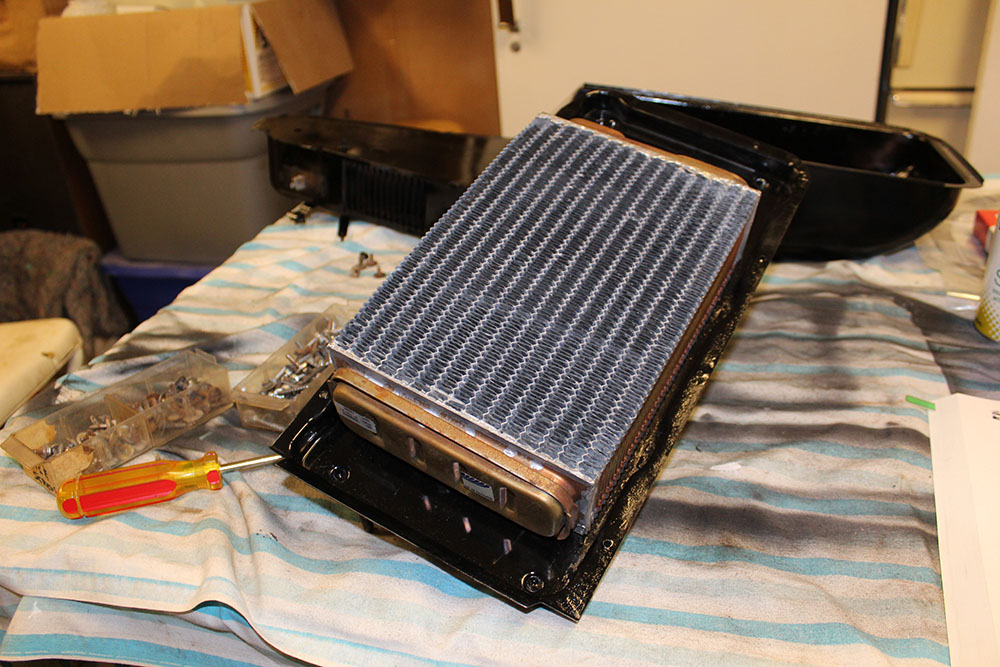
Fig. D Heater core mounted on plate. Note bracket/strap over end tank.
In this photo, you can see one of the straps holding down one of the core's two end tanks; there's one at the other end as well. Each is held to the plate with a pair of screws that come through from the other side, points toward the tanks. This is a potential problem if, like us, you find yourself scrounging up new screws from a huge bin full of random fasteners, having long since lost the originals. If the screws you pick are too long, you can end up screwing them straight through the plate and bracket and into the tank, which is bad.
However, this problem was easily averted through the use of Vise-Grips® (other locking pliers are available) and a bench grinder.
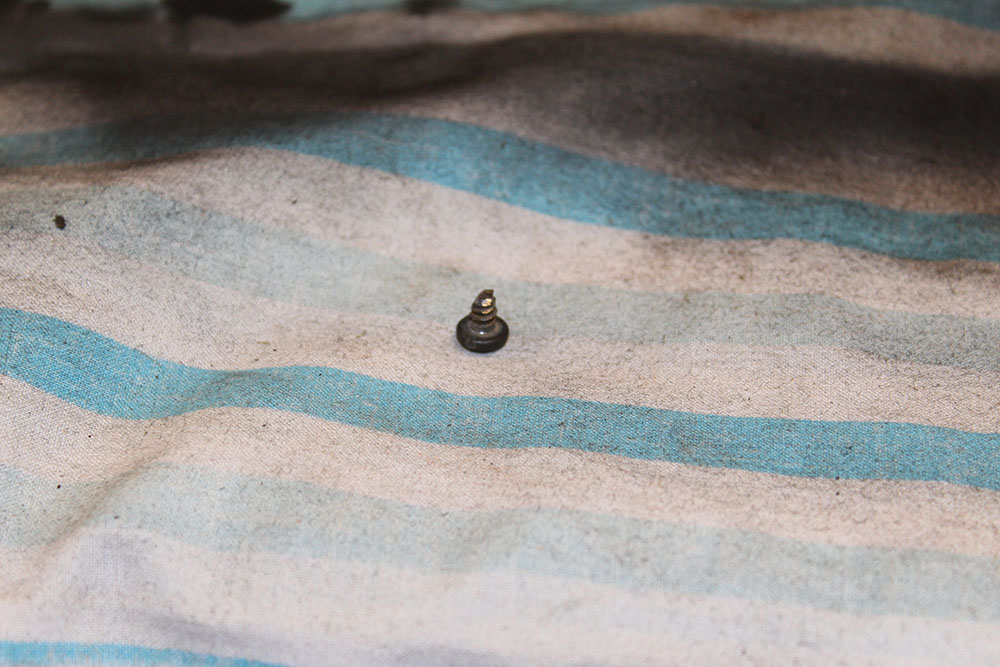
Fig. E Yeah, yeah, I'm a short screw. Go ahead and laugh.
Once the brackets were secured, the only job remaining was to put the core into the box, add a couple of fresh foam gaskets, and pop the unit back onto the firewall, where the threaded studs on the front surface would come out into the engine compartment, through another box on that side (where lives the control valve, about which more in a moment), and secure the nuts. Easy!
Well, it looks easy in the assembly manual, anyway...
First problem:
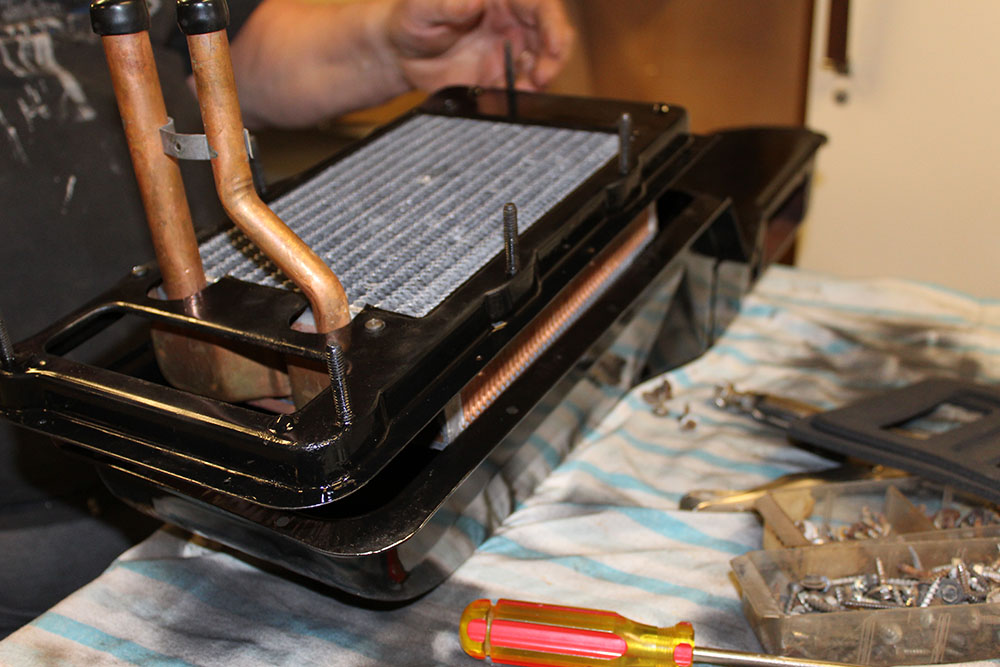
Fig. F Nope. Nuh-uh.
According to the specs, the heater core in this model car is nine inches long by six and a half inches wide by two inches tall. When it wouldn't go into the box, we measured the one we have. It's nine by six and nine-sixteenths by two and a half. One sixteenth of an inch too wide. (For those of you in the French-speaking world, that's about 1.6 mm, or slightly less than 0.000005 Eiffel Towers.)
This left us with an interesting structural problem, because while widening the box wouldn't be too hard, we still had to be able to screw the cover plate onto it, which meant we had to widen the enclosure without widening the opening and then figure out how to get the core into it without a wider opening. This took a couple of pieces of sturdy hardwood, a deadblow hammer, and a bit of swearing...
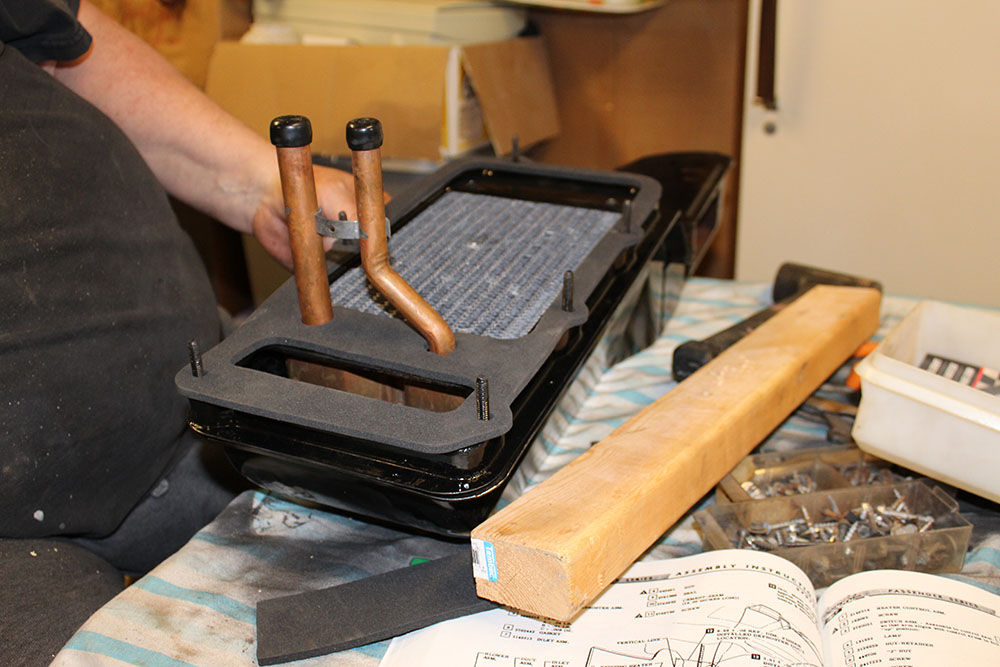
Fig. G And they said it couldn't be done.
... but lo, the task was accomplished. (Note the gasket. There's another one like it that goes between the firewall and the outer box, which meant we had to take that box off too, which we were really hoping not to do, but that's life.)
There are no photos of the next part, because we were too busy shoving and cursing and hurting ourselves. Like I said before, in the assembly manual the installation of this setup in the car looks really simple--just put the outer box on the engine side of the firewall, make sure the stud holes are lined up, pop the inner box on the cabin side so that the studs and the pipes come through the holes, put on the nuts, hook up the hoses, and you're away.
The thing is, after doing it, we're pretty sure that the guys in Tarrytown who had to do this in 1961 were doing it before the interior or the engine were in the car. If you have someone standing where the engine should be, and someone else inside without seats and a dash and stuff to work around, it probably isreally easy. If you've got one person squashed into the passenger side leghole and the other trying to reach over the fenders and past the engine... not so much!
Still, we did eventually get it done.
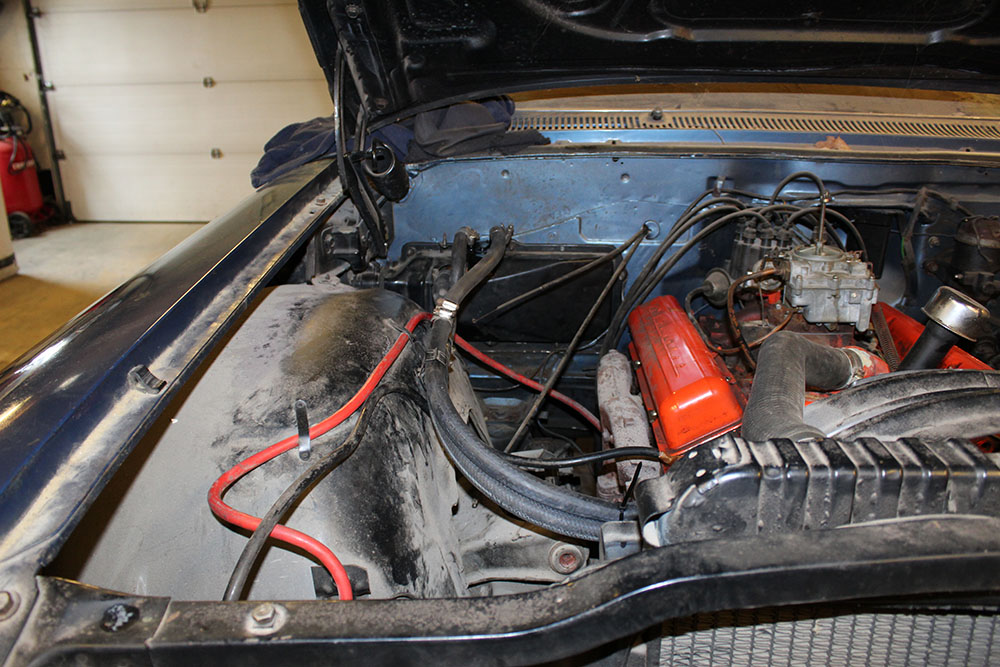
Fig. H Imagine how much more complicated this would be with 1960s air conditioning.
That black box with the hoses going to it is the engine side of the heater core enclosure, with the new control valve on top. The hoses look a little confusing, but basically, you've got a 5/8-inch hose going from the engine thermostat to the core, another 5/8-inch hose from the core to the input side of the control valve, and then a 3/4-inch hose going from the output side of the valve back to the water pump on the front of the engine. The valve acts as a bypass; when it's open, hot coolant goes into one side of the heater core and comes immediately back out again, up through the valve out the exhaust side; whereas if it's closed, the coolant has to go all the way through the core before it can get to the exhaust side of the valve and be sent back to the engine.
(Note: The red line you can see in this photo is not a hose, but in fact the positive or "hot" battery cable, which runs down to the starter solenoid. The black cable that runs next to it along the inner fender is the negative or battery ground, which is bolted straight to the engine block there on the right side. This is what we in the industry call "foreshadowing".)
There isn't a great camera angle to get a picture of the interior enclosure from, but I gave it a shot anyway.
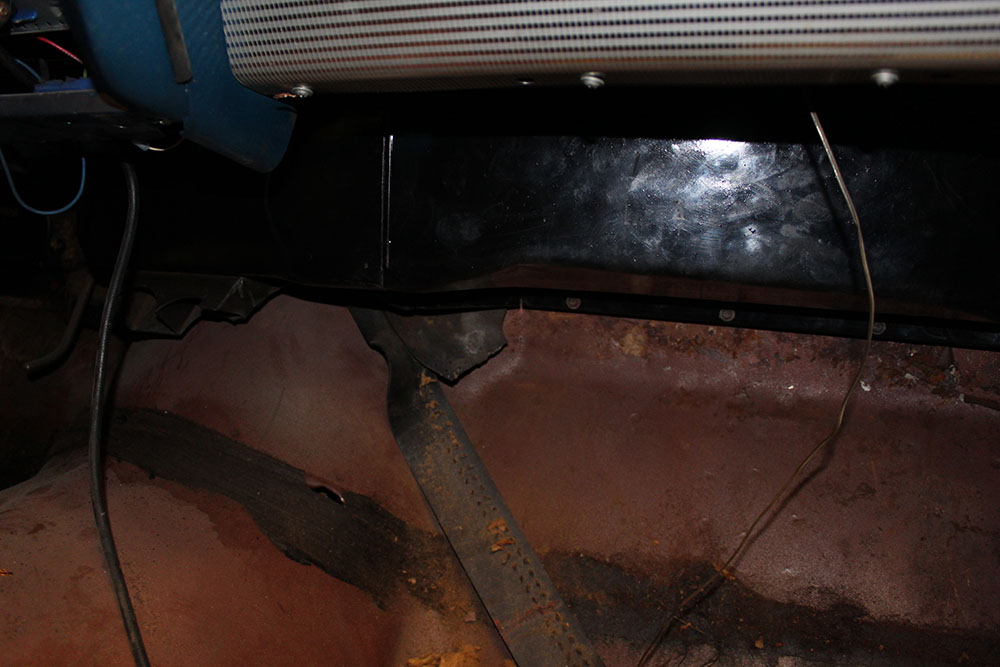
Fig. I It's like one of those "what is this a photo of?" things from Games magazine.
The floor's not all rusty, that's just some more of that red primer, which is all that's underneath the carpets, door cards, and whatnot. As seen in this current shot of the state of the interior:
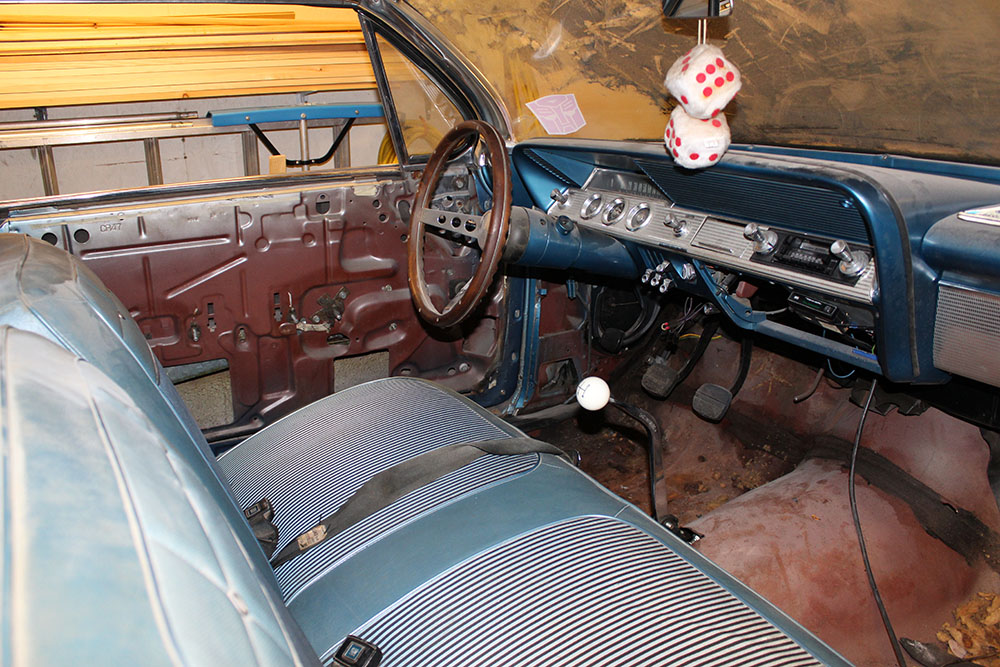
Fig. J When 900 years old you reach, look as good you will not.
While I was taking those photos, I noticed another bit of evidence of the car's original color:
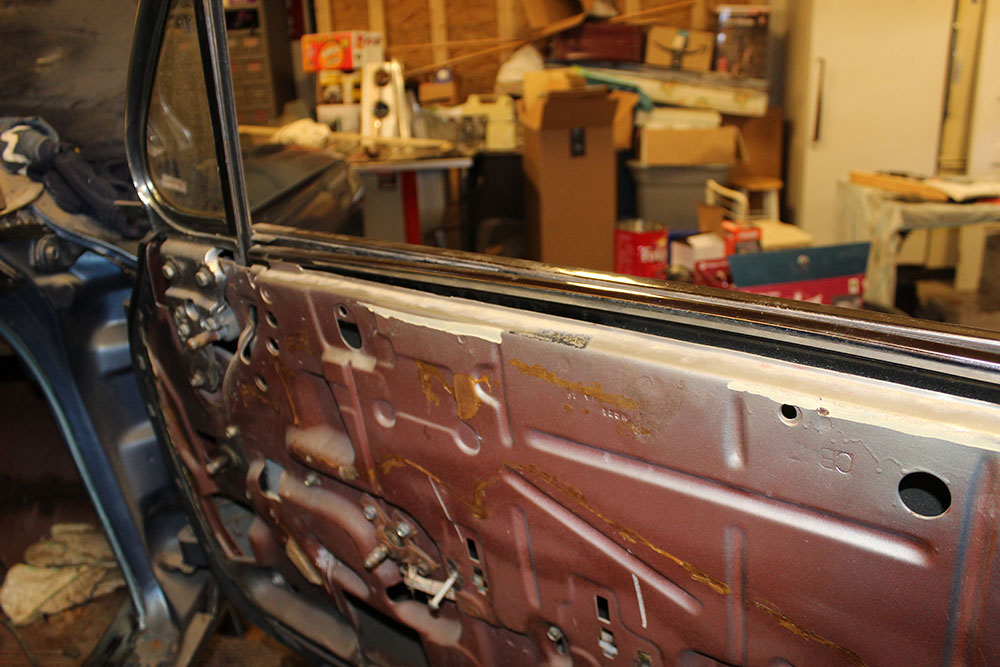
Fig. K Like a tan line. As it were.
Note the pale color along the top of the door; that's hidden by the door upholstery, but it's the interior paint color that went with the car's original "fawn" interior. We found some more of that behind the engine-side heater box, which evidently was masked rather than removed when the car was repainted. I didn't get a picture of that, because, as previously noted, I was too busy cursing the design of the heating system.
With the heater installed, the cooling system was fully back together. The obvious next step was to break out the coolant and fill it back up. According to the service manual, the coolant capacity of Chevrolet's 283-cubic-inch V8, when equipped with an automatic transmission (as the Impala had when we got it), is 17¼ quarts (4.3125 gal, 16.32 l).
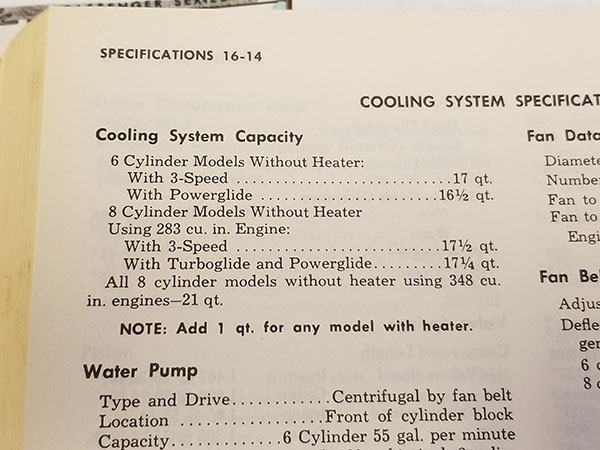
Fig. L I kind of love GM's 1960s service manual headings font.
So here's one of the silly things about the automotive industry. When I was a kid, there was one (1) kind of coolant (or, as we almost universally called it in the Maine of my childhood, "antifreeze", I guess because of the two services coolant provides, that's the more important one for most of the year around here). It was a yellowish-green color, very poisonous, and—unfortunately—dogs considered it very tasty.
That stuff still exists, but sometime in the last 30 year or so, types of automobile coolant have proliferated to a slightly bizarre extent. My Volkswagen requires a very expensive bright pink substance which, according to the packaging, is more thermally effective than any other liquid known to science (note: this part may be an exaggeration) and yet somehow nontoxic. There's also purple coolant, orange coolant, red coolant—they're getting like types of Kryptonite before Crisis on Infinite Earth. These types are all mutually incompatible and different types of engines only work with particular sorts and it's all jolly confusing.
Well, the Impala's engine being from the 1960s, it's fine with the regular old green crap. I mention the above because in order to fill up the cooling system, we had to find the appropriate kind in that row of jugs up top of Dad's workbench (see Fig. A). When we did, there were two gallons of it, which brings us to the second silly thing about coolant: it comes in a concentrated form that has to be cut with water, but the jugs it comes in are full, so you need some other container to mix it in. Over time, if you're, say, my father, you accumulate jugs of the stuff that may or may not have been mixed already.
Fortunately, there is a tool with which you can find out, but it's not an exact science, and when we tested the two jugs of it Dad had lying around, we found that they were diluted, but not enough. There followed one of those weird math word problems. You know the kind where you have, say, a bunch of animals one of which is a wolf, and a boat that holds a certain number of animals, and you have to get them all across a river without anybody getting eaten? Sort of like that, except with two guys, two gallons of partially mixed coolant, a water supply, and an old vinegar jug.
After quite a lot of fooling around, we had two gallons of more-or-less-properly-mixed coolant in the car, and without the water pump running, that was all we could get into it; the rest would have to wait until we had the engine going, at which point the pump would fill up the heater core, the coolant channels in the engine, and so on, and draw the level in the radiator down to the point where we could put in the rest. Which we didn't actually have.
Tabling that matter for the moment, we moved on to installing an oil pressure gauge. As it happened, we already had one of those.
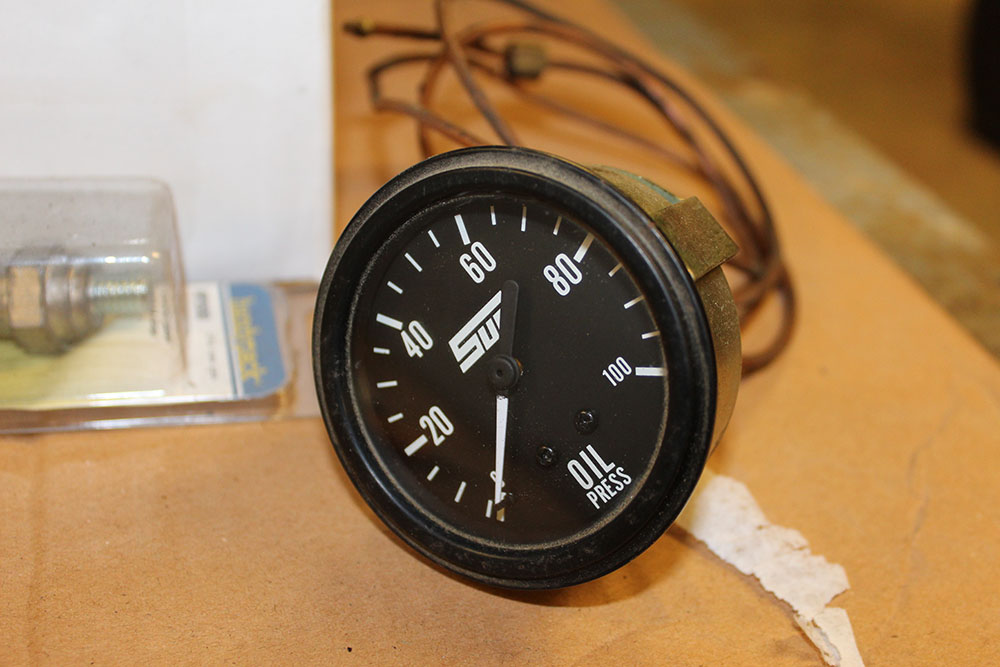
Fig. M Zero to one hundred... somethings.
Classic Sun gauges like this one used to be the aftermarket instruments of choice for American hot rodders and custom-builders. This one comes from a set of three (oil pressure, water temperature, and ammeter) that were originally fitted to Angus the Wonder Truck when it was serving as the testbed for our rebuild of the '69 GTO engine back in the late '80s. They stayed aboard, mounted in a pod under the dash, when the original inline six was put back in, although neither Dad nor I can now remember whether we actually connected them again after the engine swap. The other two are still there, but Dad went and pulled this one out for our present needs.
Note that Sun didn't bother indicating anywhere on the gauge what unit it's calibrated in. Sun's gauges were products intended for a specialist customer base; probably, their designers figured if you didn't know that your oil pressure was measured in pounds per square inch, you shouldn't have a gauge for it in the first place. :)
The reason we wanted to add an oil pressure gauge in this case was because knowing the actual pressure in the lubrication system is much more useful for spotting potential problems in an untried or long-neglected engine than the warning light. The light doesn't come on until the situation is already an emergency, whereas if we started the engine up and the pressure didn't come up, we could shut it off immediately and possibly save the bearings.
In 1962, regular Impalas like ours didn't have the more advanced engine status instruments—no oil pressure gauge, no tachometer, no ammeter or voltmeter. They did have a water (i.e., coolant) temperature gauge, and... that was about it. Everything else was handled by warning lights. Fortunately, the fact that there's an oil pressure warning light from the factory means there's a ready-made place to hook up the sender for a pressure gauge instead. Just unhook the electrical lead from the existing sender to the warning light, unscrew that sender, screw in the one for the gauge (which connects a long, thin copper tube directly to the gauge), and you're good to go.
Except, for reasons I'm not entirely clear on, Dad decided we ought to put in a T and connect both the light and the gauge. This required some plumbing parts he didn't have, so we had to make a field trip to the only hardware store in the region that was open after 4 PM on a Sunday, which was in the next town over. Dad decided to pick up another gallon of coolant while we were at it, so that we'd have everything we needed on hand when the engine started up.
There followed one of those peculiar interludes that happen sometimes in small-town America. After driving us to the store, waited in the car, the better to rest the knee that's been giving me some problems lately, while Dad went inside to get the bits and pieces required. It was a nice day, so I had the windows partway open and was just chilling in my car. Or I would've been, if the woman sitting in the parked SUV next to me hadn't kept blowing her horn, then giggling guiltily and glancing over to see if I would react. Mystified as to what the hell she was up to, I did my best to pretend she wasn't there, which was made more difficult by the fact that she kept commenting on the weather and so forth and I don't like to be completely rude.
Eventually a man came out and got into the SUV, at which point the woman driving asked him, "What took you so long? Didn't you hear me honking?" He (very reasonably) replied incredulously that of course he had, but he didn't realize it was her trying to call him out of the store, because who does that? He was in the middle of a long-winded explanation about how they were out of 5/8-inch somethingorothers as she put the SUV in gear and drove off.
A moment later, Dad came out with a small paper bag and a gallon jug of "universal" coolant, climbed in, and said they were out of 5/8-inch somethingorothers. Then, while explaining what he'd had to buy instead, he realized he needed three of something he'd only bought two of, climbed out, and went back inside.
While he was gone, I idly glanced over at the jug and noticed something printed on it. When he returned, I asked him if he was aware that he'd bought a gallon of pre-diluted coolant, which would give us one fewer than we would need. Back into the store he went to exchange it.
AND NOW, THE PUNCH LINE: A gallon of pure coolant cost $2 less than a jug containing half a gallon of the same stuff and half a gallon of water. Convenience fee for not having to mix it yourself, I suppose.
Anyway, back to the Technology Center, where we performed a routine oil and filter change just for good measure, then put together the various plumbing bits and hooked up the pressure gauge... and didn't, as I had been expecting us to do all along, actually put it in the car.
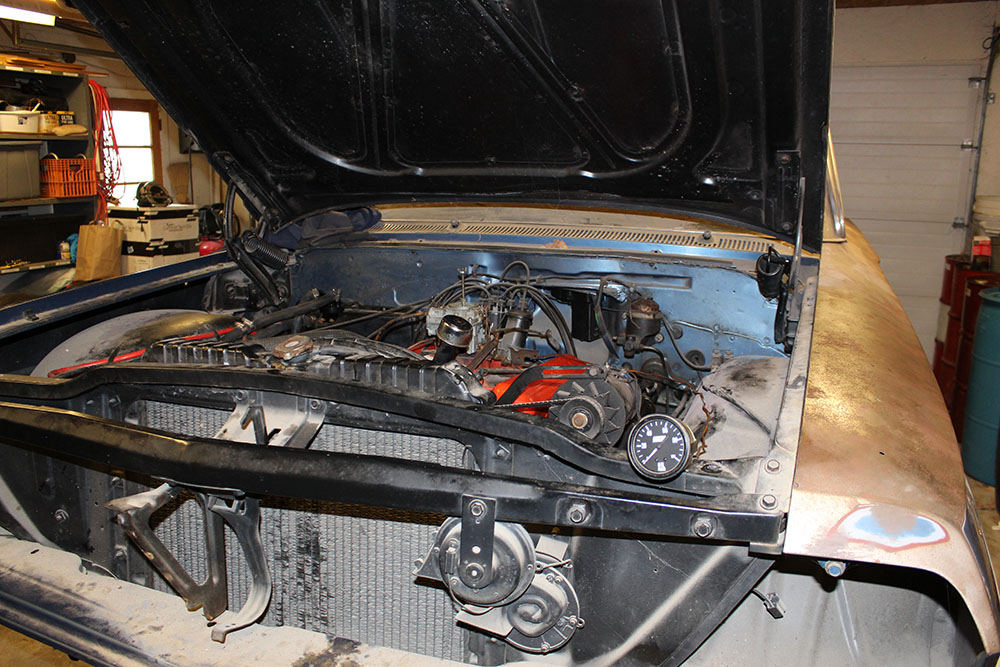
Fig. N field expedient oil pressure gauge install
This left me even more mystified about why we hadn't just replaced the light with it, since it wasn't even a permanent install, but whatever. It's just sitting there on the edge of the engine compartment with its copper pipe trailing back to where the sender is screwed in at the back.
With another gallon of water and a bucket of oil absorbent (in case of sudden leaks) at the ready, the spare car battery retrieved from storage and connected, three gallons of gas in the new tank, half an hour or so of our working day remaining, and a mysterious key with the helpfully labeled tag 62 IMPALA OR 66 PICKUP? attached, we found ourselves at a Crossroads of Truth. The Before Start Checklist was complete.
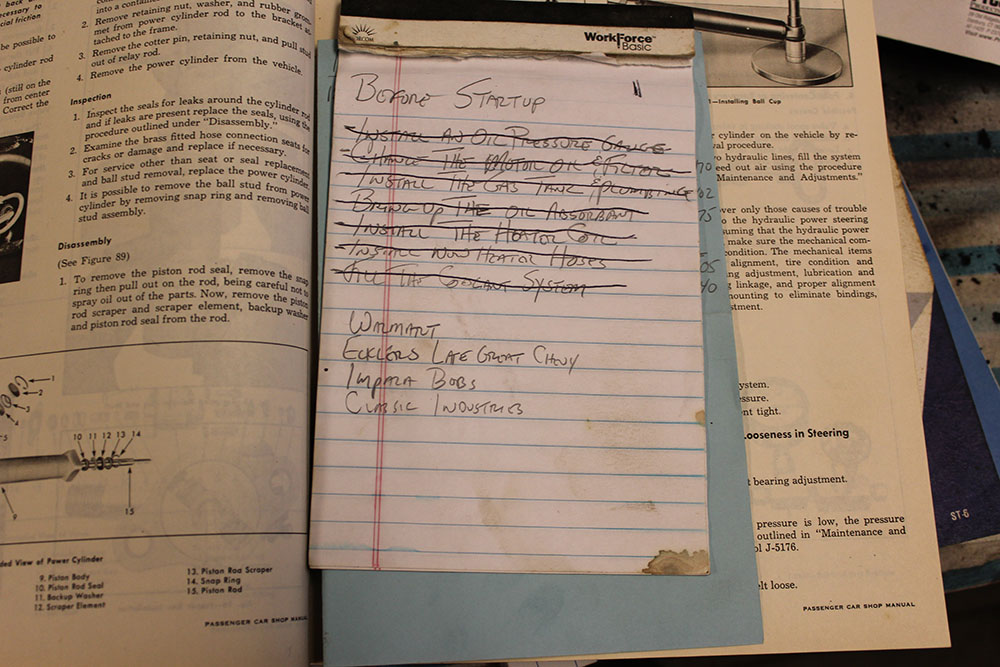
Fig. O See?
While I sat on my handy rolling stool (see Fig. A) where I could watch both the oil pressure gauge and the area under the engine (where leaks might occur), a fire extinguisher ready to hand, Dad climbed aboard, made sure the car was in neutral (not that it would really matter, with no wheels attached and the frame up on jack stands, but it's like making sure a gun isn't loaded), inserted the key, and turned it to START.
Absolutely
nothing
happened.
We... weren't expecting that. We knew it wouldn't start immediately. With no fuel in the lines or the rebuilt carburetor, no coolant anywhere but in the radiator, no oil anywhere but down in the sump, it would have to crank over on the starter for quite a while before it even could start, and even then it was anyone's guess whether it would without considerable messing around. The carb will almost certainly need a lot of adjusting. We have no reason to suspect the old spark plugs, ignition wires, distributor parts etc. of not working, but no reason to be certain that they will, either. We were prepared for a bunch of fruitless, cold-winter-day style cranking.
We were no prepared for no reaction whatsoever, and it mystified us entirely for a minute. At first we thought the battery must be dead, despite having seemed to take a charge just fine on the tender. With time ticking down, we broke out the multimeter and checked around. Thirteen and a half volts DC across the battery. Check. OK, is it the starter solenoid (the thing that throws the starter gear into and out of engagement with the flywheel)? Can we tell that without taking the starter out? Not a hard job, but not one we have time for. Anyway, 13.51 VDC down to there. Same across to the voltage regulator, which is over on the lefthand side of the engine bay. And on the other side of the regulator... zero.
Ah.
The voltage regulator is now the prime suspect in Car No Worky. It was fine when the car was last driven, and there's really nothing in them that has much business just randomly ceasing to work when left sitting around idle for 20 years, but, well, this perfectly illustrates the essential truth about old cars:
They just don't work very well.
This is partly a function of their age, of course, and the fact that even when not operational, entropy in any system always increases. However, and this upsets a lot of Classic Car Guys when you say it out loud, but: they didn't work terribly well back in their heyday either. Automotive technology has come a long way since the early 1960s, even if car styling arguably hasn't.
Hell, even between the beginning of the '60s and the end, you can trace all sorts of incremental, but also fundamental, advances in the way these machines were both engineered and built. Seat belts as standard equipment. Shoulder belts. Power brakes. Disc brakes. Alternators instead of generators. The first rudiments of emissions control. The eight-track tape player. (OK, that might be a bad example.) Radial tires. All of these things arrived in the full-size General Motors car sometime during the 1960s (although radial tires didn't become standard until the '70s). The recommended engine service interval in the '62 Impala owner's manual is 1,500 miles; today 10,000 isn't uncommon. And, so, on, as Carl Sagan might have put it.
As transportation, then, for all that some of us wish it weren't so, old cars are nowhere near as good as modern ones. They're slower, harder to drive, much less reliable, and far less safe. I wouldn't be at all surprised to find that the worst-performing new car in crash tests today was safer than the best one you could buy in 1962.
Put more baldly, those of us who love the classics don't do so because they're better cars; we do so because we're sentimental saps. And because we're sentimental saps, we'll put up with a lot of nonsense from them, like a person with an unruly but lovable dog.
All of which is to say that, while discouraging and a bit unexpected, this week's outcome is by no means unusual, and we are all in for a long old haul on this project. :)
Well, I think we all need a bit of a lift after that, so here's a nice thing. Remember those Cragar wheels Dad bought ages ago, that had gotten all dingy and a bit rusty despite never leaving the garage? He looked around online and found a trick for sprucing them back up. Turns out if you rub rusty chrome wheels down with wet aluminum foil (unpleasant as that sounds), this happens.
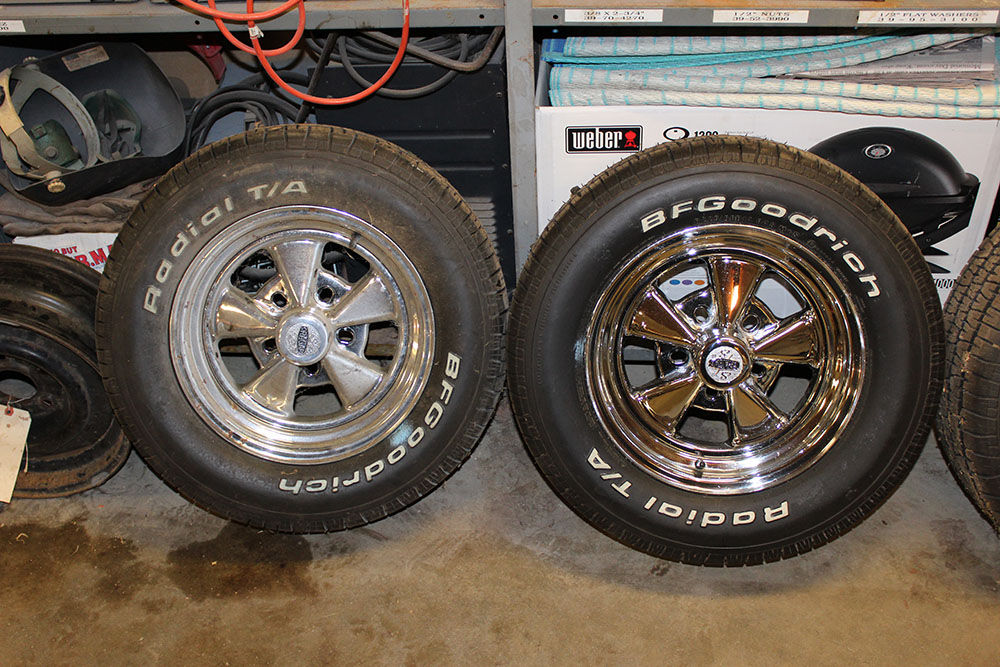
Fig. P Ta-da!
On the left, one of the wheels as they came off the car; on the right, one that's had the tinfoil treatment. We still can't use them, as they're still the wrong size for the brakes, but they're certainly more presentable as items that may be offered for sale.
Well, that's enough of this nonsense for one week. Next time we'll investigate the voltage regulator and other electrical matters, and then, because we'll probably have to order some parts, we'll most likely end up having to put aside getting the car started and working on the brakes instead while we wait.
--G.
-><-
Benjamin D. Hutchins, Co-Founder, Editor-in-Chief, & Forum Mod
Eyrie Productions, Unlimited http://www.eyrie-productions.com/
zgryphon at that email service Google has
Ceterum censeo Carthaginem esse delendam.

 Printer-friendly copy


 RE: Project Impala: Session 5
 RE: Project Impala: Session 5