LAST EDITED ON May-29-19 AT 12:31 PM (EDT)
Sorry this one's a bit late, had kind of a busy holiday weekend.Session 7: May 26, 2019
Fake It 'Til You Make It
Previously on Project Impala: We worked out a lot of weird problems with the engine and ignition switch wiring and got the engine to turn over, but it wasn't even trying to actually start.
This session thus opened, as did the one before it, with diagnostics. When a car will crank over, but it won't start, there are two prime candidates for the reason why: the fuel system and the ignition system.
Despite the fact that we overhauled it completely at the start of the project, the fuel system in this car was kind of an unknown. We could be confident that the tank and sending unit were OK, since they were brand new. The pipe from the tank to the engine was probably OK; we knew it wasn't blocked, since we blew it out with compressed air before we reconnected the carburetor the other week, and there didn't seem to be a leak anywhere. The tubing from the fuel pump up to the carb was easily inspected and looked fine.
That left us with two working parts that could have problems, to wit:
- The fuel pump, which is on the side of the engine in these models and might or might not be working. The main potential problem here, apart from the possibility that the pump had just failed, is that if you leave gasoline sitting around long enough, it basically turns into lacquer, so if there was any left pooling in the pump when the car was parked, it could have gummed up the whole works. Plus, the state of the carb and its fuel filter when we tore it down suggests that that pump spent a fair bit of time pumping a nice gasoline/powdered-rust slurry, which is not what it's designed to do; or
- The carburetor, which we rebuilt ourselves and, well, to paraphrase Jeremy Clarkson, would you drive a car I'd built? We might have gotten part of that rebuild wrong, or there could be a problem with the vacuum pull-off on the automatic choke (which we didn't have the tool to test), or it could just be way out of adjustment.
We didn't think either of these was a terribly likely candidate, though. When a car's having trouble with its fuel system, assuming that system hasn't just completely failed, it will usually get enough fuel that it will at least try to start when cranked over. Carbureted cars, in particular, will sputter and gasp and fire on one or two cylinders if the least amount of fuel is making it through. It ran before with the carb choked with rust, too, so we would have had to foul up the rebuild very badly indeed for it not to be providing any fuel at all.
That leaves the ignition system. We knew going in that the ignition starting circuit was fine; we spent most of Session 6 repairing that, and the starter engaging was proof that that part of the system was working. What we didn't know about was whether the actual engine ignition circuit was getting a spark out to the plugs, which is what actually sets off the fuel-air mixture in the cylinders and makes the engine work. But at the end of last session, we'd pulled a plug and seen no spark on it, which suggested that that system wasn't working.
During the week, Dad got proactive on this problem and ordered... pretty much the whole system, apart from the actual body of the distributor itself.
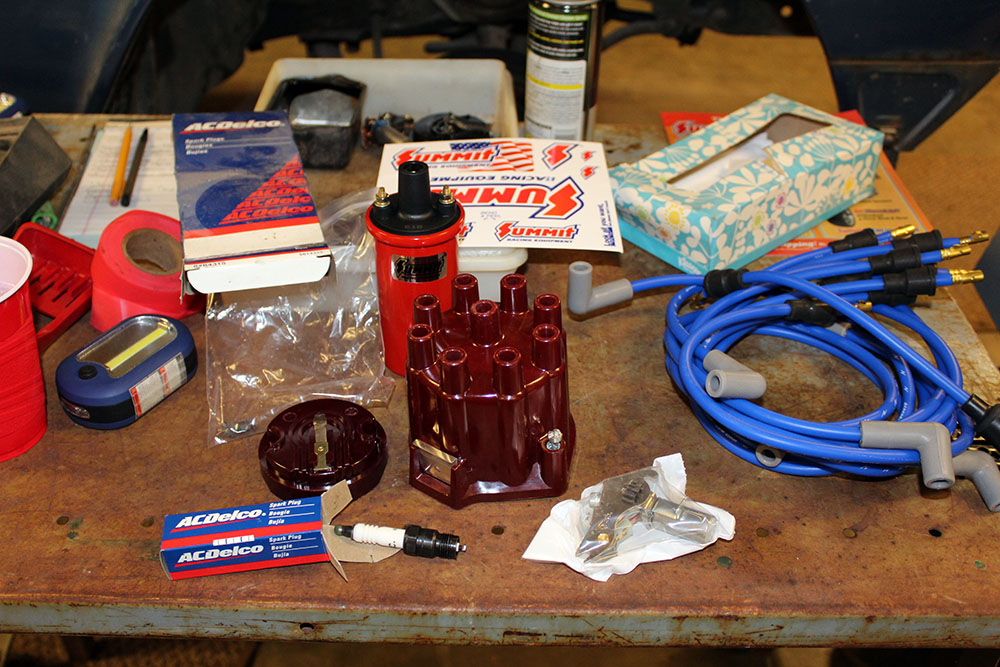
Fig. A Caveat: Not everything on this table is directly related to the ignition system.
From left to right, we have: an ACDelco R43TS spark plug; a distributor rotor with a little baggie of fresh screws to hold it in place; an ignition coil; a brand shiny new distributor cap; a new set of points with condenser (the gadget inside the distributor that sends the voltage to the coil at the right time); and a brand new set of high-temperature spark plug wires. No promotional consideration was paid by Summit Racing, it's just where Dad got the parts from—with the exception of the spark plugs, which, judging by how dusty the box was, he'd had sitting around on a shelf for a long time. They're brand new, though!
(As an aside, ACDelco spark plugs come in boxes of eight. You can't say they don't know their target demographic. :)
While we've got the distributor cap off, here's a view of what's inside it:
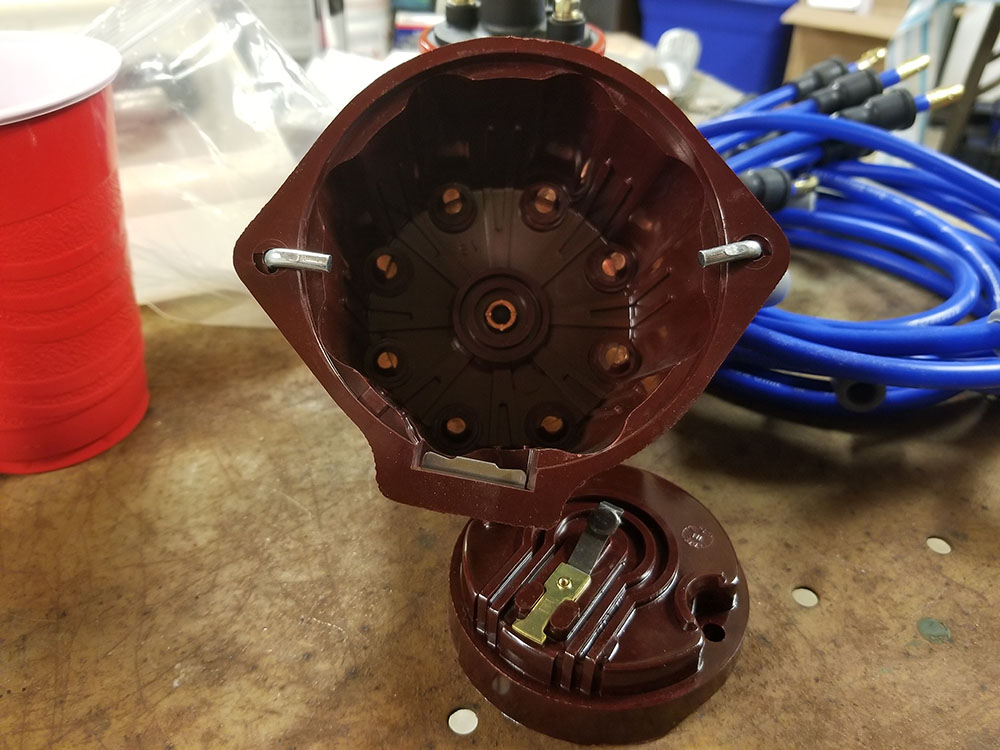
Fig. B A view not many people get these days...
Pretty straightforward: the voltage from the coil comes in on that center contact, which is touching the spring bit in the center of the rotor. As the rotor turns, the metal "tongue" on it makes contact sequentially with each of the radial conductors, each of which has a spark plug wire connected to it. The points basically switch the voltage rapidly on and off, so that it's only on when the rotor is in contact with one of the plug wire conductors—this prevents arcing and makes the system last longer. The whole thing is synchronized to the power take-off on the engine's camshaft that drives the distributor mechanism in the first place. It rotates once for every two turns of the crankshaft (for example, if the engine is turning at 1000 RPM, the distributor is doing 500).
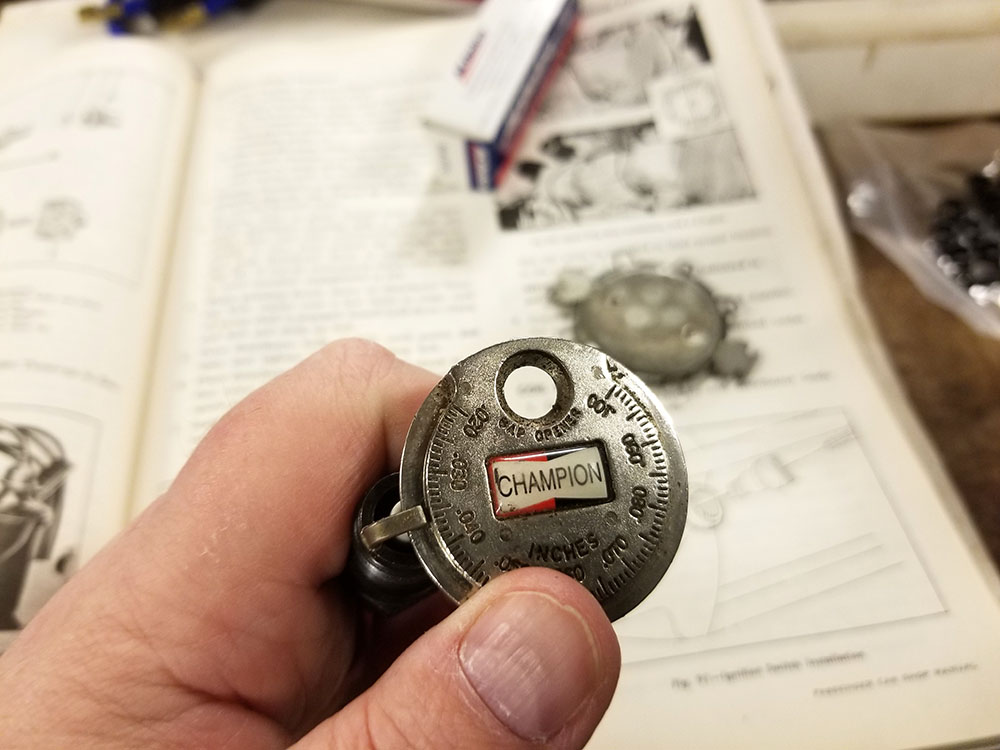
Fig. C ×8
To get ready for installation of the new ignition parts, the first order of business was to set the gap on the spark plugs. This is done with a little tool that has a calibrated, tapering edge on it; you put the edge in the gap between the center and side electrodes and turn it until it's at the right spot, and the taper pushes the side electrode up to suit. If the gap is too wide, you use that hole in the tool like a reverse bottle opener to bend it back down and then start again. Chevy smallblock V8s like their spark plug gap to be as close as you can get it to 0.035 inches (0.89 mm).
While I was at that, Dad got started installing the new points and rotor in the distributor, a task which requires the services of some Tiny Wrenches.
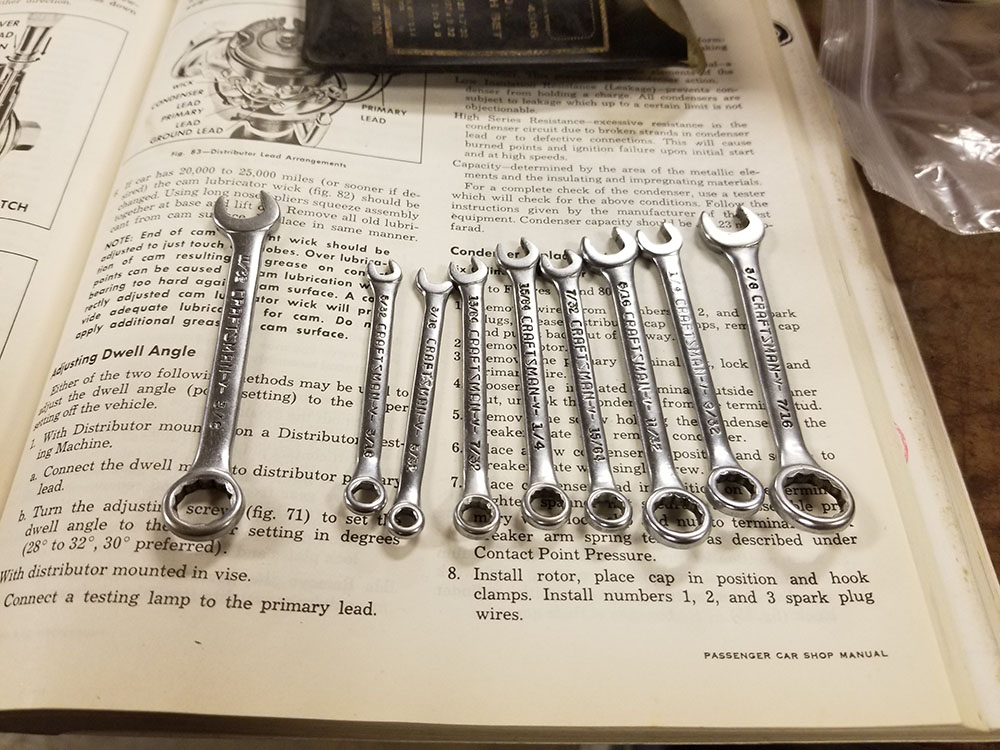
Fig. D tiiiiny wrenches
These were specifically sold as "ignition wrenches", and came (probably still come) in two flavors, the combination style shown here and a version with two open ends, one parallel to the handle and the other perpendicular. They are specifically for working with the tiny nuts and bolts that hold electrical bits together on these old cars.
With the distributor back together and the new cap and coil installed, it was time to change out the spark plugs and hook up the new plug wires. Here we ran into our first logistical problem. The Summit plug wires Dad bought were intended for racing, so they have no excess length to them at all. Each one is just long enough to reach one and only one cylinder; hooked to any of the others, it'll either be too short to reach, or will have wasted length and will mean whatever cylinder it was meant for won't have enough wire.
And they're not labeled. You just have to figure it out as you go.
Also, they need to be prevented from draping over the exhaust manifold (that's that ram's-horn-looking thing on the side of the engine you can see in this earlier shot; there's one on each side of a V-engine like this one), because it gets super hot and melted plug wires don't work very well. Ordinarily there would be a little set of stand-off brackets to hold the wires away from the manifolds, but this car's appear to be missing. The old plug wires were so long they could just be routed around the manifolds; this new set, not so much, so we had to get a bit creative with routing them behind stuff, clipping them together, and otherwise arranging for them to have manifold clearance without the stand-offs. (One of them, on the port side of the engine, we had to zip-tie to the generator bracket.)
There is another gotcha with wiring up spark plugs, of course: the spark plug for each cylinder has one, and only one, spot on the distributor it's meant to be plugged into. This sets the firing order of the cylinders, which is very important—so important that it's cast into the intake manifold, in big numbers, up top, where you can't miss it.
No, of course I didn't think to take a picture of this, don't be silly.
For the record, though, it's 1-8-4-3-6-5-7-2. (#1 is the frontmost cylinder on the engine's port side; all the odd-numbered cylinders are on that side, and the even-numbered ones on the other.)
Here's the thing, though: it isn't marked on the distributor. I don't know why, because the cap can only go on one way, so it easily could be; but it isn't. If you don't have access to a shop manual with the little diagram explaining it, you just have to know that #1 is the one just to the right of the little metal trap door on the front (we'll get to what that's for in a minute), and that it rotates clockwise as seen from above.
If you get the firing order a little wrong, the engine may run, but it will never run very well. If you get it a lot wrong, it probably won't work at all, but if you are very, very unlucky, you might actually break something expensive and hard to get at, like a piston connecting rod or the crankshaft.
So we were very diligent about setting up the distributor and the plug wires correctly, and it took us the better part of an hour. Finally, everything was secured, and the moment had arrived.
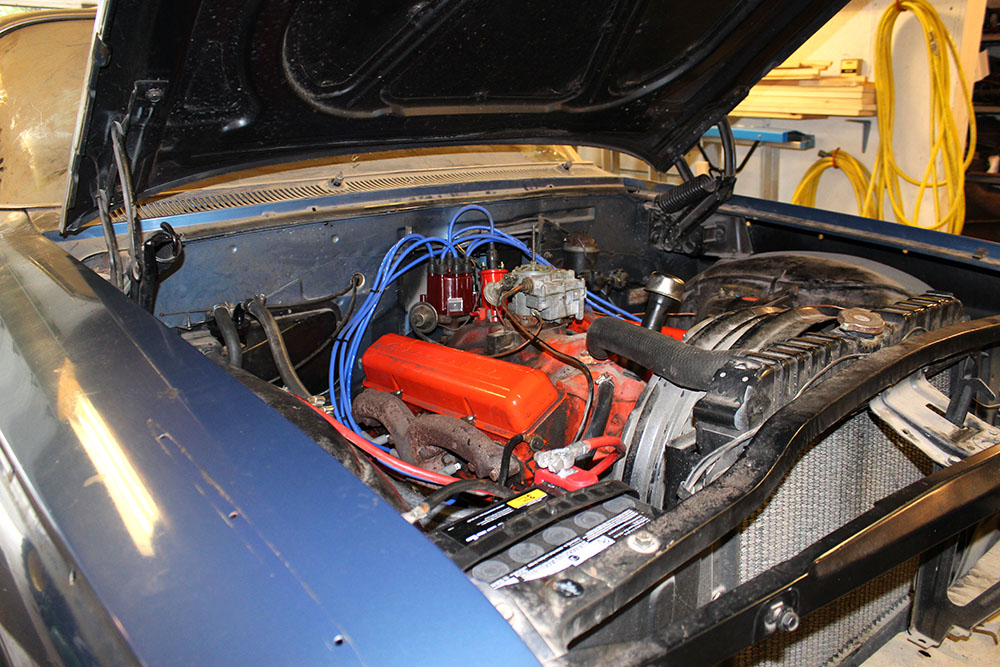
Fig. E (Almost) all dressed up, but will it go?
Dad climbed aboard. I watched the oil pressure gauge and kept an eye out for leaks and smoke (since we're still not sure about some of that engine wiring). And...
... the car started right up. It was almost anticlimactic. It didn't run terribly well at first; the idle speed was way too high and the spark timing was off. Neither of these was a surprise, though, given that we'd had both the carb and the points off the car. The important thing is that it was running. Both of those things can only really be adjusted with the engine running, so just getting it to start was the major hurdle there, and we'd just cleared it.
Despite the open doors, the garage immediately filled with smoke. It was the normal kind, though; the kind you get when the car's been sitting long enough for everything that gets hot to get dusty, and you've spilled some oil down into the dungeons at the bottom of the engine compartment somewhere, and so on. It cleared up after a few minutes, and we could get to adjusting things.
I won't go into exhaustive detail about the things that need to be tweaked when a car is in this state, but I'll hit the highlights for you. There are basically four things that need to be looked into at this point.
1) Carburetor idle setting. This is just a little mechanical widget on the side of the carb that holds the throttle slightly open, so that the engine will run without the driver's foot on the gas pedal. In a more modern, semi-automated engine like this one (funny as it is to think of a 1960s American V8 as "more modern", they have more in common with the engines of today than they do with the ones from the 1910s), this has a tiny cam in it which can automatically bring the idle down to a lower setting as the engine warms up and the choke opens, but the "baseline" idle speed still has to be set with a small screw.
2) Carburetor idle mixture. There are two small screws on the front of a Rochester 2GV carb which alter the fuel-air mixture for each of the carb's two barrels. Once the best idle speed is set, these have to be adjusted so that the engine is running as lean (low fuel:air ratio) as possible without misfiring. This saves fuel and prevents problems related to running too rich (backfiring, fouled plugs, etc.).
3) Dwell angle. "Dwell" in an ignition distributor is how long the spark stays "on" for each cylinder. It's measured as an angle (though I think it's actually how many degrees in the rotor's circle of rotation it is). In a Chevrolet small-block V8, the optimal dwell angle is described in the shop manual as "28°–32°, 30° preferred". This is adjusted using a special flexible tool that goes in through the trap door on the front of the distributor and tweaks the setting on the points. You know when you've got it right using one of these:
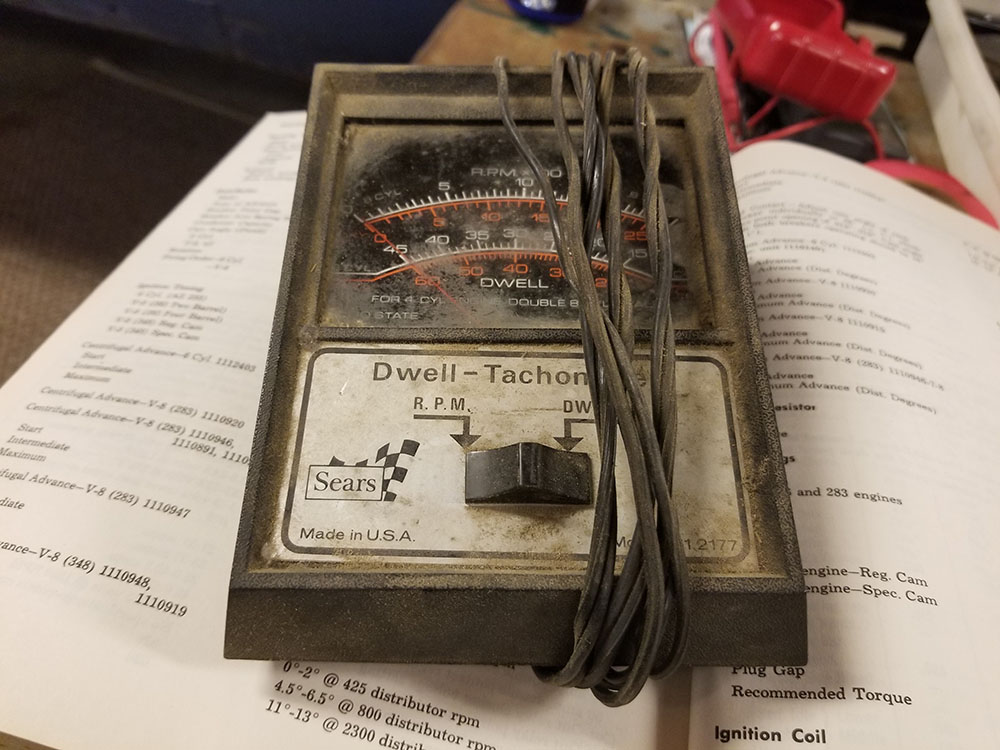
Fig. F It's not old, it's vintage.
This is a dwell-tachometer, which, as the name suggests, can tell you two things. You connect a pair of leads on it to the positive and negative terminals of the ignition coil, and then it will tell you either the current dwell angle of the distributor, or the revolutions per minute the engine is turning. The former is what you need to set the dwell (obviously), while the latter is good for, e.g., calibrating the idle speed, or doing various engine diagnostics that want the engine to be running at a specific RPM.
Dad's had this one for... a while. Like, since he was in high school. Unfortunately, it doesn't seem to work very well any more; its internal mechanisms have worn to the point where it's lost most of its precision and just sort of shows a range of possible values. It worked sufficiently well that we could get the dwell angle close enough, but probably not much better than someone with Dad's experience could've done just going by ear. We'll have to get a new one sometime and give the system another look.
Finally, there's
4) The ignition timing. Messing around with the dwell angle changes the actual point in time at which the cylinders fire, which then also needs to be adjusted before the car will run properly. This is done using kind of a cool trick.
Ideally, one of these engines wants to fire about four degrees of crankshaft rotation before the piston reaches a position called top dead center (TDC), or as high up in the cylinder as it can go before it reaches the limit of the connecting rod's travel and the crankshaft's rotation starts pulling it back down again. You want it to fire just slightly ahead of time because the fuel-air combustion takes a tiny bit of time to happen once the spark plug goes off, and 4° TDC gives the piston just long enough to finish compressing the mixture as much as it can be in time for the explosion to happen. This makes the engine run as efficiently as it can (which, for a heat engine, admittedly still isn't very, but we're not here to debate the mechanical virtues or faults of the internal-combustion engine), and as smoothly.
The trick to this is knowing when that actually is with an engine that's spinning at—assuming you have the idle set to to the recommended rate from the book—450 RPM or thereabouts. Four hundred and fifty RPM in a four-stroke engine means each cylinder is firing half as many times per minute (every other upward stroke), or about 3¾ times per second, and there are eight of them, so you're not going to be able to time it by ear with a stopwatch.
Instead, what you do is connect a gadget called a timing light to the #1 spark plug wire (modern timing lights do this by induction with a little clamp, so you don't have to unplug the wire) and shine it on the counterweight at the front of the crankshaft, between the radiator fan and the engine block. The light is a strobe synchronized to the spark plug, and the crank counterweight has a small line marked on it; if it was installed correctly when the engine was built, this line should appear to "stop" alongside a little scale engraved on the front of the engine block. The scale is calibrated in degrees BTDC for cylinder #1.
Now you get your assistant (well, all right, if you're the one holding the light, you're probably the assistant) to loosen the clamp that holds the distributor body in place on top of the engine and rotate the whole thing bodily in its housing, which changes its relationship to the cam turning the rotor inside it. Do that until the strobe-lit crankshaft mark lines up with 4° BTDC on the engine block scale, tighten the distributor clamp (without turning the distributor some more in the process), and Bob's your uncle.
Yeah, it's not really as simple as it sounds, especially if, like me, you had just had a full-up ophthalmological exam the day before and your eyes weren't really all the way back from the dilation drops yet. Staring at the effects of a strobe light is probably not the best way to spend your time under those conditions.
Still, we did eventually get it done, and with the engine fully squared away, it ran well and restarted readily each time. Idled well, revved smoothly, made good oil pressure; everything you could want in an engine, really. We tried it again at the end of the day, after it had been sitting for a couple hours while we did other things and cooled completely off, and it fired right back up again. Apart from what sounds like a disconnected vacuum line somewhere, which we'll need to find, and a possible exhaust leak, ditto, it runs so well you'd hardly know it had been parked for 20 years.
Dad was even feeling so confident about it, he put the air cleaner back on.
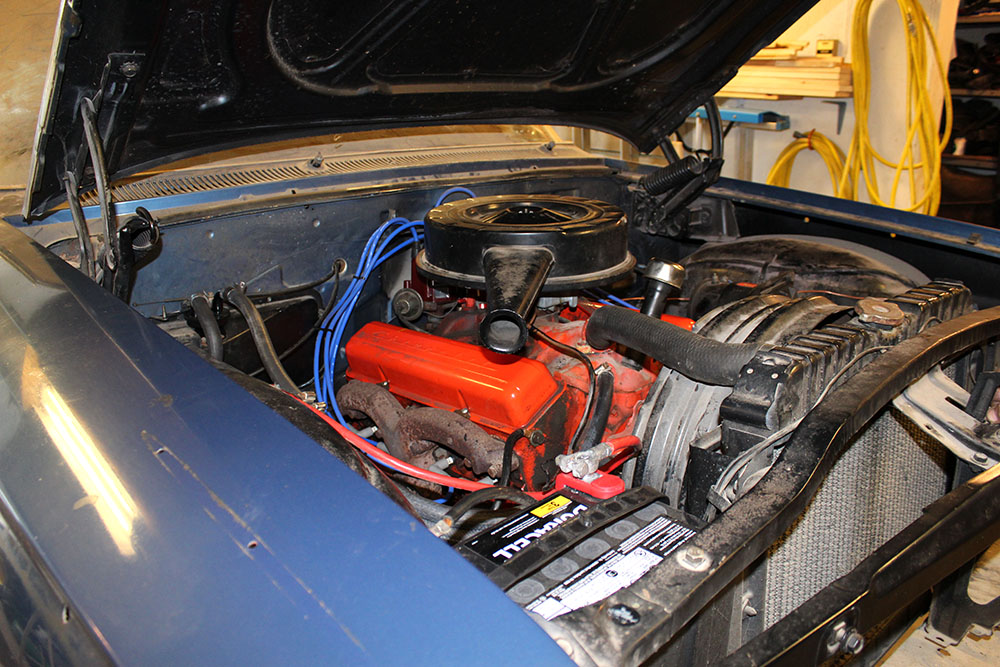
Fig. G Tell me you like my hat. (Is that a South Park reference? For the record, I got it from The Mighty Jingles, but he sounds like he's doing a Cartman voice when he says it.)
We were going to spend the rest of the session getting started on the brakes, but then Dad said he should probably uninstall the oil pressure gauge before we accidentally shut the hood on it, and I made an offhanded quip about how maybe we should install it in the car.
I think I mentioned last time, or the time before, or whenever the oil pressure gauge first appeared, that it was part of a set of classic Sun gauges we installed in Angus the Wonder Truck when that worthy was serving as the testbed for the rebuilt engine from that GTO Dad used to have. Well, when I said that, Dad got a thoughtful look and said yeah, that would probably be a good idea, but we'd need the mounting bracket, and at that point we might as well go get the rest of the set...
... and so we trooped off to the Project Impala Technology Center Overflow Storage Facility, better known as the back shed, to recover the rest of the bits, and that means this episode has a special guest star.
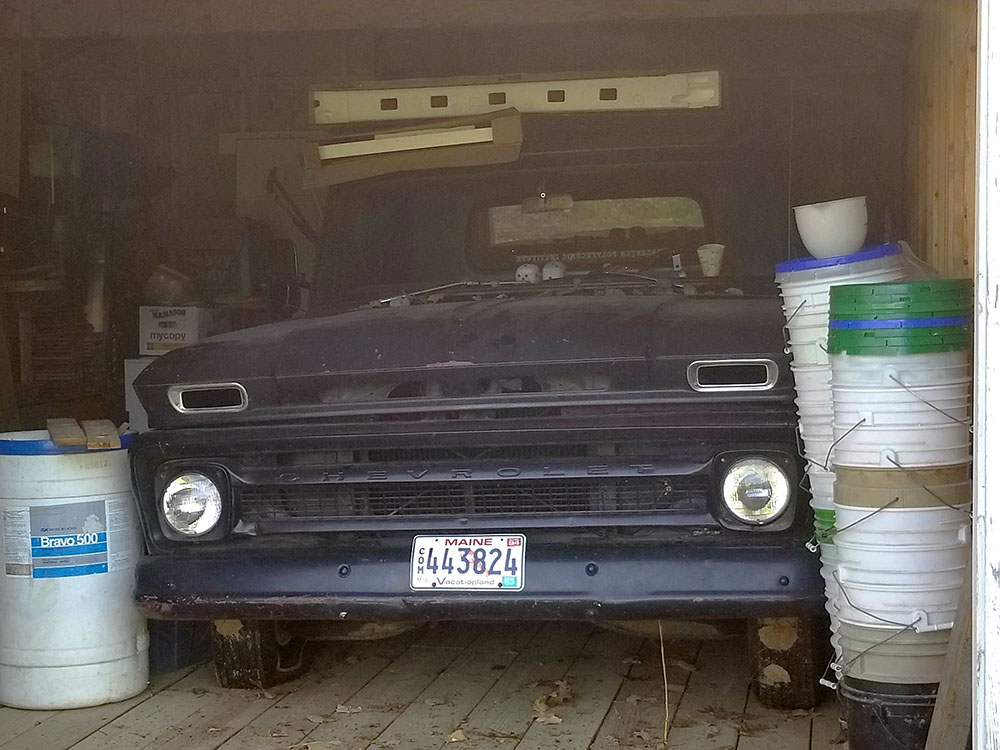
Fig. H aye, laddie
Yes, it's Angus, listing a bit to starboard because the tires on that side have rotted more than the others for some reason, and lacking an engine, transmission, and (weirdly) front directional signal lamps, but lifesize and still patiently awaiting its turn. Note the old Maine commercial license plates, which at the time you could get just by telling the person at the town office that you were registering a truck. The last registration was still in the glove compartment, and expired at the end of April, 1994. License plates of that style, the notorious "lobster plates", haven't been valid since 2000.
(Unlike some states, which introduce new styles without pulling the old ones, Maine tends to end-of-life the old style whenever a new base passenger license plate design gets introduced. When the old ones expire after the new ones are out, they have to be replaced. This is very annoying if, for instance, you liked the plain black-on-white ones from the olden days, but were forced to change to the garish and eyerollingly sterotypey lobster one in 1987. Like my dad. But anyway.)
While we were out there, I got a couple more photos of the old duffer, just for fun. Here's a shot of the interior:
Fig. I To be fair, it wasn't much less dusty in there when I was actually driving it.
Note the three-pack of gauges mounted under the dash below the radio, with the hole where the oil pressure gauge was already removed, and also the tachometer strapped to the steering column. We finally got around to taking the automatic-shift lever off the column when we installed that gauge, which I was kind of sad about, because it had certain uses in psychological warfare, but anyway.
Also, notice the absence of a gas pedal. I actually drove it like that for a while in high school, just stepping on the stub of the pedal lever to work the throttle.
Those horse-blanket seat covers were all the rage around here in the '80s. I remember Dad's old Dodge pickup had a set of them in green, and a lot of other people around town had them too.
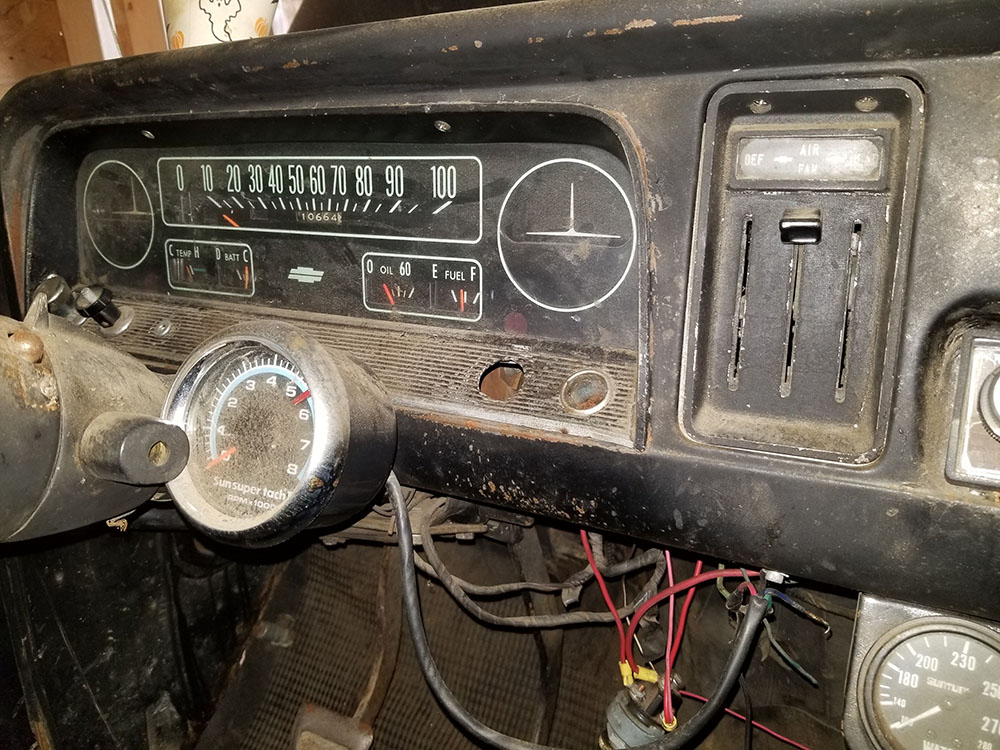
Fig. J very ambitious speedometer
Here's a closeup of the instrument cluster. You can see that the truck already had all three of the gauges we installed aftermarket ones for; I can't remember if we put in the Sun package because we couldn't get the stock gauges to connect to the Pontiac big-block, or if they just didn't work. The latter is entirely possible. You will note that the fuel gauge claims the tank is half-full when it is, in fact, both empty and not installed in the truck. Two of the levers for the heater controls are broken, I don't remember that being the case when I drove the truck regularly, but then it was a while ago. I don't know what's meant to be in those two blank gauge faces flanking the speedo; possibly they're just decorative, but in any case this truck never had anything there, so if they did originally do something, it was in a fancier version of the C10 than this one was.
Fig. K just like they do it at Best Buy
And, of course, no visit to Angus's interior would be complete without a shot of our super pro speaker install. Those aren't even car speakers; if memory serves, they're from a Radio Shack ("Realistic" brand) PA system. They worked, though!
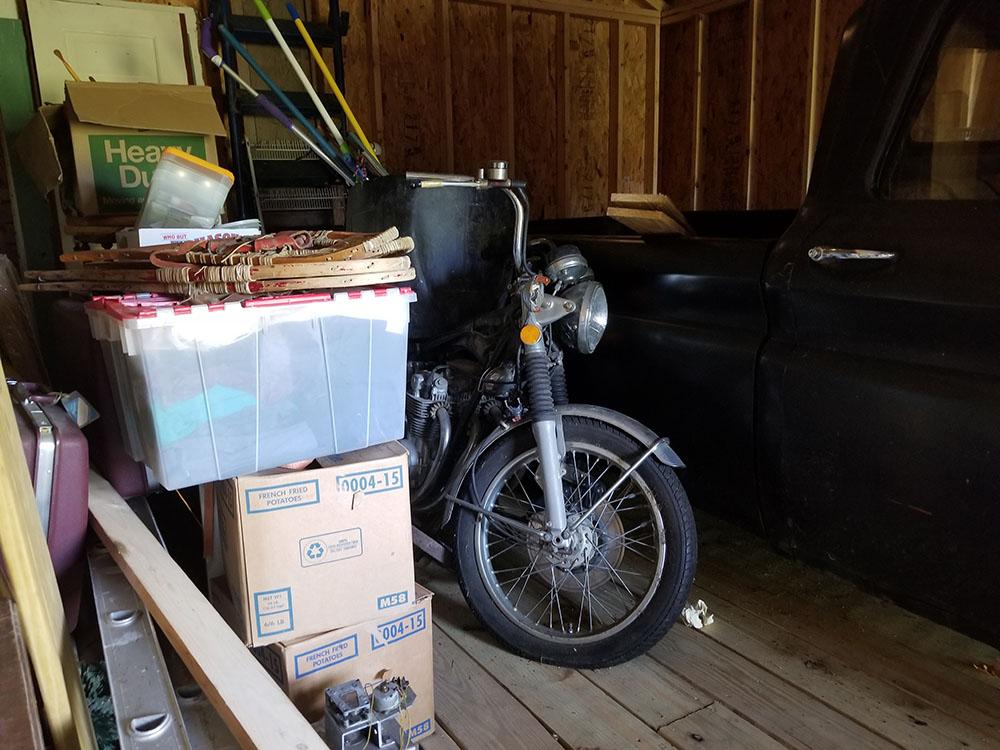
Fig. L ♪ don't you forget about me ♪
While we're out here, this is my early-'70s Honda CB550 motorcycle, which I rode for a year or so in high school but never got around to taking the road test for. One of these days I'd like to get it working too. Maybe put a sidecar on it, since I'm a bit too neurological for two-wheeled motoring these days.
Back in the garage, we sat down with our box o' gauges and the instruction booklets (which Dad still has, 25+ years later) to work out how to go about installing them.
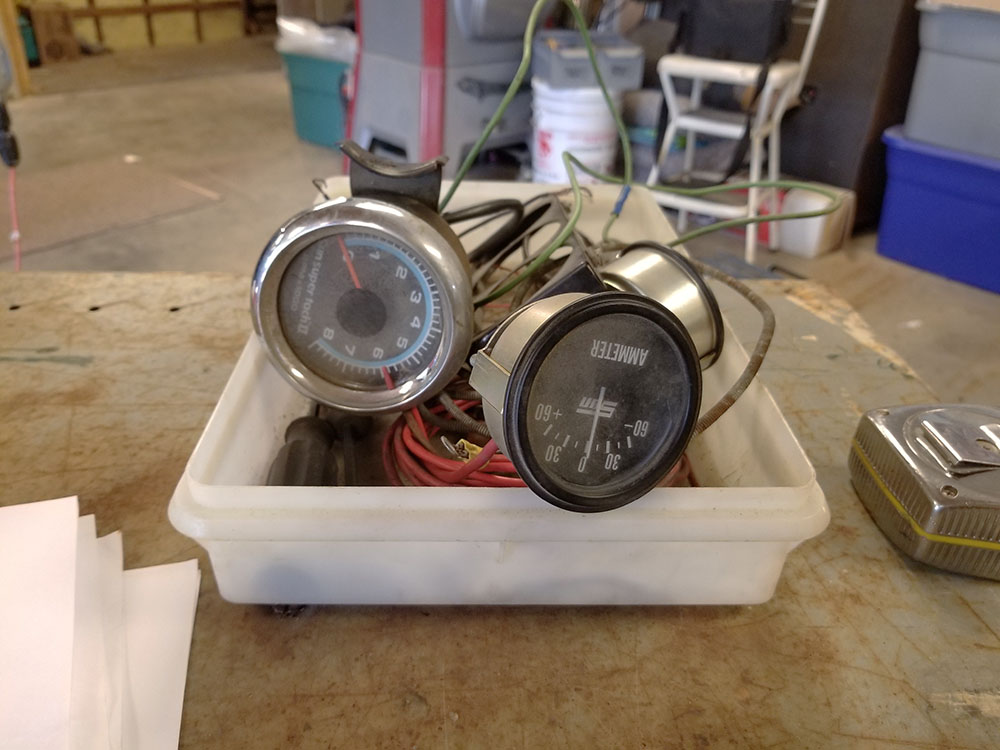
Fig. M They're a little cruddy, but they should clean up just fine.
The Impala already has a water temperature gauge, and it seems to work fine, but we'll install all three anyway, because we have the three-hole bracket and why not. Figuring out where to put the tach is going to be a little harder, since it won't mount to the column as neatly in the car as it did in Angus, but I'm sure we'll figure something out.
Bonus pic: while hunting around in FUEL STORAGE for the instructions and stuff, Dad found this other vintage oil pressure gauge, which I took a photo of for no better reason than I really like the typography on it.
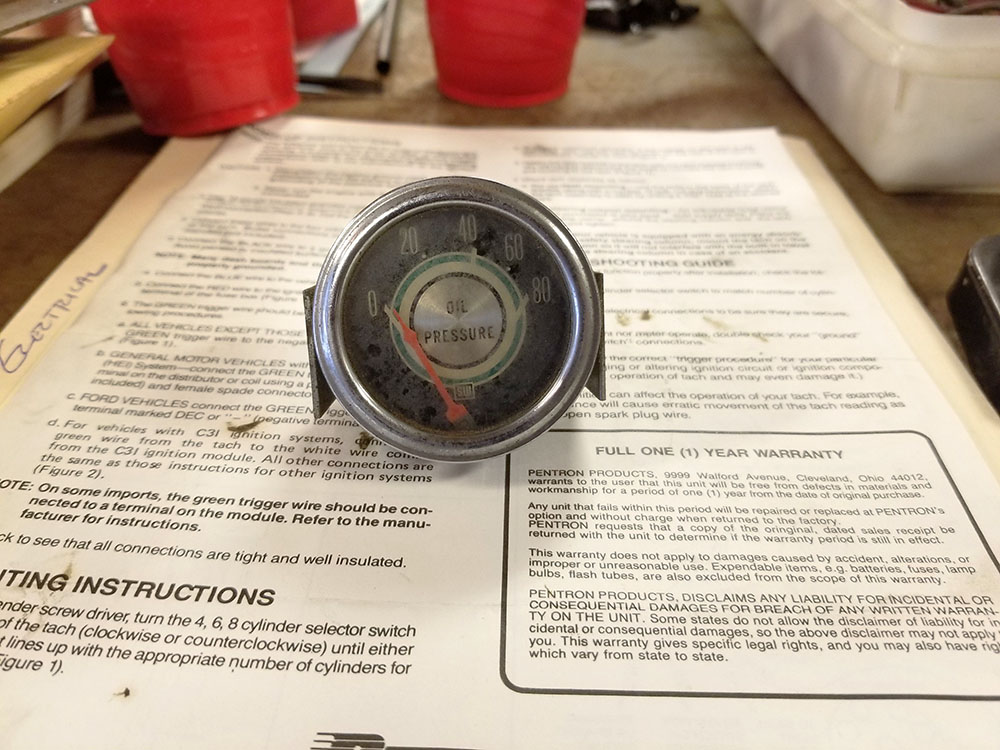
Fig. N Note that this one doesn't say what units it's calibrated in either.
I actually think that one looks more like it belongs in a '62 Impala than the Sun one, and could theoretically be installed in one of the pods on the dash where, e.g., the (probably non-functional) clock is now, but I think the old man's got his heart set on putting the full set of Suns in there. Maybe I can swipe this one for Angus when the time comes. :)
That's a wrap for this session. Next time, we'll probably either get those gauges installed, or finally get started on the brakes. Not sure when that will be, as, yesterday having been Memorial Day in the US, we have arrived at the beginning of camping season and Dad's probably going to spend next weekend setting up his fifth-wheel rig up in Presque Isle. (I know, I know. Retired people and their damn camper trailers. But it gives him a way of spending summers close to the nursing home where his father lives, for only a small fortune and an unending series of mechanical crises. :)
--G.
-><-
Benjamin D. Hutchins, Co-Founder, Editor-in-Chief, & Forum Mod
Eyrie Productions, Unlimited http://www.eyrie-productions.com/
zgryphon at that email service Google has
Ceterum censeo Carthaginem esse delendam.

 Printer-friendly copy


