The best laid schemes o’ Mice an’ Men
Gang aft agley,
An’ lea’e us nought but grief an’ pain,
For promis’d joy!
—Robert Burns
"To a Mouse (On Turning her up in her Nest, with the Plough, November 1785)"
Today's session started out promising, even though the weather was disgusting and humid and I was feeling far from my best.
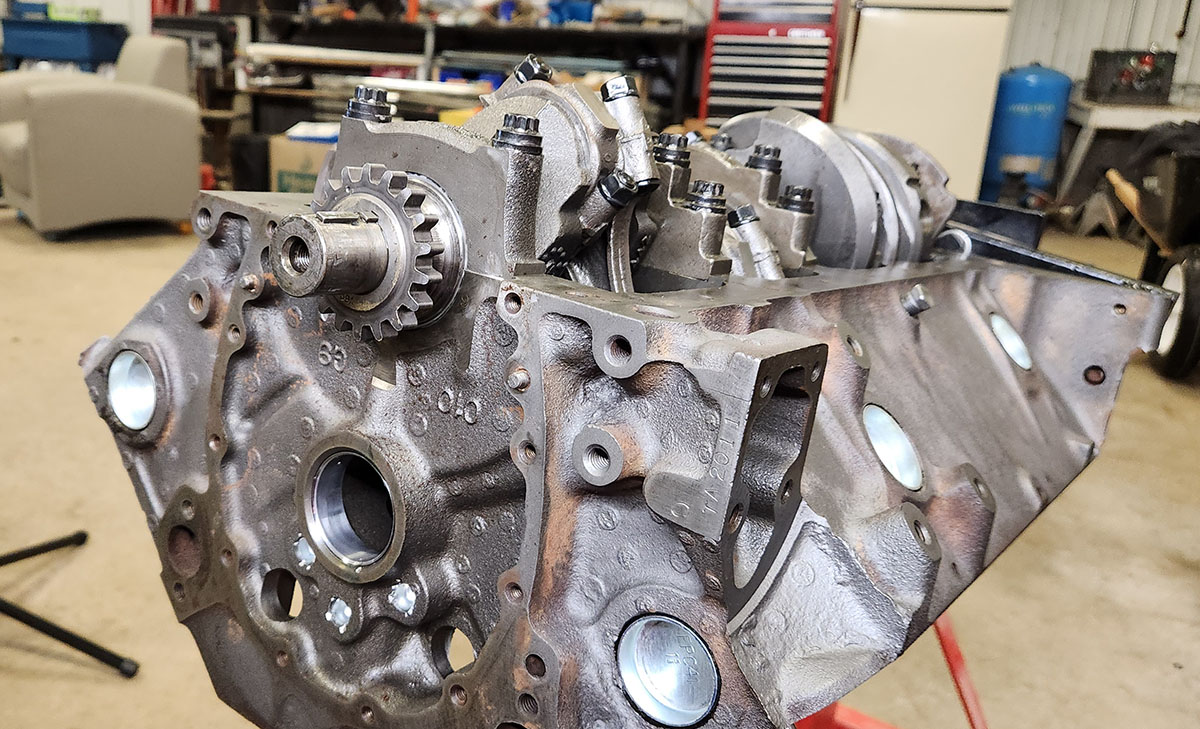
Picking up from last time, the first order of business was to install the crankshaft gear. This involved the use of a large socket, not in its capacity as a socket, but just as a large enough round piece of metal to apply force to the whole gear at once and clear the crankshaft nose in the middle. No pics of that process because I was too busy doing it, but here's what it looked like once it was banged all the way on:
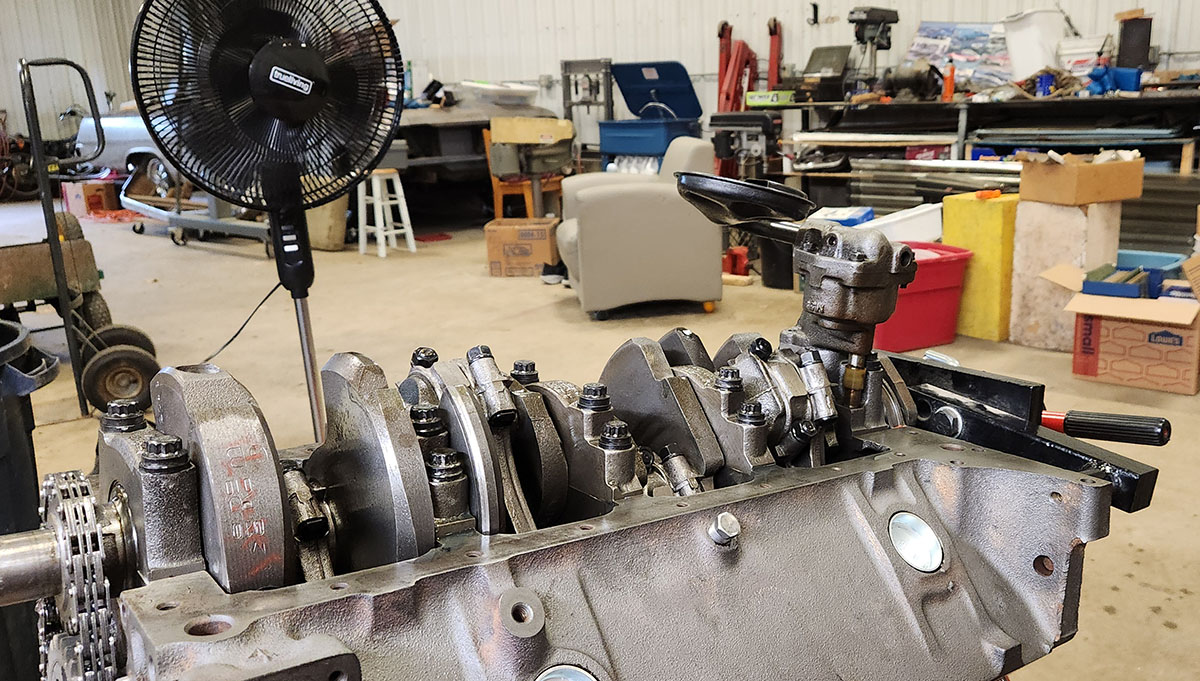
Now for a tricky part: installing the camshaft. This is tricky mainly because the bearings are designed to fit quite snugly, but in between them the lobes, being smaller than the bearings' diameter, are unsupported, so it's easy to get things out of alignment. You don't want the lobes getting banged against the bearings, or anything else that's inside there, and there's not really any way to reach in and guide anything from the inside, what with all the main caps and connecting rods and stuff in the way.
Nothing for it but to proceed! With a liberal coating of assembly grease (heavier than the gooey assembly lube used on the crank and whatnot, to help the cam hold onto it longer), in it goes.
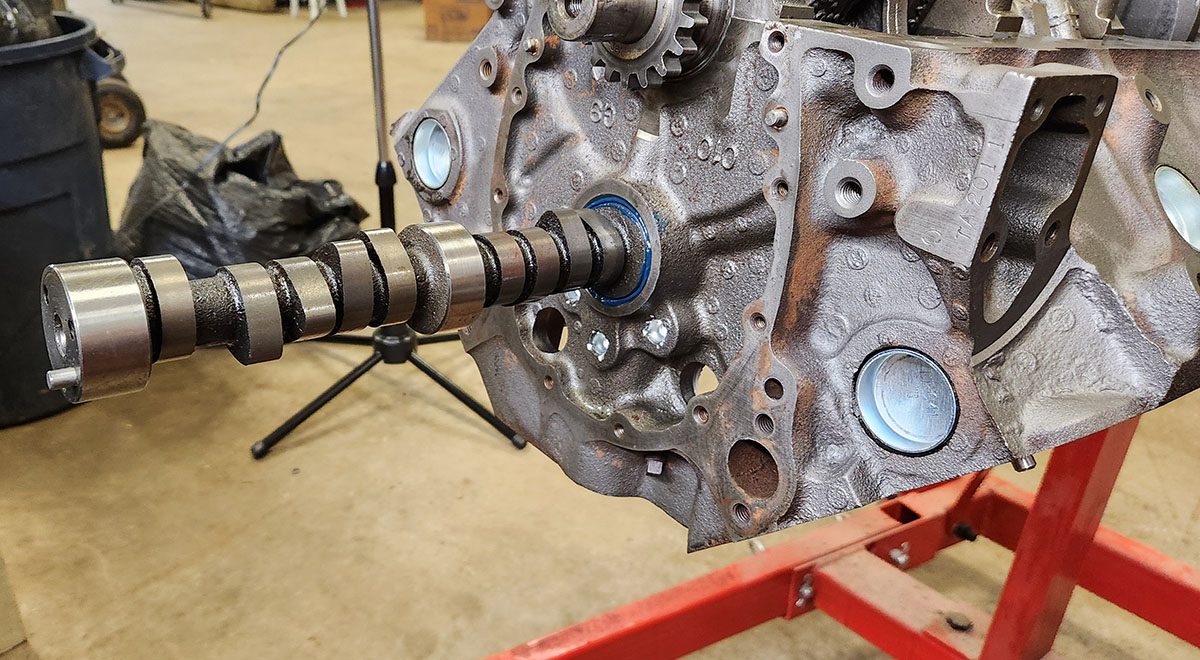
Once it gets farther in there, and the available length outside the block gets shorter, holding onto it and guiding it while also tapping it with a deadblow hammer gets trickier. Fortunately, we have that hardware thing full of a million-zillion bolts.
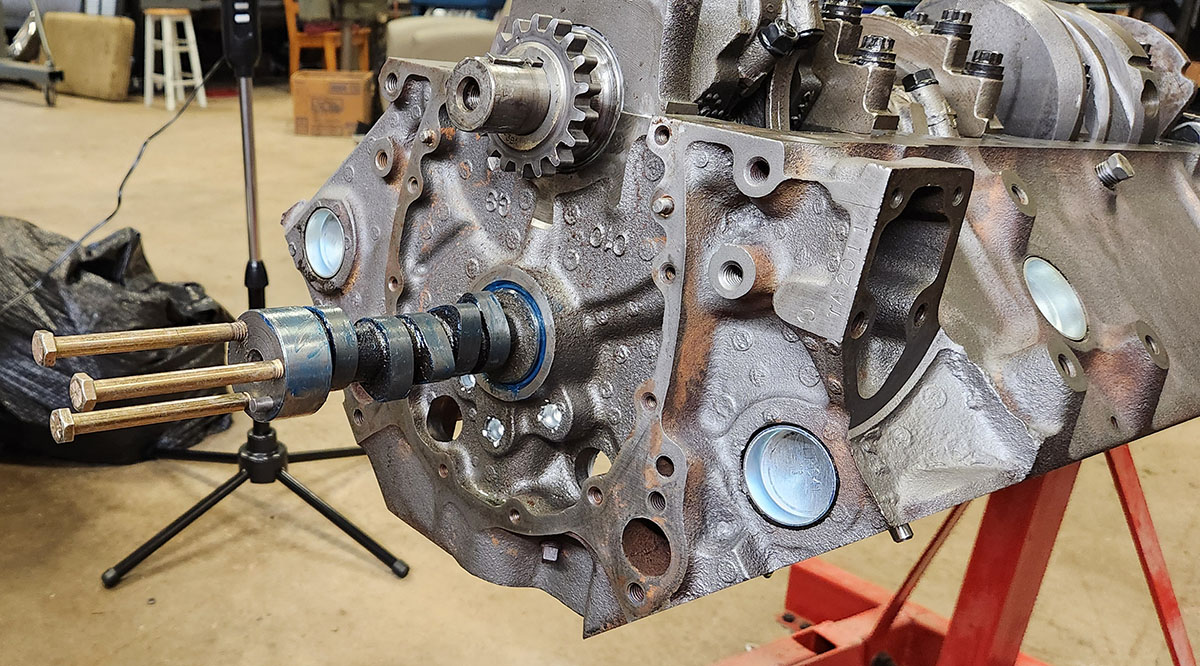
Another use for those million bolts: cleaning up the threads on all the threaded holes that will eventually have the bolts for the timing cover and oil pan screwed into them. Normally you'd do this with a tap, but we didn't have a ¼"-20 tap* and the hardware store wasn't open on a Saturday afternoon, so instead we expended three 3" bolts on the problem, just screwing them in and back out again with applications of Kroil to flush the crud out.
You can see from how dirty the threads got what we were up against there. This process wore out the first few threads and eventually rounded the bolt heads, which is why the whole undertaking used up three of them, since there were 24 such holes to clean.
Anyway! With the crank gear on, it was time to install the rest of the timing gear.
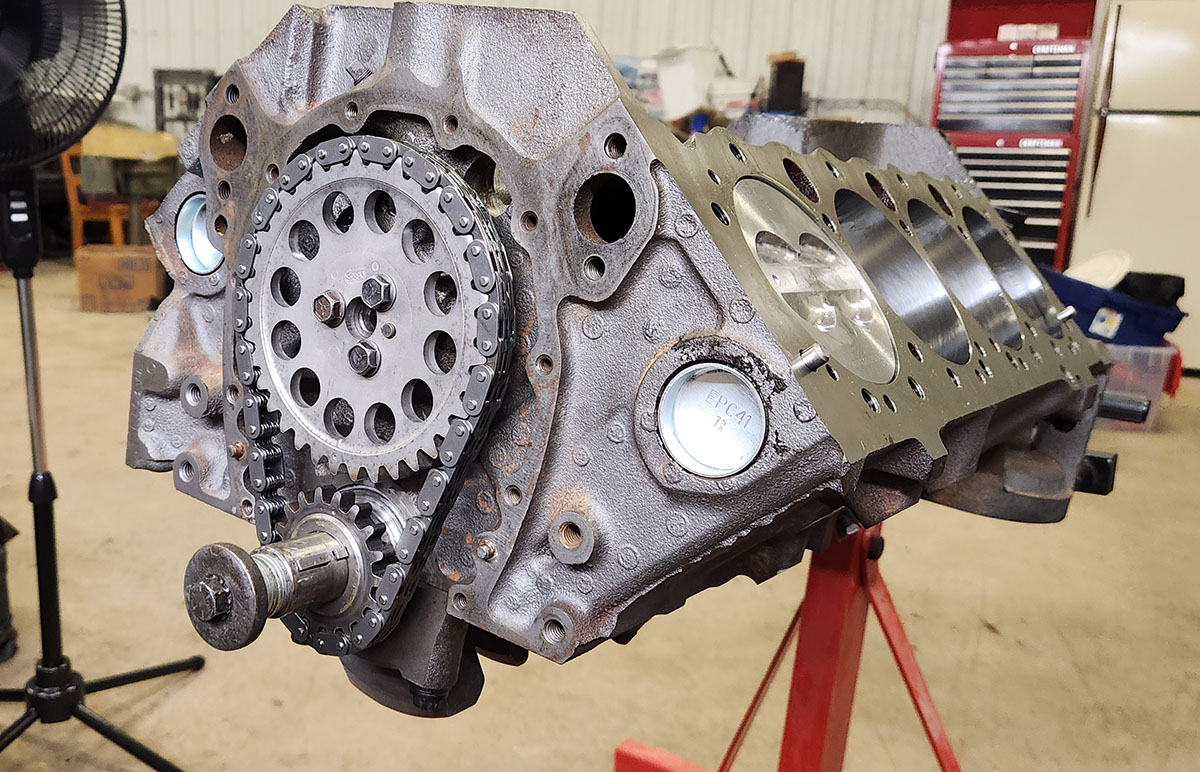
For those who may not know how this works, the two sprockets connected by the chain are what drive the camshaft and time it to the rotation of the crankshaft. Since this is a four-stroke engine, the crank turns twice for every one rotation of the cam (hence why the cam gear is so much larger). Both are keyed so they can only go onto their respective shafts one way, and it's hard to make them out at this resolution, but you might be able to see the little dots on each gear. The idea is that you turn the crank until number-1 piston is at top dead center (i.e., all the way up), which should put the dot on the crank gear at the top. Then you turn the cam until the dot on its gear is at the bottom, so that the two dots are facing each other.
The cam gear then has to come off so that you can put on the chain, which takes a bit of screwing around to get it on the right teeth and everything centered so you can put the cam gear back on the shaft. Following this, turn the crank through two complete revolutions and make sure the dots still line up once the cam has gone all the way around once. (They're slightly misaligned in this photo because I turned it slightly past TDC, but they did line up when the crank was at that point.
I'll get back to this when the time comes to put the heads on and rig up the valve train, but basically what the camshaft does in a pushrod engine like this one is bump a series of small hydraulic cylinders inside the engine (called "valve lifters" because... well... that's what they do) in a very specific sequence. The lifters, through pushrods, transmit the force from the cam lobes up to levers on top of the cylinder heads ("rocker arms"), which push the intake and exhaust valves in the heads down in said very specific sequence so that the engine can breathe. This is a little bit of a Rube Goldberg arrangement, but in its time, the overhead-valve pushrod engine was a big improvement over the way the valves in earlier types of engine worked!
Oh yeah, while I had a minute, I went ahead and threw the oil pump on as well.
I apologize for the visual clutter in the background of this image. We're going to have to clean that area up sooner or later. Hopefully sooner.
As the name suggests, the oil pump sits in the sump at the back of the oil pan, picks up motor oil, and pumps it up into the block through that brass pipe you can see to the right of the last set of connecting rods. In addition to the passages inside the crank, previously mentioned, that oil up all the bearings in there, there are oil galleries up in the block that carry the oil on up to the camshaft and past it into the heads, where it splashes around and lubricates the rocker arms and whatnot, then runs back down through other passages back into the crankcase to start the process all over again.
Anyway, I put the oil pump on at that point because with the timing set installed and the cam gear properly bolted on and torqued, the next step would have been to install the timing cover, followed by the oil pan. In this type of engine, they have to go on in that order because of the way the seals overlap.
We had a nice-looking chrome timing cover on hand that Dad bought years and years ago, and which we planned to use in this application, but when we broke it out of storage and got ready to put it on, we ran into a strange and entirely unexpected problem.
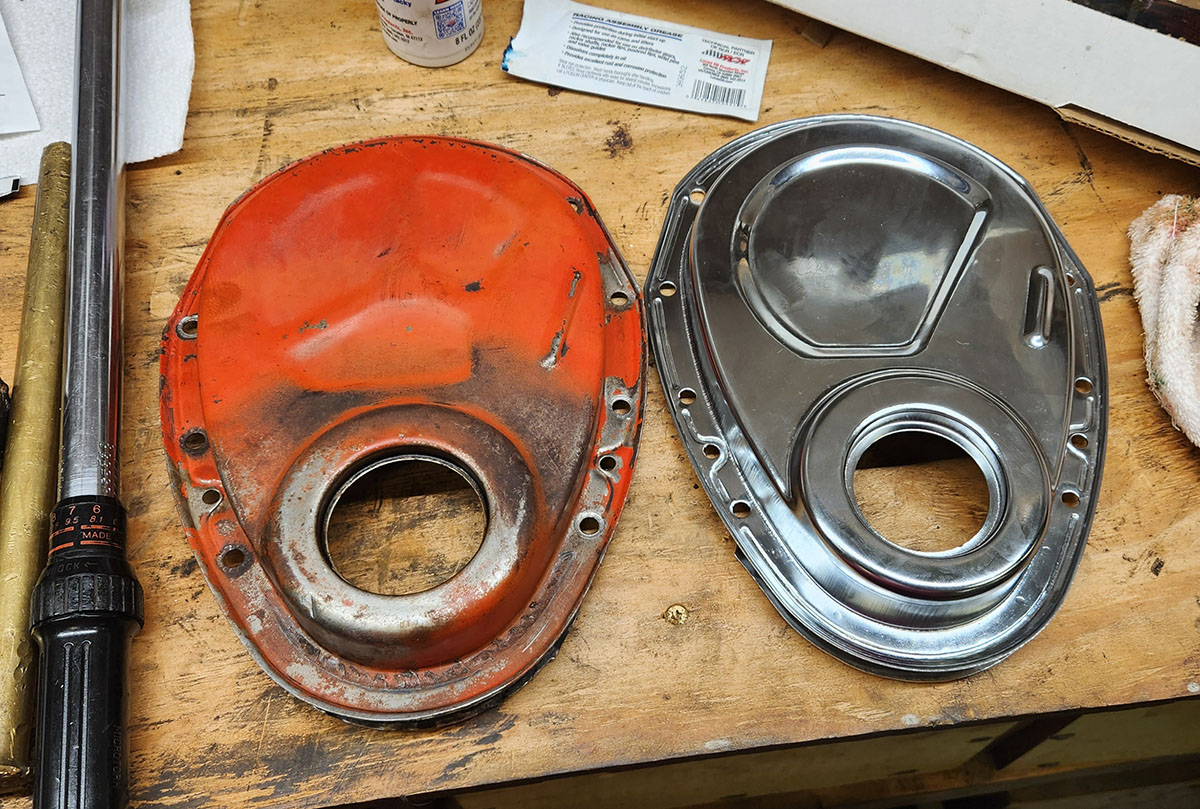
On the left: the timing cover that came off this engine when it was dismantled years ago. On the right: the chrome one we planned to use. Note the holes at the bottom. The nose of the crankshaft, forward of the timing gear, comes through that hole, so it needs to have a seal in it to keep the oil circulating around the timing setup from coming out.
From here, the holes in the stock cover and the chrome one look the same size, but when I went to install the oil seal in the chrome one... it just dropped right into the hole. That's... not supposed to happen. It's a seal. It's meant to be an interference fit, needing to be tapped into place with a hammer.
And here's the thing: the seal that just fell into the hole was the one that came with the cover, and it's the standard size for a 350-ci SBC. Mystifyingly, the seal hole in the chrome cover is just... too big, and unlike, say, main bearings, this is not something they make a "slightly oversized" version of.
We considered re-using the original one, which is why it's relatively clean in this photo--we ran it through the parts washer and got the worst of the crud off it, then knocked the old seal out of it so we could fit a fresh one. Unfortunately...
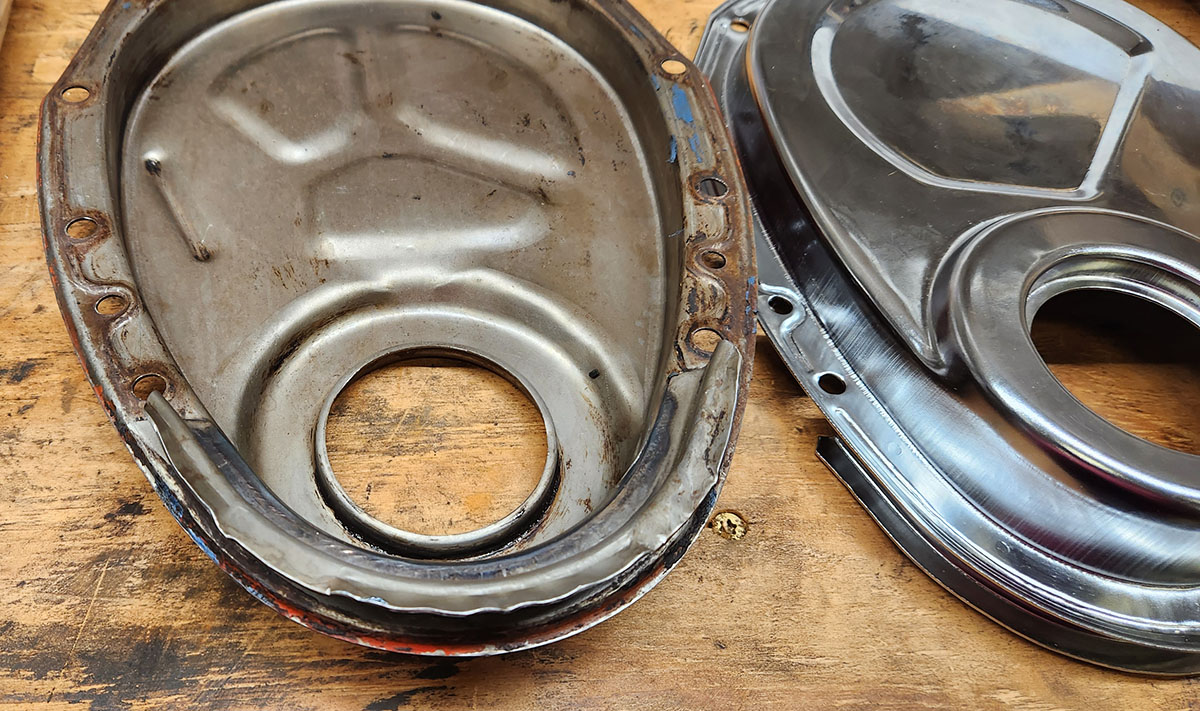
... that area is where the seal at the front of the oil pan goes, and it's never going to make a decent seal with the lip all chewed up like that. At this remove, we have no idea what happened to it, but there it is.
This pretty well beached us for the day, and indeed the duration until we can get another timing cover in. :/
I've said it before, back in one of the Project Impala reports, but it bears repeating: this is the kind of stuff that happens when you're working on this old hardware. Sometimes stuff just doesn't fit like it was supposed to. Sometimes you grab a part you bought 20 years ago but never got around to using off the shelf, and discover that it was apparently defective the whole time. It is what it is...
--G.
-><-
Benjamin D. Hutchins, Co-Founder, Editor-in-Chief, & Forum Mod
Eyrie Productions, Unlimited http://www.eyrie-productions.com/
zgryphon at that email service Google has
Ceterum censeo Carthaginem esse delendam.

 Printer-friendly copy


