|
|

Eyrie Productions, Unlimited
Gryphon
Charter Member
23033 posts |
Sep-17-24, 11:28 PM (EDT) |
    |
"finally getting into it with the truck..."
| |
Back in the shop today. Most of what we did was maintenance on current vehicles rather than work on the project ones. At this point I think "Project 350" proper is actually complete; the engine itself is built, everything else we have to do with it now is to do with getting it into a vehicle and working. I'm not sure what I'll call the pickup project itself, but today we got a little bit of a start on it, anyway. 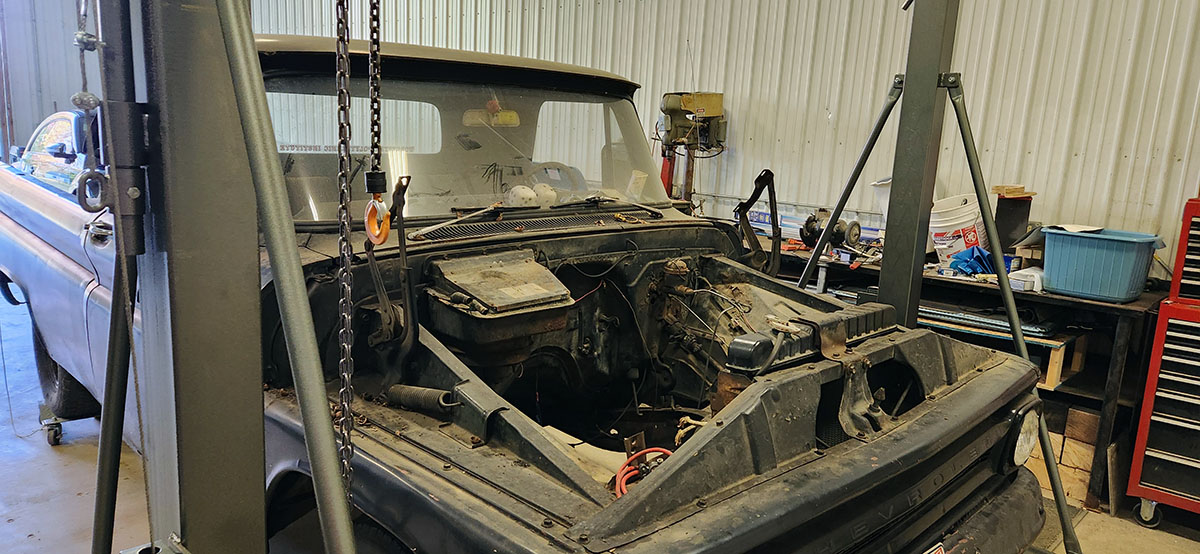
It's very hard to install an engine in a front-engined vehicle if you don't take the hood off. :) We'll probably take the front fenders off as well, but we didn't have time to do all that today. If we were young, fit men, we would just have unbolted the hood and taken it off by hand. We are neither of those things, so we used the gantry crane. :) 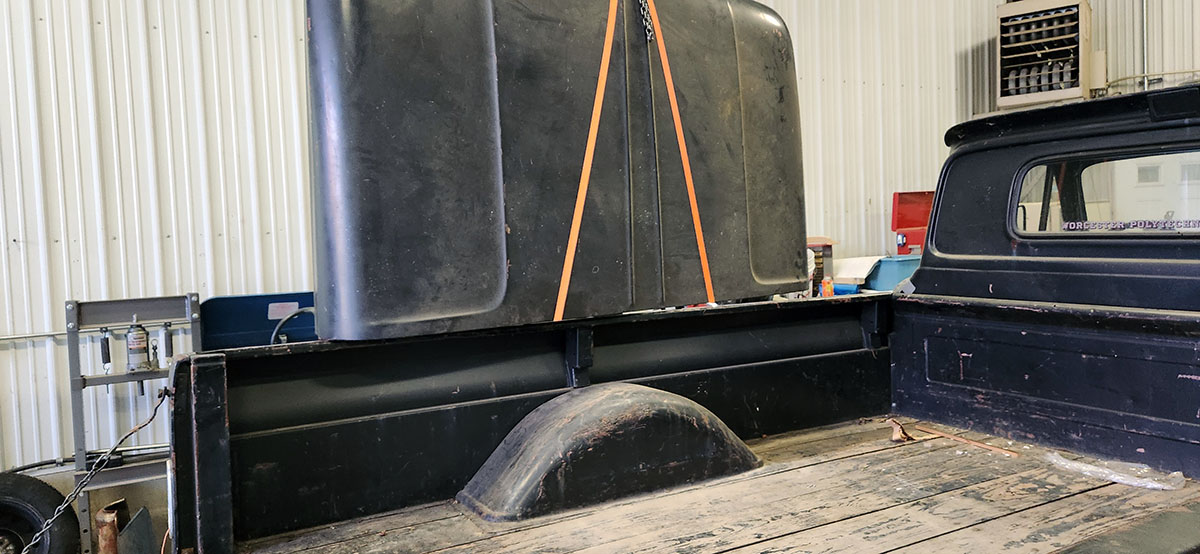
Having a place to put the hood where it'll be out of the way and safe can be a problem sometimes. But when you're workingon a pickup, well... 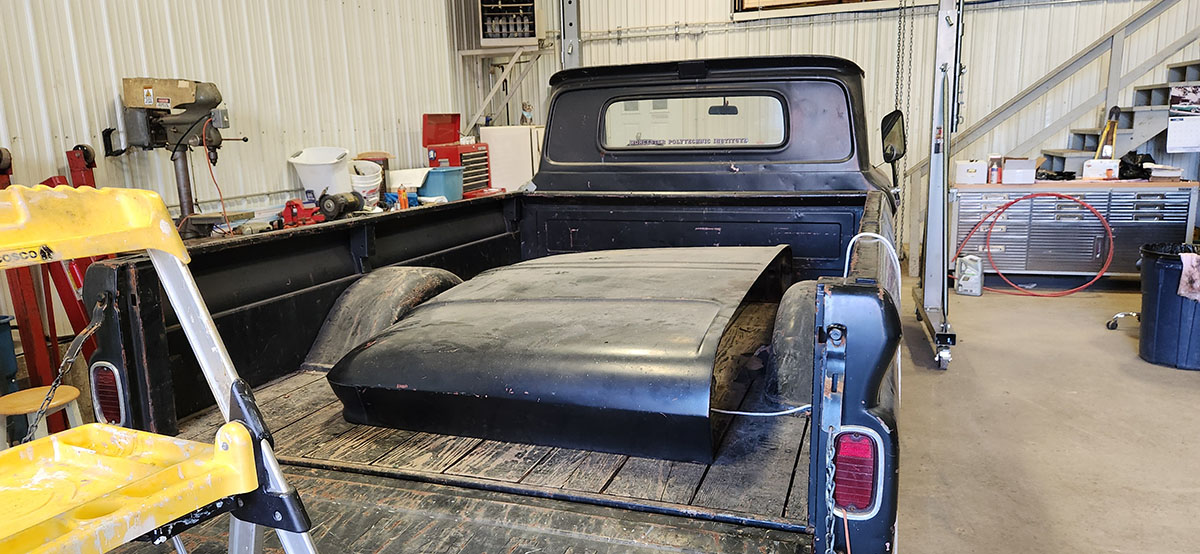
... the stowage location kind of suggests itself. :) That was all we had time for today. Next time we'll probably do some more disassembly, including the front fenders and probably the seat. We don't really need the seat out of the vehicle to install the engine, but the electrical system in this old pickup is kind of a nightmare, and remedying that issue under the dash will be a lot easier without the seat in the way. --G.
-><-
Benjamin D. Hutchins, Co-Founder, Editor-in-Chief, & Forum Mod
Eyrie Productions, Unlimited http://www.eyrie-productions.com/
zgryphon at that email service Google has
Ceterum censeo Carthaginem esse delendam. |
|
|
Alert | IP |
Printer-friendly page | Edit |
Reply |
Reply With Quote | Top |
|
|
Gryphon
Charter Member
23033 posts |
Sep-19-24, 10:03 PM (EDT) |
|
|
1. "Session 1"
In response to message #0
| |
LAST EDITED ON Oct-05-24 AT 06:10 PM (EDT)
If considering the hood removal, on a day when we were mostly doing other stuff, as "session zero", today was definitely a full session 1.Let me cut straight to the chase: 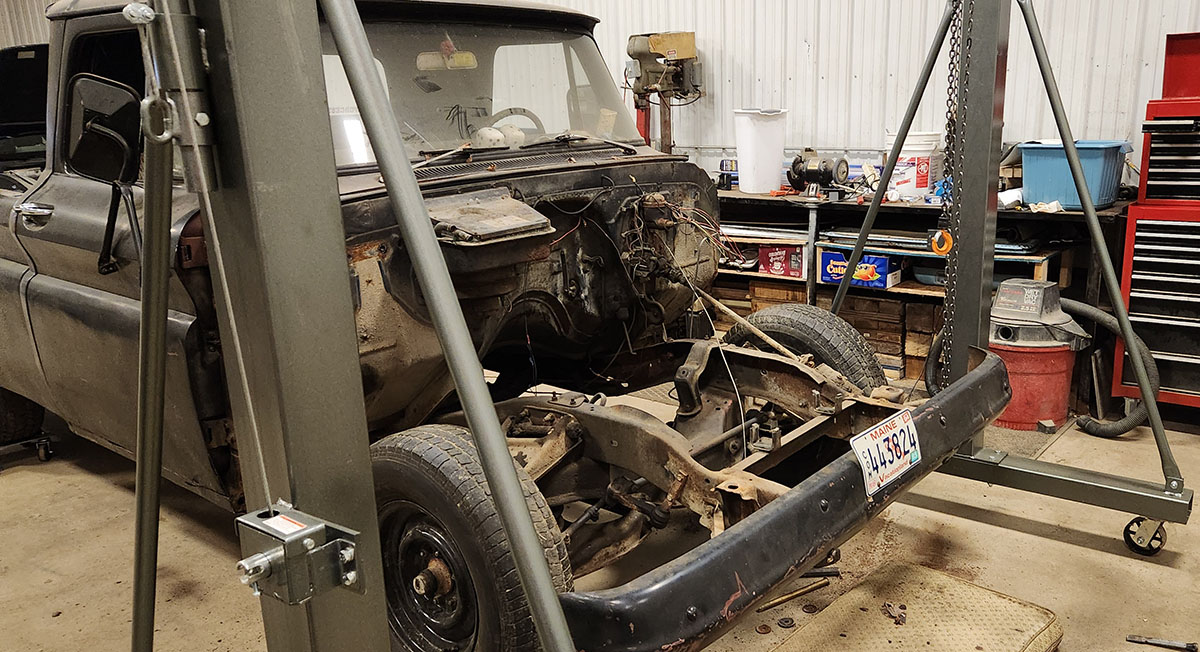
Today we took the front off. Like... all of it. This took the entire afternoon, for two main reasons. One is that there are more pieces to the front end of a 1966 Chevrolet pickup than one may assume. The other is that most of the fasteners we had to undo in order to remove those pieces had probably never been removed since the truck was assembled in 1965*, and many of them were underneath. This in-progress shot gives a sense of what's in there: 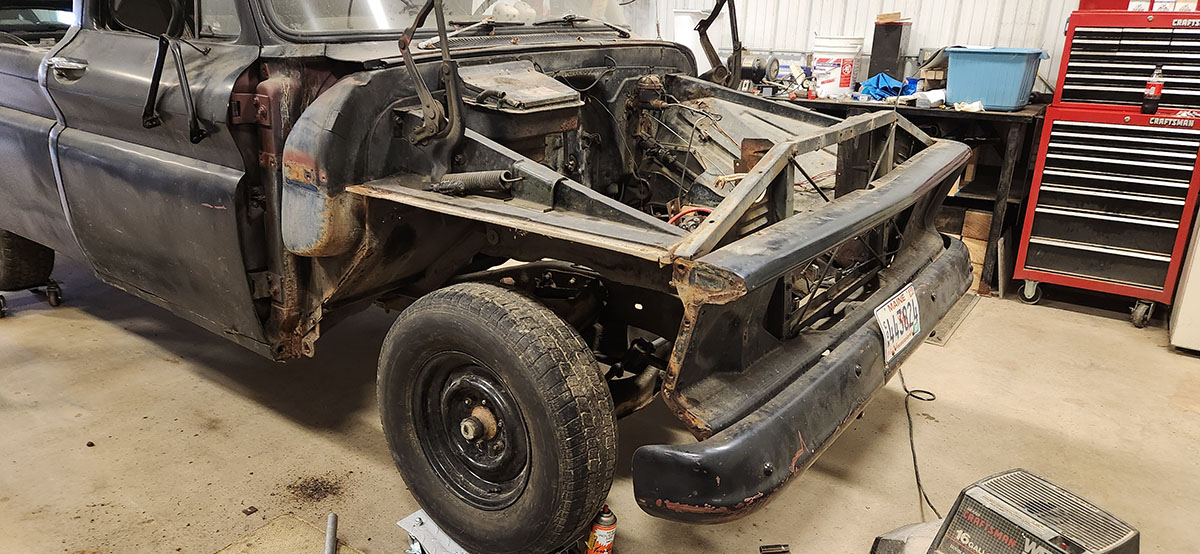
I took this when we'd only removed the grille and the passenger side outer fender, which comes off in two pieces--the main body of the fender, and a sort of "shoulder" piece filling in the corner where the door meets the bottom of the windshield. With those gone, you can see the inner fenders, radiator support, and... uh... front-end piece that goes between the radiator support and the grille, I don't know its name. The problem we ran into from here is that once you get the outer fenders off, all of the other structures are interconnected, so you can't get any of them off until you've freed the radiator support from its mountings--but you can't do that until you've taken all the bolts out of all the other pieces first. It's a long slog without a lot of sense of progress, unless you get such a sense out of keeping track of how many rusty old bolts you've broken. (We broke seven, out of approximately 132 million, which isn't a terrible ratio.) 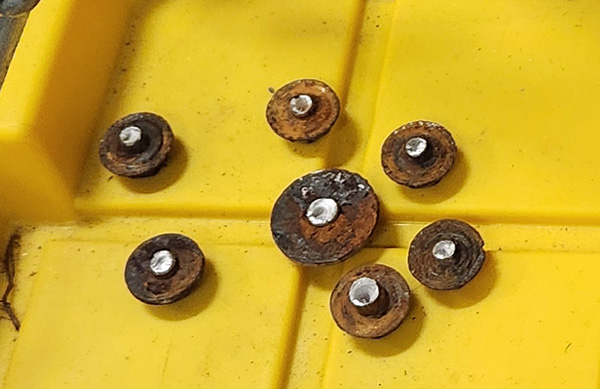
Oh yeah, also, the "shoulder" piece on the driver's side has the radio antenna mounted on it. Dad sort of forgot that the antenna does something... 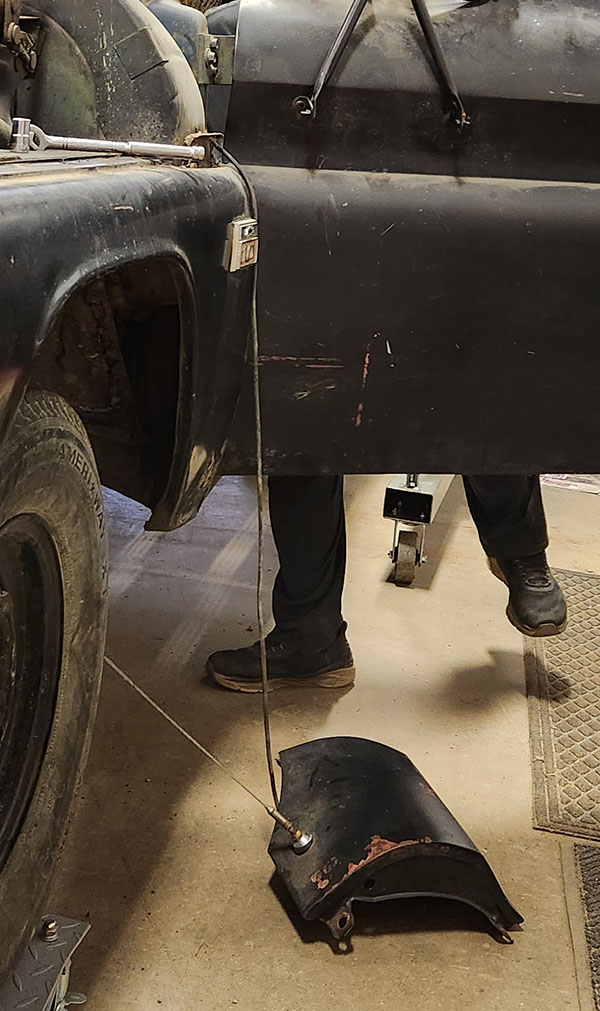
"That's not going to come out until you unhook it from the radio, you know." "This has a radio in it??" (it's been a while, OK) Still, we persevered. And used the crane. It's kind of becoming our favorite tool. Also: I think I've mentioned that this truck has been many colors. When we bought it, it was mostly red primer with a couple of green patches. Sandblasting revealed that it was previously green, yellow, and possibly white. We were never sure what the original color was, though, until we got the outer fenders off. Since we don't think they've been off before, we're reasonably sure the color revealed underneath them is the original. 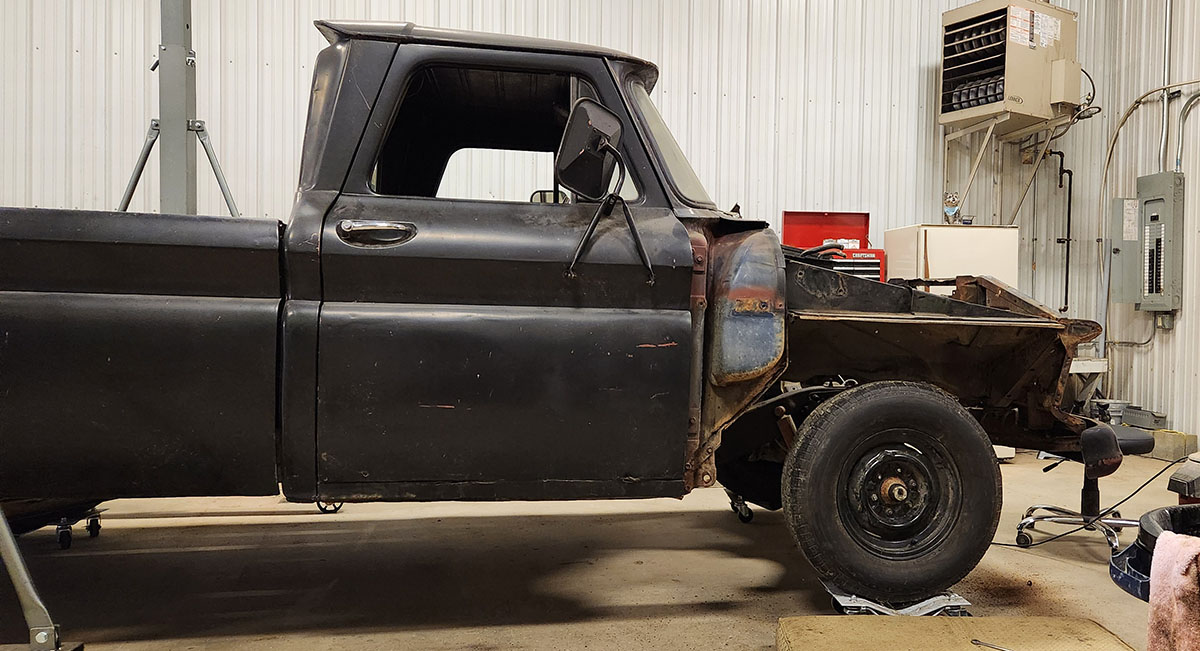
When I got home tonight, I dug around a little and found a color sample card for 1966 pickups online, from which I think I've determined what the original color actually was. 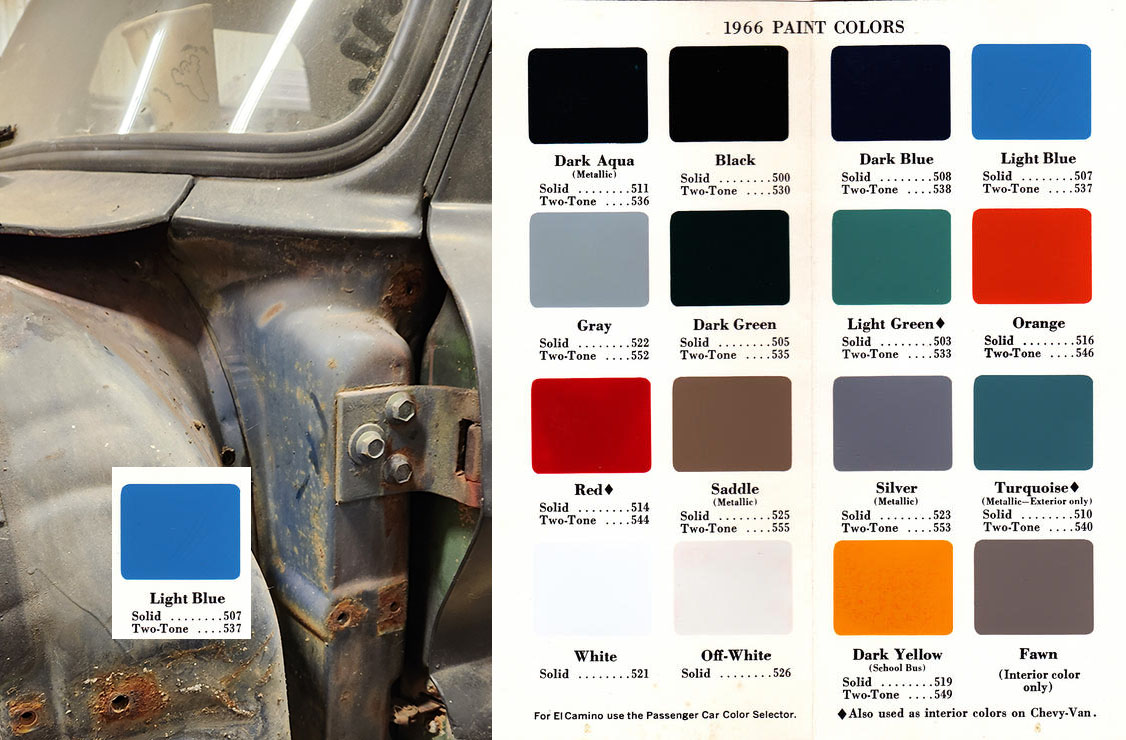
So that's neat! Even considering the state of the fasteners, we found surprisingly little significant rust in the parts we removed, given that they were subject to Maine roads for decades before the truck went into storage. They may need some repairs, particularly to the lower rear corners, but they're better than we expected! On the other hand, the original engine bay wiring is pretty crunchy, so, as I suspected, the whole thing probably needs to be re-wired. (Also, a certain someone dropped one of the headlights, which promptly smashed into a million pieces on the floor. But old-timey sealed-beam headlamps are cheap. :) Probably should look into upgrading the brakes, too; as you can see in the first photo, in 1966 Chevy pickups still had single-chamber brake master cylinders, which is... not ideal. (You may recall we addressed this same problem on the Impala back just before the plague shut us down.) Might as well throw a vacuum servo on there while we're at it. (Also, note in that photo that in this model, the heater core is on the outside of the cab--it's in that box thing on the passenger side of the firewall. It likely needs to be replaced. It's been empty the whole time, but they still don't take well to sitting unused for 30+ years.) Next time, if the weather's good, we plan to take out the seat and remove the body from the back, then get the chassis-cab assembly down off the dollies, roll it outside, and power wash the lot. It needs a thorough cleaning before we start sanding off rust and sealing/painting. Also, every single one of those threaded holes needs to be re-tapped. That'll be fun. --G.
* model years haven't lined up with calendar years in a long time
-><-
Benjamin D. Hutchins, Co-Founder, Editor-in-Chief, & Forum Mod
Eyrie Productions, Unlimited http://www.eyrie-productions.com/
zgryphon at that email service Google has
Ceterum censeo Carthaginem esse delendam. |
|
|
Alert | IP |
Printer-friendly page | Edit |
Reply |
Reply With Quote | Top |
|
|
 |
|
|
|
|
MoonEyes
Member since Jun-29-03
1158 posts |
Oct-01-24, 03:24 AM (EDT) |
 |
4. "RE: Session 1"
In response to message #1
| |
>Next time, if the weather's good, we plan to take out the seat and
>remove the body from the back, then get the chassis-cab assembly down
>off the dollies, roll it outside, and power wash the lot.Isn't that the sort of job best left to the coroner/police?
Also a lot easier on you guys if they do it for you. (sorry) ...!
Stoke Mandeville, Esq & The
Victorian Ballsmiths
"Nobody Want Verdigris-
Covered Balls!" |
|
|
Alert | IP |
Printer-friendly page | Edit |
Reply |
Reply With Quote | Top |
|
|
|
|
Gryphon
Charter Member
23033 posts |
Nov-03-24, 01:08 AM (EDT) |
|
|
9. "Session 2"
In response to message #1
| |
Finally finished the suspension repairs on the VW and cleared the way to remove the pickup bed. 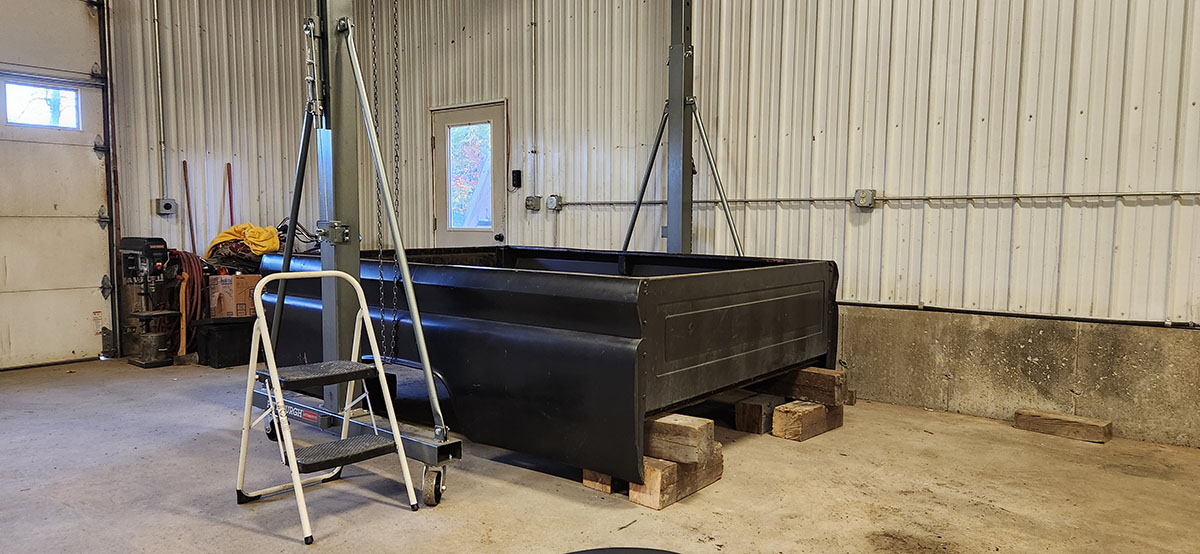
Then we had a bit of luck, in that this past Thursday, despite being Hallow-frickin'-een, was a sunny day with a most unseasonable high in the low seventies Fahrenheit. Which meant it was a perfect day to roll the beast outside and do some pressure washin'. 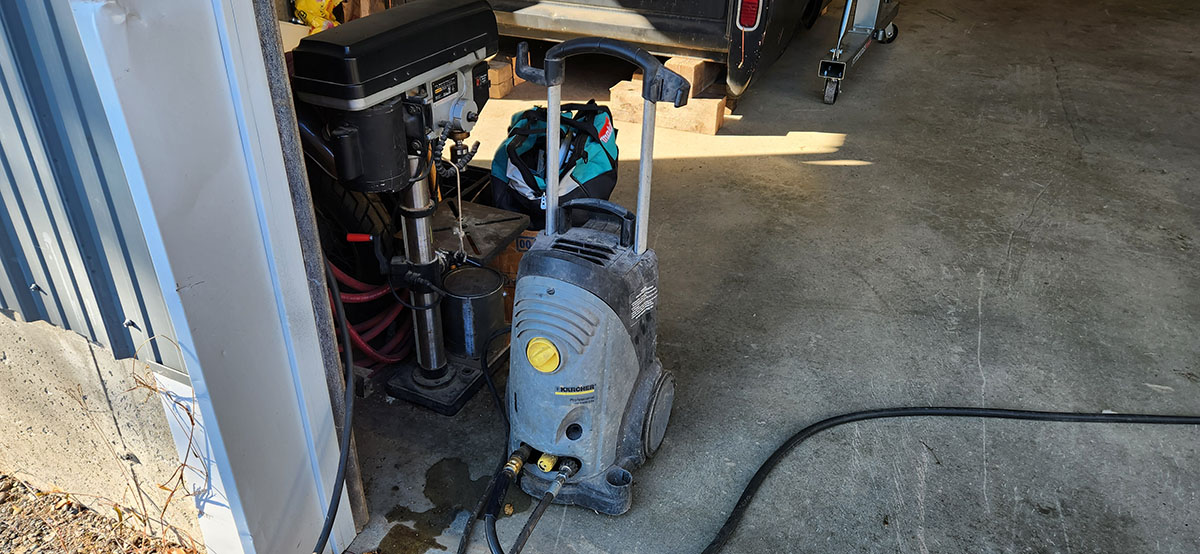
Our weapon of choice: a high-powered Kärcher industrial washer that came with the garage. It was originally used to wash the heavy trucks the building's first owner's haulage company used. It requires 240-volt power and came with a telescoping wash wand that can extend to a length of about 30 feet, in addition to the normal-sized one. The only thing it doesn't do is heat the water (and they make a version that does). 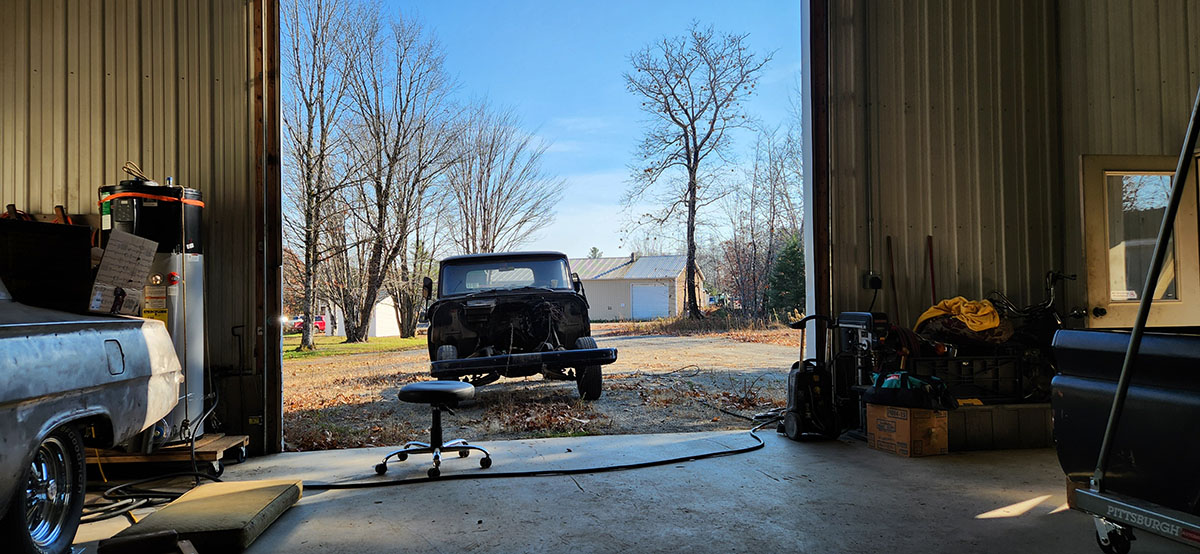
Fun side fact: we weren't the only ones who thought "wow, this is a perfect day to wash a truck." At the same time we were doing it, someone at the beige garage you can see in the background (which once belonged to the same company as ours, and unlike ours is still in commercial use) was doing the exact same thing to a dump truck. :) 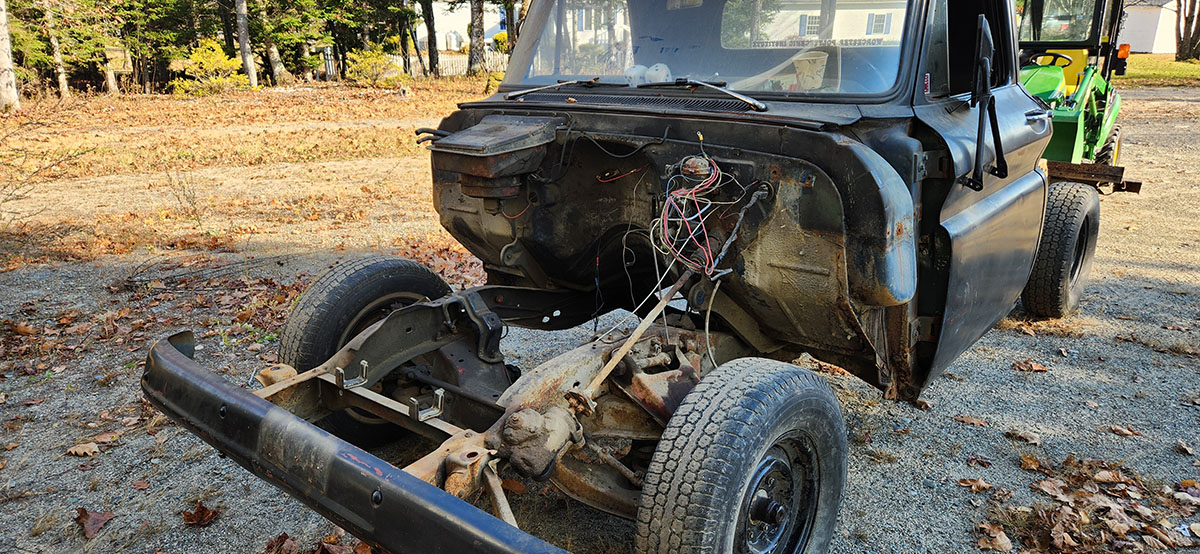
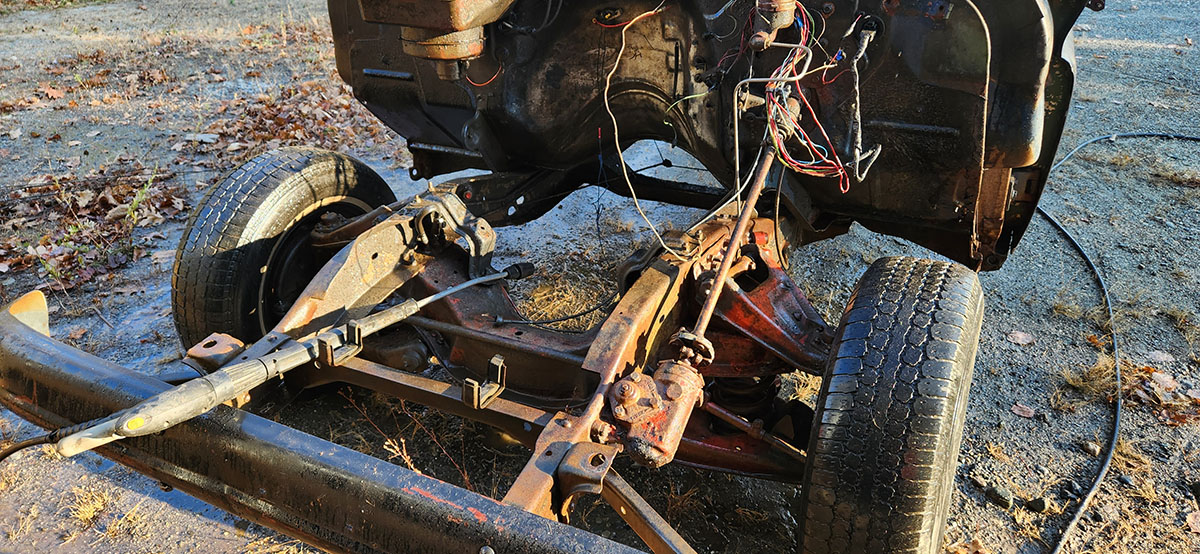
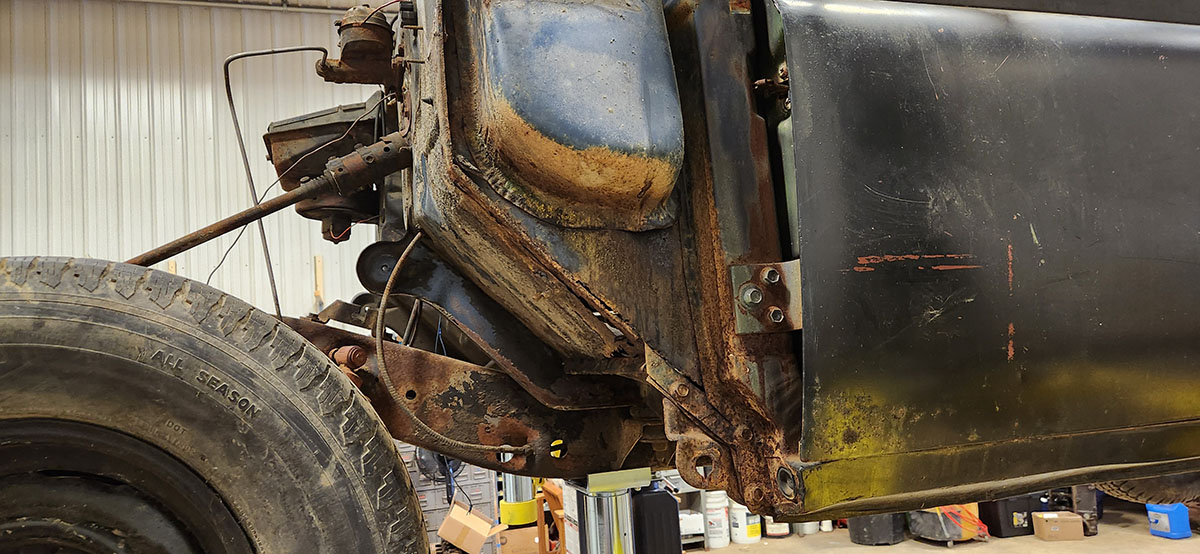
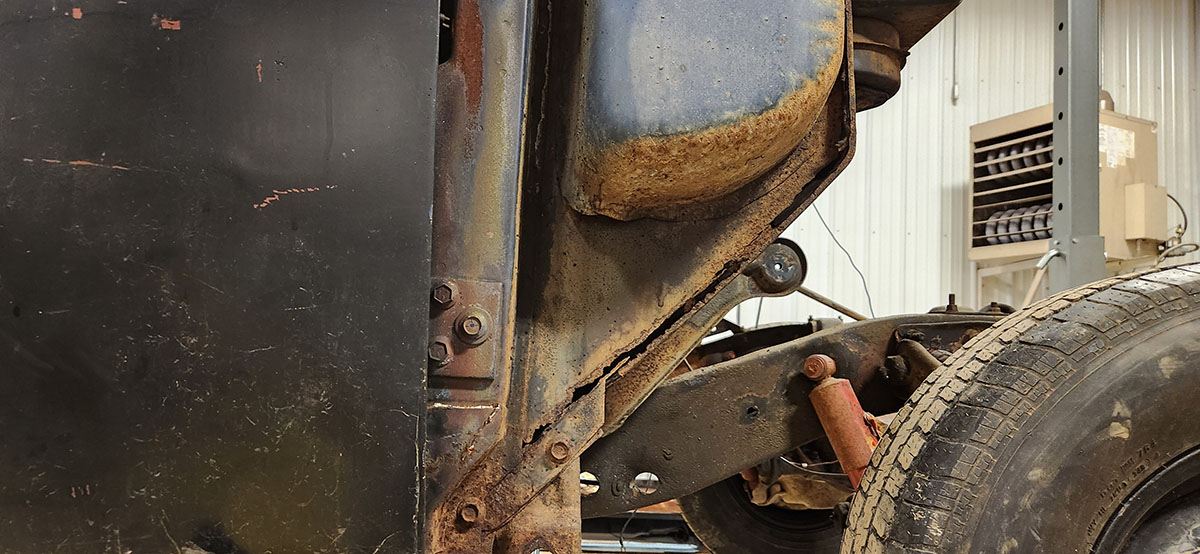
The washer did a pretty good job considering how much ancient dust-mixed-with-grease was on those front-end components. You can even see where the steering box and the upper suspension arms were originally painted Chevy engine red. :) 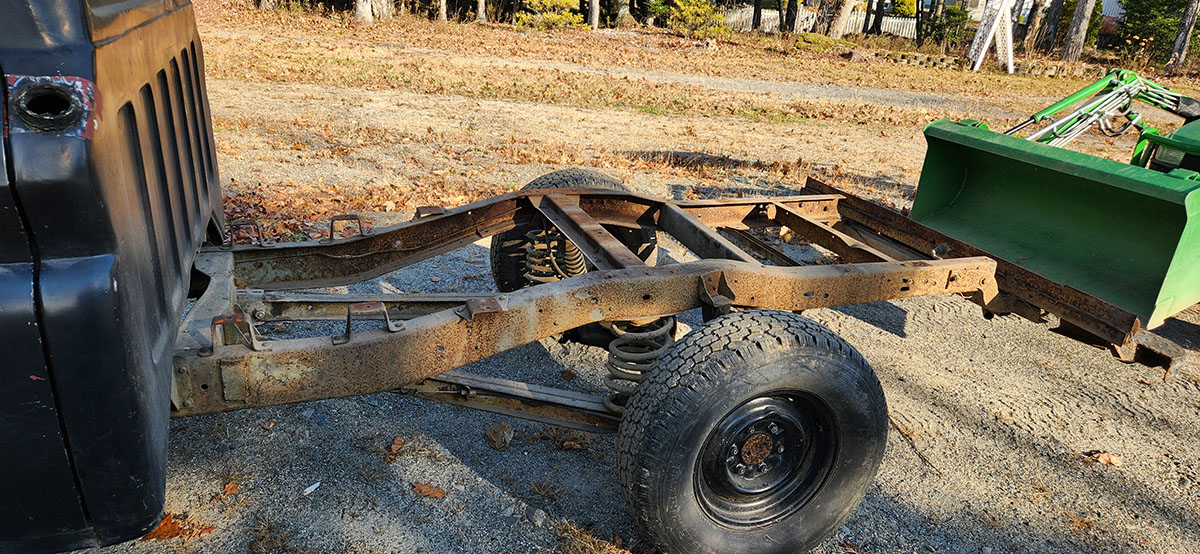
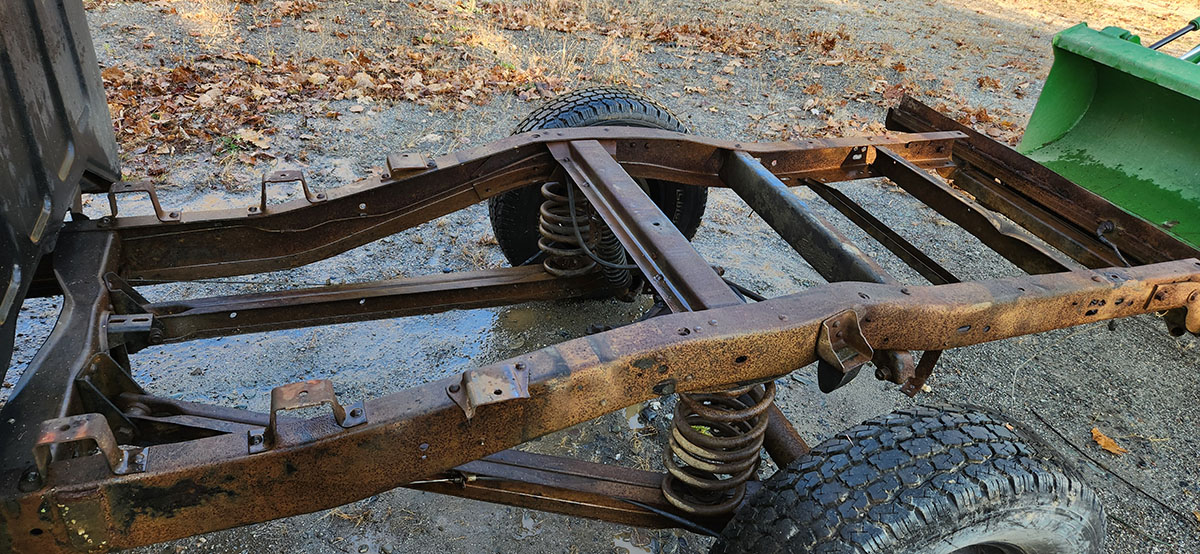
The difference is less dramatic in back, since the washer didn't have much to say to rust, but it's just surface scale and should be easy enough to clean up before we put the body back on. Artsy late-afternoon sunshine shot with some of the original color showing! 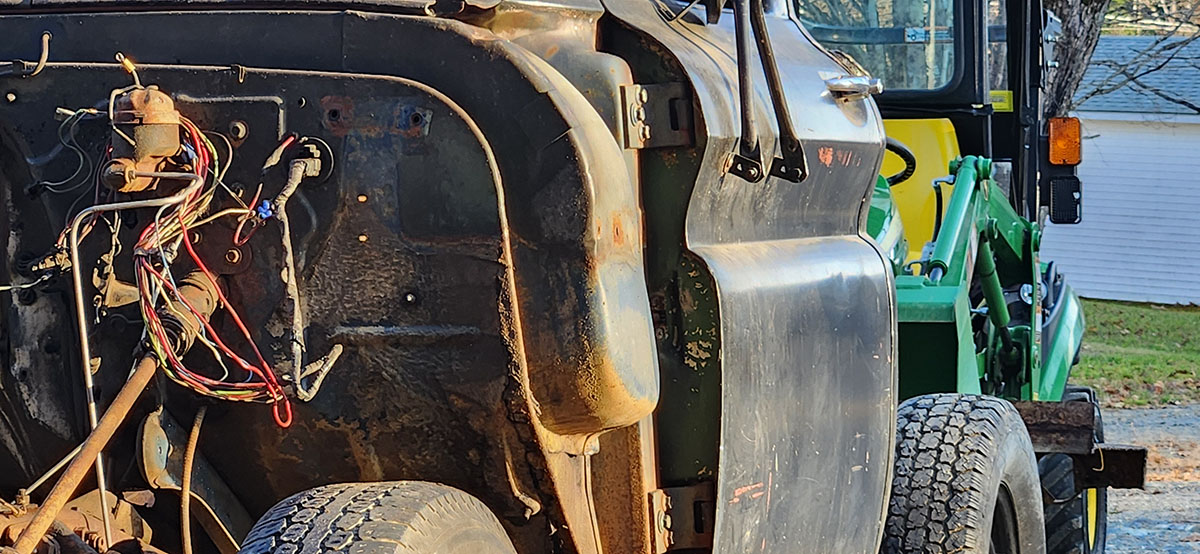
Don't worry about that mess of wiring getting wet; it's all coming out anyway. It's too old and brittle and previously-spliced to be worth messing around with; we're going to end up rewiring the whole vehicle. 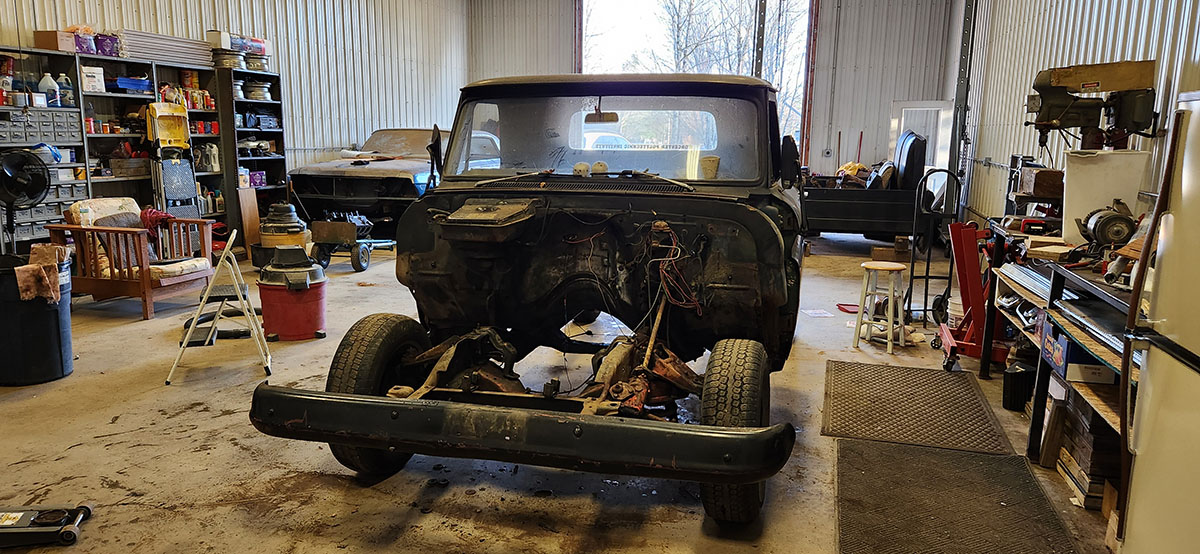
And back inside. --G.
-><-
Benjamin D. Hutchins, Co-Founder, Editor-in-Chief, & Forum Mod
Eyrie Productions, Unlimited http://www.eyrie-productions.com/
zgryphon at that email service Google has
Ceterum censeo Carthaginem esse delendam. |
|
|
Alert | IP |
Printer-friendly page | Edit |
Reply |
Reply With Quote | Top |
|
|
|
Gryphon
Charter Member
23033 posts |
Oct-05-24, 06:06 PM (EDT) |
|
|
5. "Session 1A"
In response to message #0
| |
LAST EDITED ON Oct-05-24 AT 06:11 PM (EDT)
We've gotten a little sidetracked by a capacity problem. The Volkswagen needs some suspension work to pass inspection, so it's up on jack stands in a corner of the VAB now. When we went to take the bed off the pickup, we realized that the Beetle is right where we should logically put the bed--so we need to get that job done first.Unfortunately, said job turns out to be a lot more complex than Dad thought it would be when he decided to chuck the dealership's estimate and do the work himself, so it's taking... a while. In the meantime, I do have these photos from before we got sidetracked. We removed the seat and vacuumed out all the dirt and whatnot from the cab floor, which gave us a clear view of all the rust damage down there that needs to be addressed. Driver's side door sill:
 Passenger side door sill:
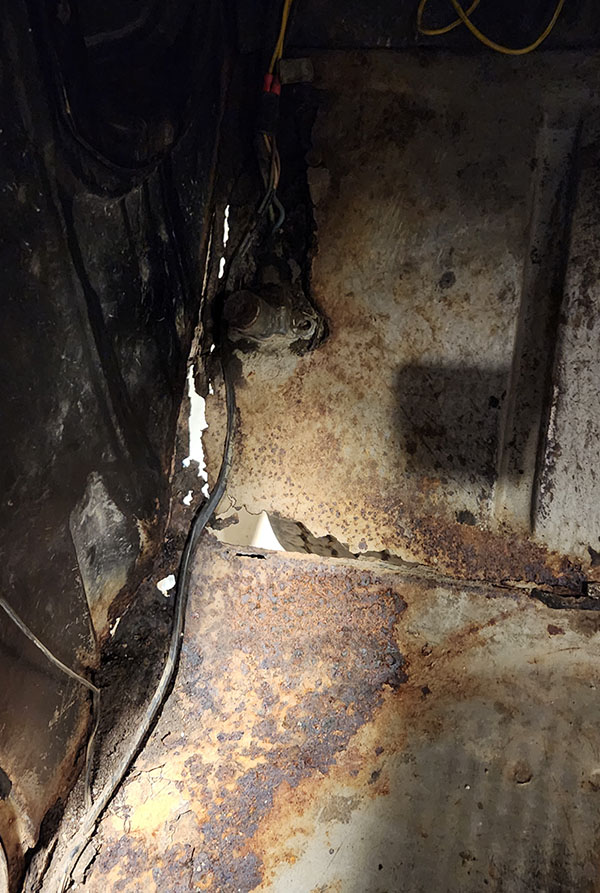
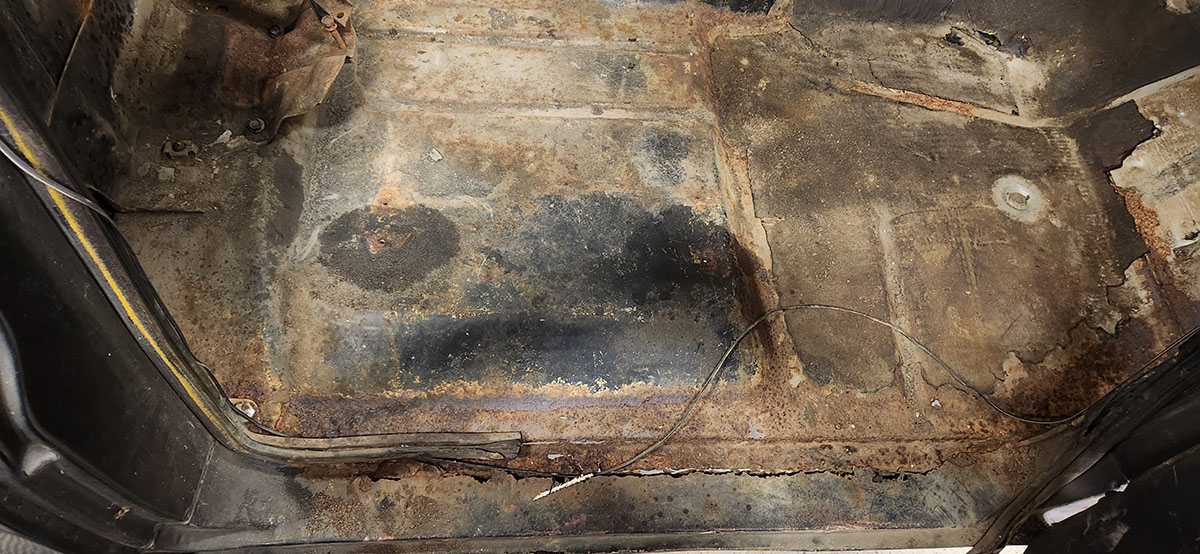 Driver's side footwell:
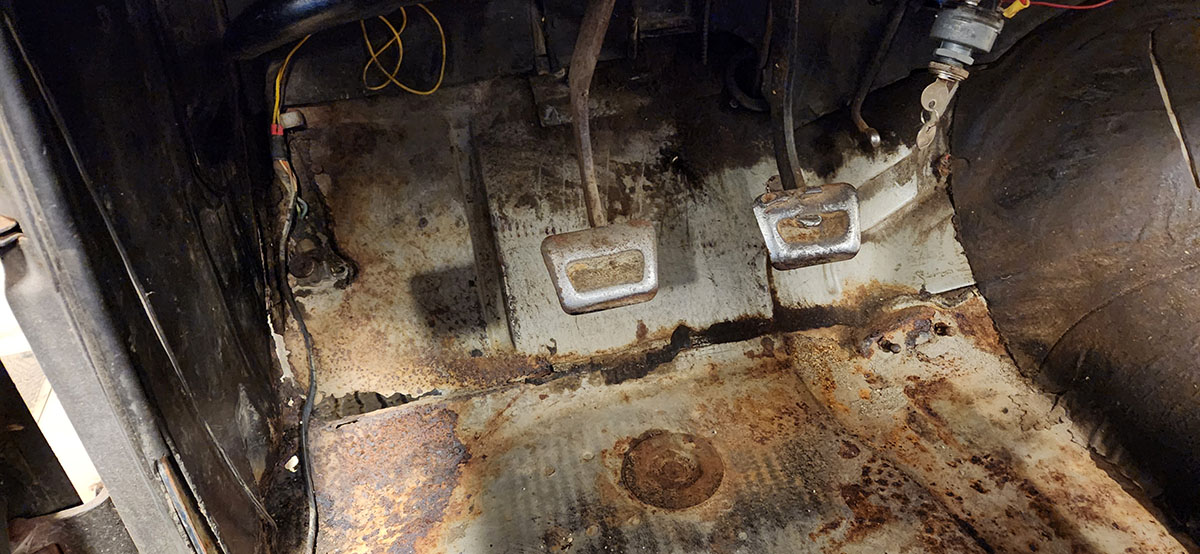 Closeup of the worst of the driver's footwell, which is along the seam where the floorpan meets the side bulkhead:
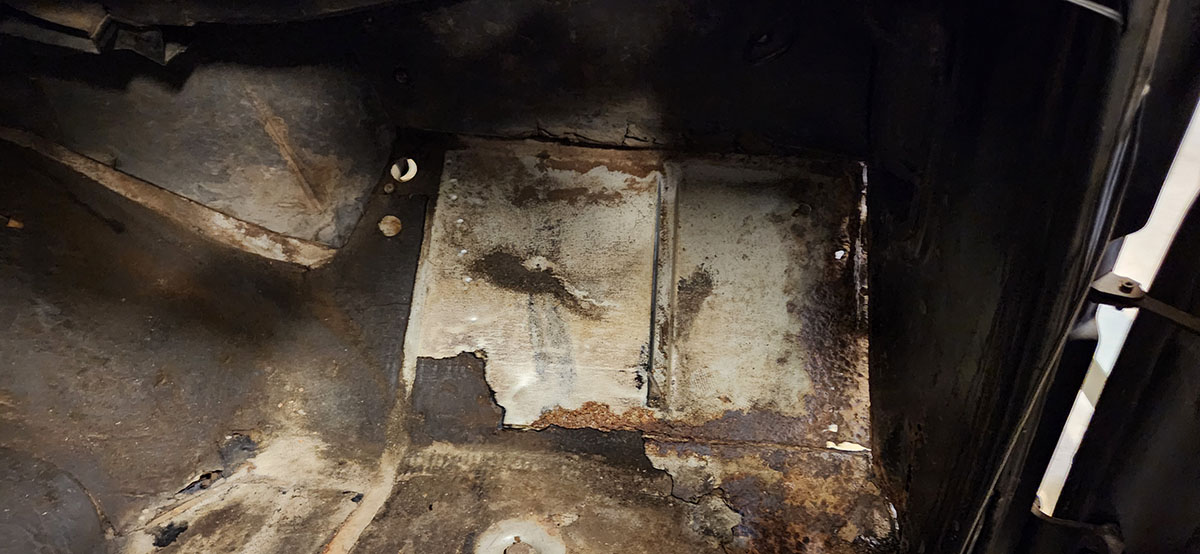
 Passenger side footwell:
 All in all, no real surprises there. Most of the damage is right where you'd expect, along panel seams and in the areas most likely to get and stay wet over the course of normal operations. We could probably patch it up with stray bits of metal (I once knew someone who repaired a much rustier pickup floor using "borrowed" road signs), but proper replacement floor panels are available. I say no surprises, but there was one. When we took out the seat, I found this underneath. 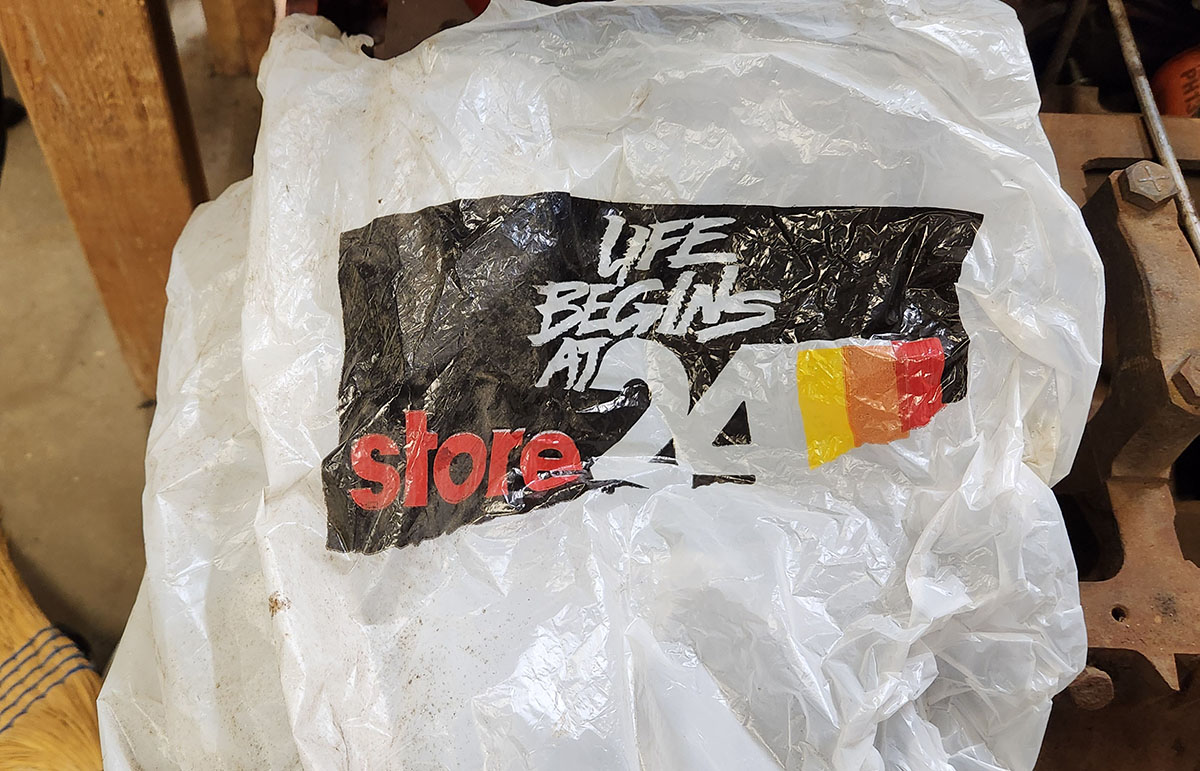
A bag from Stoh! That is some prime early-'90s fontology going on there. Anyway, work will resume on the truck once the VW repairs are done and the space is cleared for the bed to land. And also once my lower back muscles stop going into spasm. I had to cancel a shop day today on account of this bullshit. :/ --G.
-><-
Benjamin D. Hutchins, Co-Founder, Editor-in-Chief, & Forum Mod
Eyrie Productions, Unlimited http://www.eyrie-productions.com/
zgryphon at that email service Google has
Ceterum censeo Carthaginem esse delendam. |
|
|
Alert | IP |
Printer-friendly page | Edit |
Reply |
Reply With Quote | Top |
|
|
|
|
|
|
|
|
Gryphon
Charter Member
23033 posts |
Jan-28-25, 12:29 PM (EDT) |
|
|
10. "sessons... 3 through 5? ish"
In response to message #0
| |
The last two shop sessions have really been one task, and the previous one blended in with adding the new bits to the lift, so it's all a bit of an organizational muddle, but anyway. Let's get into it! With the '66 pickup on the lift (see the other thread), we we able to take better stock of the situation down below. It's... bad, but not as bad as it could be. 
The underfloor is looking pretty ratty, but we knew that. 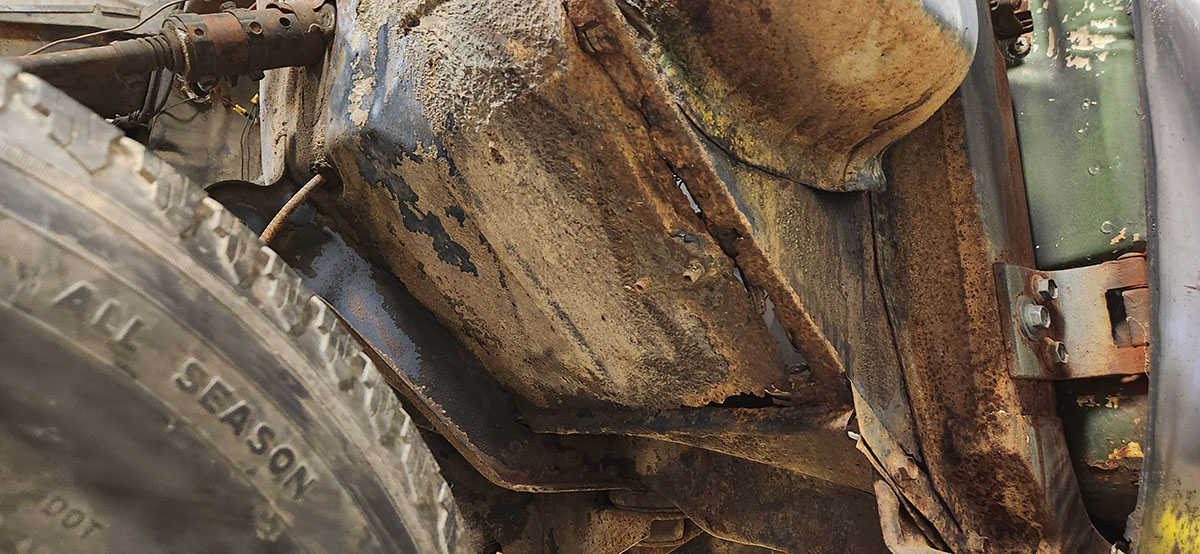
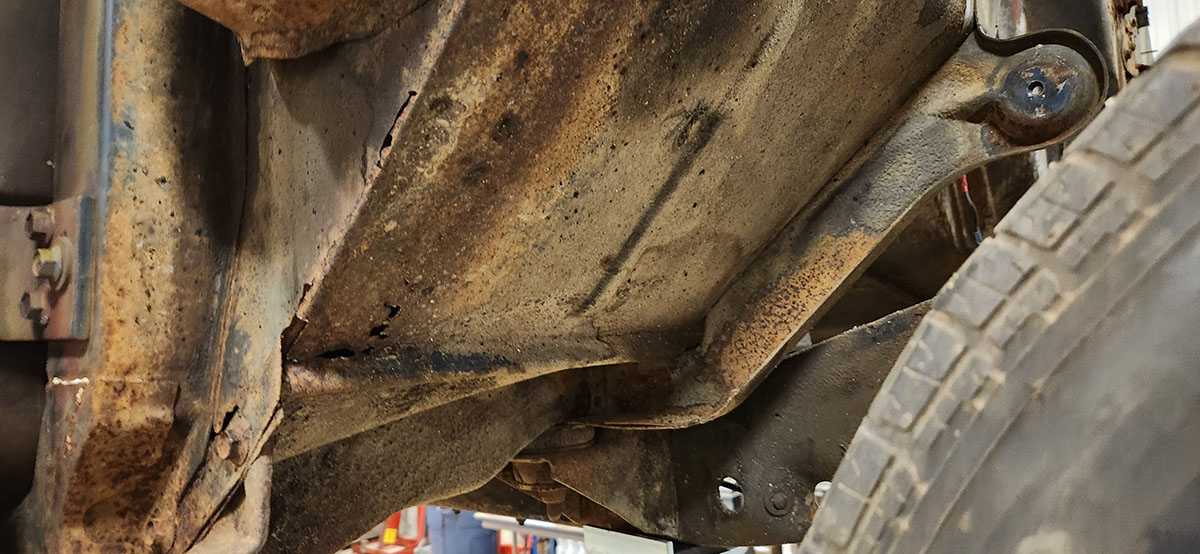
Apart from the holes developing at the seams, the footwells/front corners really don't look too bad. 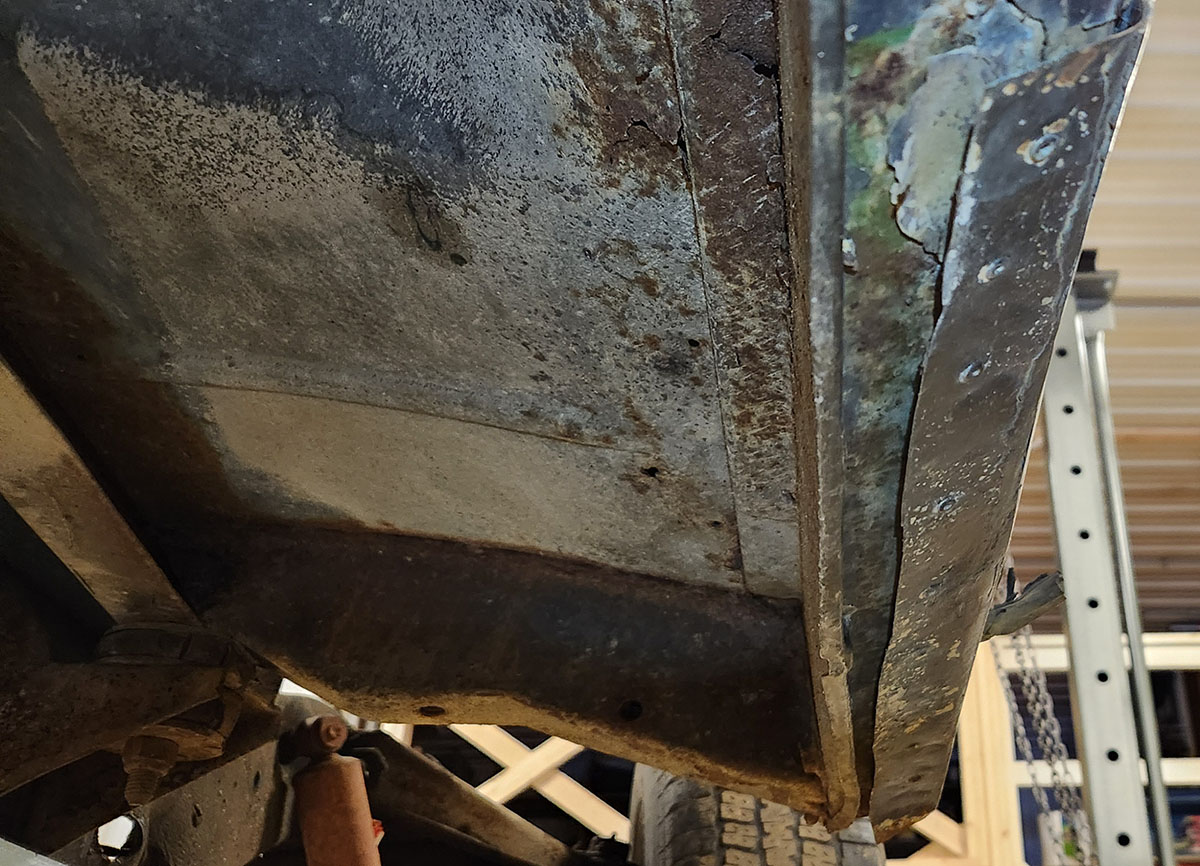
This is probably the worst of it--it's an old, bodgy repair to the passenger side door sill. So old we probably didn't do it! This vehicle contains many mysteries. 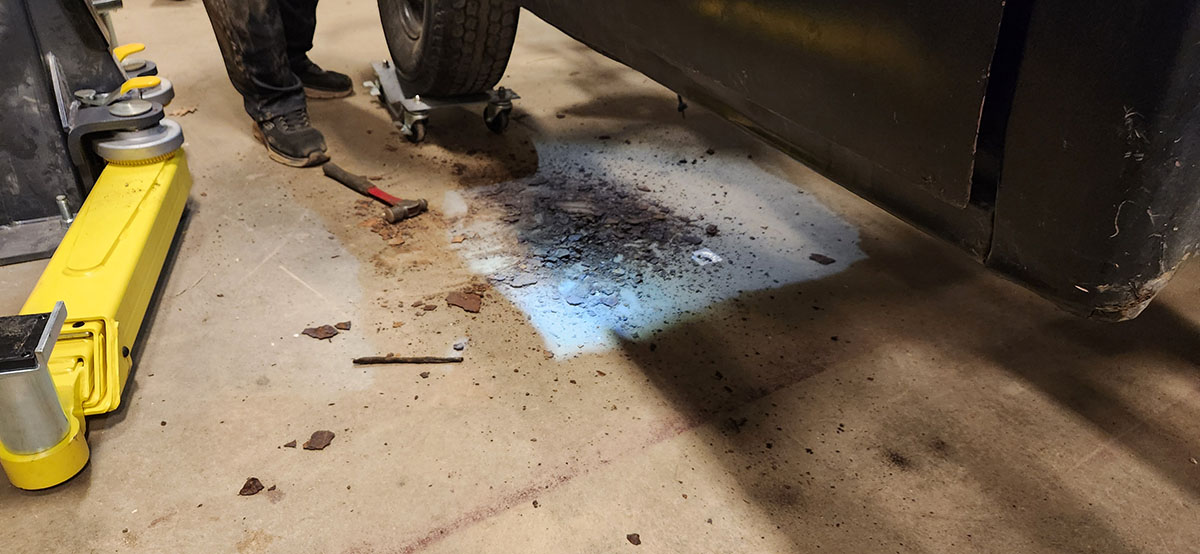
Dad, every time you hit the vehicle, more pieces of it fall off. Please stop that, it's demoralizing. You are breaking the car, Samir! Anyway, with the preliminary damage survey complete, we turned our attention to the next challenge: the electrical system. Now, you would think that a work truck from 1966 wouldn't have a very complicated electrical system, and relatively speaking you'd be right. Compared to a modern-day vehicle with all its sensors, computer controls, and whatnot, it's pretty basic. But on the shop floor, without that relative comparison for comfort, it's... it's a lot. By the 1960s, even the most basic motor vehicles had quite a few lights, gauges, and other electrical bits and pieces, to say nothing of the mass of wiring that makes the engine work. In this pickup's case, all of that wiring was pretty crusty just from age--GM was not particularly concerned with the longevity of things like electrical wiring insulation in an age when cars were expected to be worked to death and scrapped within 10 years or so of construction. Beyond that, as is often the case in vehicles this old, it had been modified a lot, especially under the dash but also out in the engine bay, to the point where it was no longer clear what a bunch of stuff we found in there was even for. So, after surveying the carnage, Dad made the executive decision that we were going to replace it. All of it. Fortunately, this is such a common outcome in the classic car scene that there are vendors who offer complete custom wiring harness kits for this exact purpose. Here's one now: 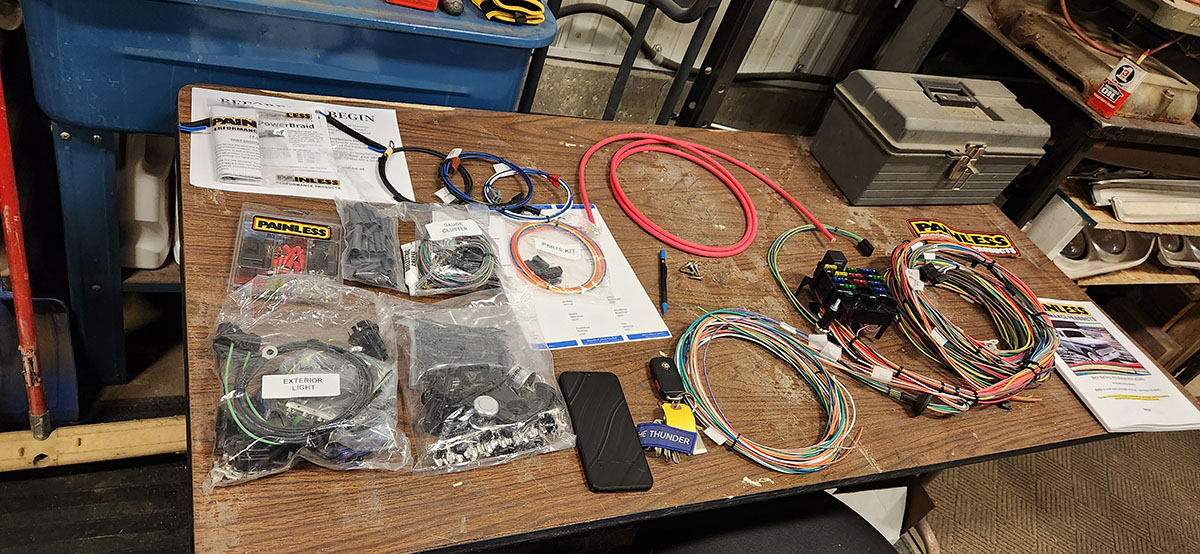
(This one's by Peerless Performance; other suppliers are available.) This wiring harness isn't an exact duplicate of the original; it's been slightly modernized in terms of the materials used and standards employed. The new fuse block, for instance, contains modern push-in-type fuses, rather than the old-fashioned "glass tube with a contact at each end" type they used in 1966. First order of business: remove what remains of the original wiring. 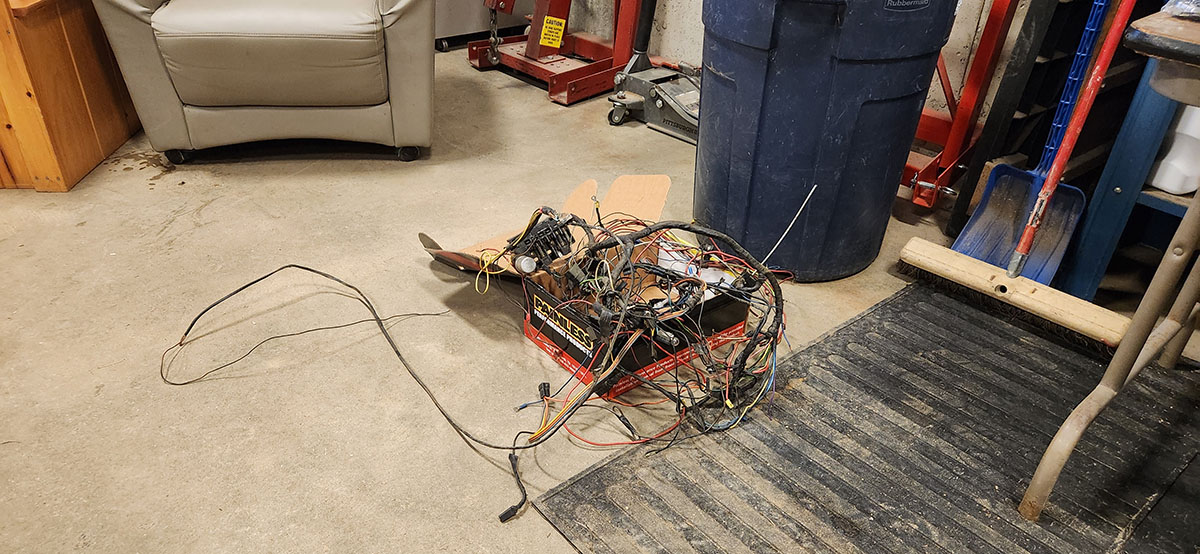
Yeah, that... didn't take long. Mostly because all the engine wiring was already gone. 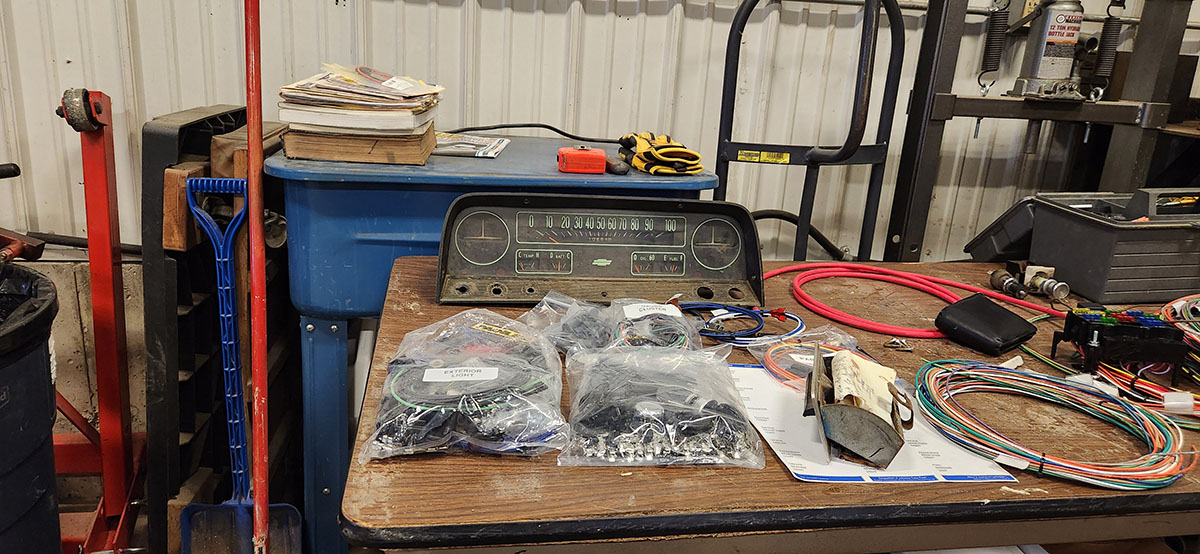
Hey look, it's the instrument cluster! I'll probably be rebuilding this soon. It certainly needs to be taken apart and cleaned, and neither of us can remember how many of the original gauges actually worked. Fortunately, the whole thing is modular, and replacements are available for the individual gauges. 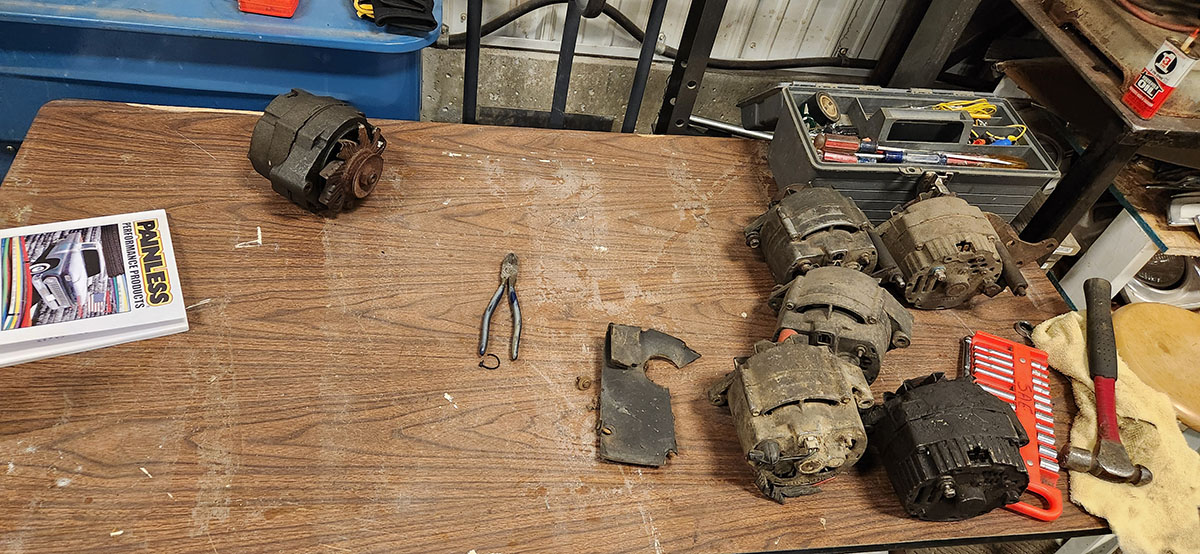
Six alternators, each alike in dignity, on fair folding table where we lay our scene. These are all GM 10SI alternators, the go-to amperage-maker for generations of cars and trucks throughout the '60s and '70s, taken off various vehicles over the years and hoarded stored for later use. We dug them out to compare with the Peerless docs and figure out which bits and bobs from the alternator install kit we needed to use. We have no idea whether any of them work, but at least we'll get $6 off if we swap one of them for a new one. :) First step of new harness install: put the fuse block where it needs to be and try not to let the dozens of wires attached to it get tangled up before they can be routed where they need to go. 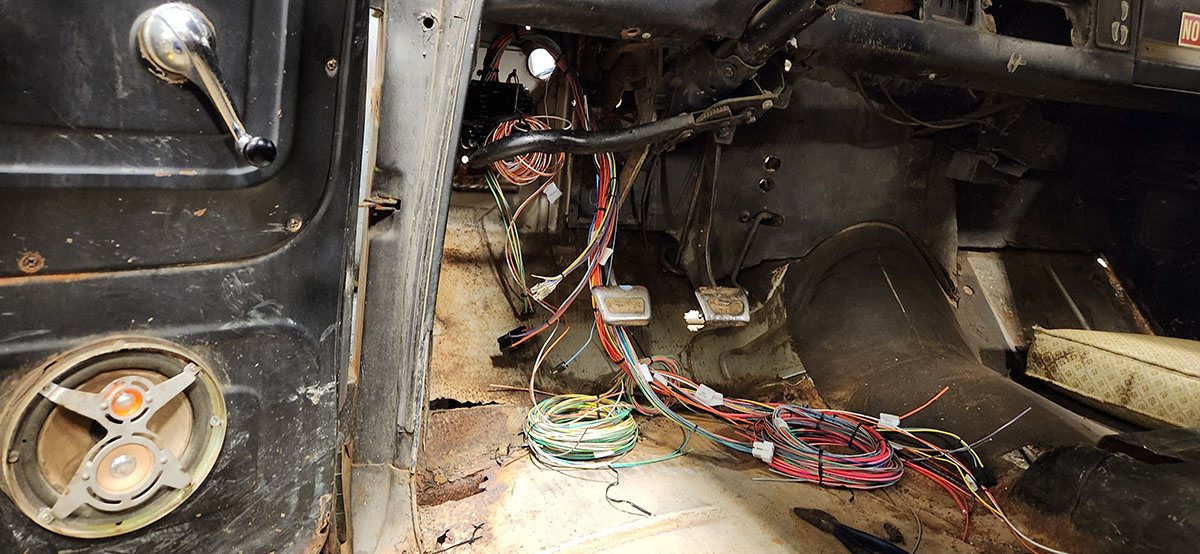
In the old days, the fuse block would have been screwed or bolted to the back of the firewall. The new one has magnets on it. Really strong magnets. We were skeptical of this when we saw it in the manual, but I tell you what, that puppy's not going anywhere. With the fuse block in place, the next order of business was to route the wires that need to be on the passenger side behind the dash and over the steering column. Then the ones that have to come out of the firewall can be put through the holes that are there for that purpose. In this particular vehicle, there are three groups of those. First up is this bunch: 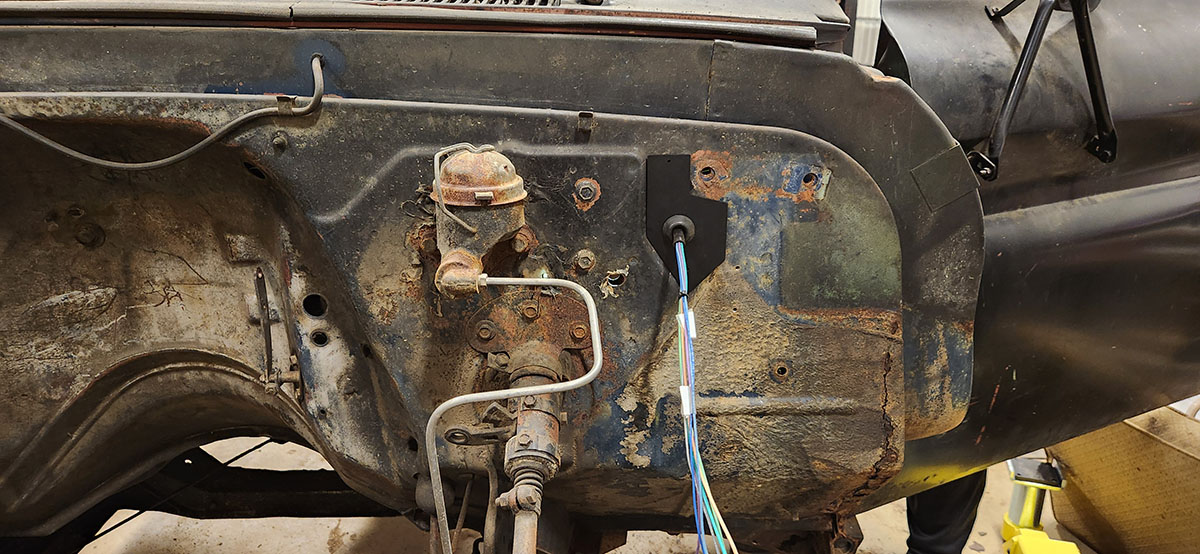
These are the wires that go to the front lights and the horn. They come through a hole high up on the driver's side--a hole that the folks at Peerless evidently think is too big, because they provided this little plate with a smaller hole in it to go over the original one. 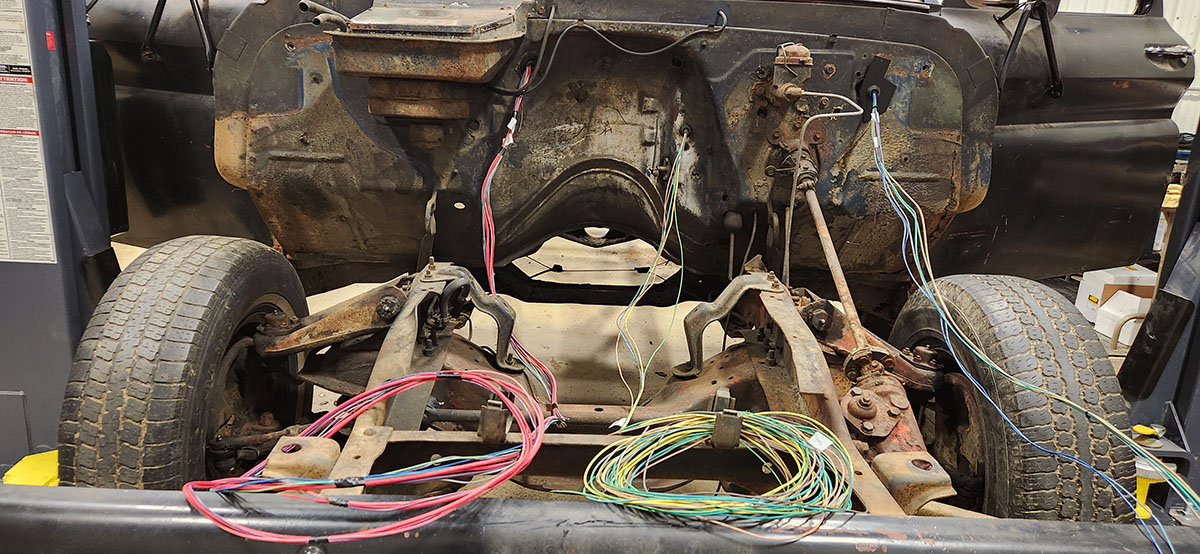
The other two bunches come out on opposite sides of the big dent in the firewall that's there to provide clearance for the bell housing on the back of the engine. The group on the right (mostly green and yellow) is made up of all the wires that need to go to the back of the truck, which is why they're so long. The one on the left is the engine wiring. This was actually the first time we put all the engine and tail wiring through. We had just finished it when Dad took another look behind the dash and realized that there was a better place to route the big bunch that has to go over to the passenger side... which meant we had to pull all of that back through and run it again. Sigh... Here's where it ended up. 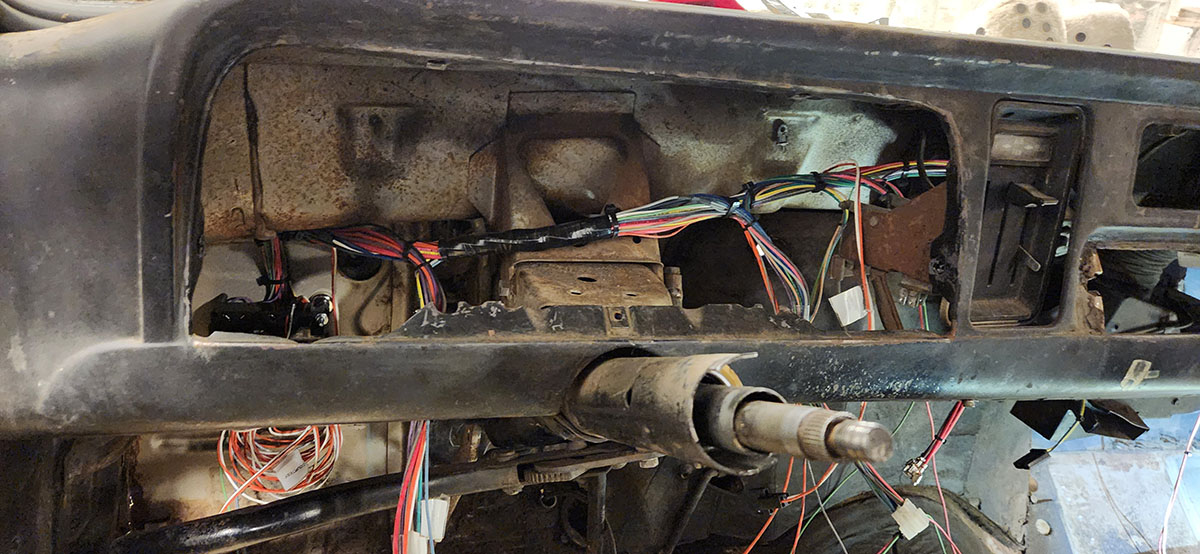
Before, he had all that run above the column but under that box structure in the middle, and there's a bunch of jagged corners under there that electrical wires really wouldn't agree with much. Only after getting everything in place did he notice that and realize it's probably meant to run behind the instrument cluster. (No, of course neither of us took note of where any of the old wiring was before pulling it out.) Anyway, with the lessons learned from running the firewall stuff the first time, the second take wasn't so bad, and I notice now that I look at the photos that I coiled everything up much more neatly the second time. 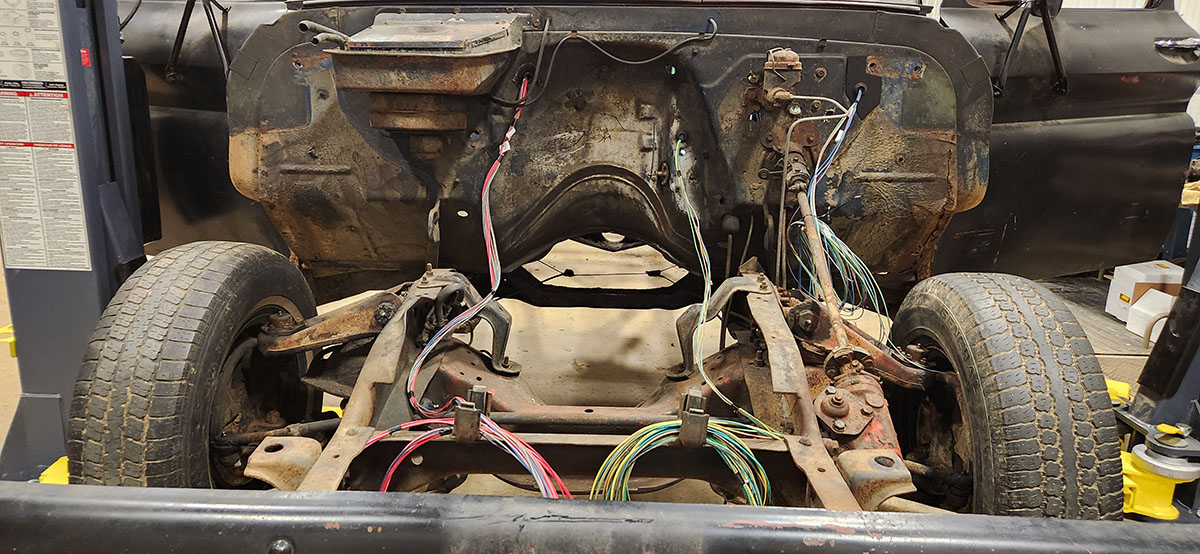
So, with that, we have all of the new wiring in place. None of it is connected to anything yet--much of what it's meant to connect to isn't actually on the vehicle at the moment--but that's still a pretty big step, and it was easier than we thought it would be when we opened the box and saw all those wires. :) --G.
-><-
Benjamin D. Hutchins, Co-Founder, Editor-in-Chief, & Forum Mod
Eyrie Productions, Unlimited http://www.eyrie-productions.com/
zgryphon at that email service Google has
Ceterum censeo Carthaginem esse delendam. |
|
|
Alert | IP |
Printer-friendly page | Edit |
Reply |
Reply With Quote | Top |
|
|
|
|
|
|
Gryphon
Charter Member
23033 posts |
Feb-13-25, 11:00 PM (EDT) |
|
|
13. "dang it"
In response to message #0
| |
LAST EDITED ON Feb-14-25 AT 00:15 AM (EST)
I did a thing yesterday that was cool as heck... and got so into it I forgot to take any photos. (facepalm)Anyway, remember this?
As with a lot of cars of its era, the '63–'66 Chevy pickup instrument cluster comes out as a single sub-assembly. There were two versions in 1966: this one, which has a row of gauges below the speedometer, and one that only has indicator lights for everything other than fuel level. The gauges, from left to right: 1. coolant temperature; pretty self-explanatory 2. the manual claims this is an ammeter, but the way it's marked, it must really be a voltmeter. it shows whether the battery is being charged or discharged, which in practice really means it shows whether the voltage at the battery is greater or less than 12 volts DC 3. oil pressure; again, kinda explains itself 4. fuel I can't remember if any of Angus's original gauges worked. I think the gas gauge did, but the others... well, we installed that package of aftermarket gauges that used to be in there for a reason. 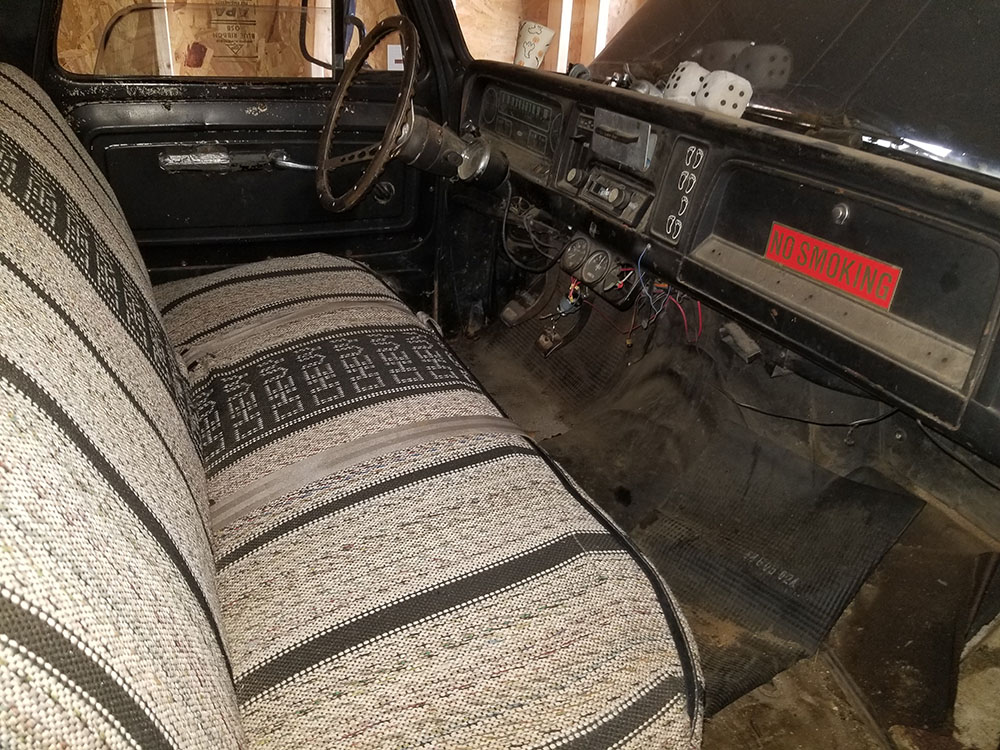
(visible below the radio in this pic from back during Project Impala in 2019. we had already stolen the oil pressure gauge out of the set for temporary use in the Impala when I took that photo) The round dummy gauges to left and right of the speedometer are blanks where different things would be in different versions of the cluster. In the indicator-lights version, the one on the left has two coolant temp lights, COLD and HOT, and the right one has a bigger, round fuel gauge. In place of the lower gauges, the left panel has a light that comes on if the generator* isn't charging, and the right one is a low-oil-pressure light. In this version of the cluster, the round panel on the left was never anything but a blank, but there was an optional tachometer that replaced the blank on the right. There's a company that makes a reproduction kit of the stock tach, and I'm very tempted, but it's kind of expensive... Anyway, that's presumably more than you ever wanted to know about a 1966 Chevrolet pickup instrument cluster. Point is, after some reconnaissance, I took mine apart. There's a lot of neat stuff about how it goes together, but... I forgot to take pictures, so... maybe next time. In the meantime, my plan is to clean up the structural parts--as you might expect, they're very dusty, even on the inside. The assembly is, after all, almost exactly 60 years old. There's a date stamped on the back of the main body casting, which I assume is when it was originally assembled: January 18, 1965. Once everything's clean, I should try to find out if there's any way of testing automotive gauges when they're not in a working car. If not, I'll have to just put it back together and we'll find out whether any of them work once we've got an engine in there. Then we'll have to decide whether to buy replacements (like the tach kit, there are suppliers that sell repro internals for the stock gauges), put back a set of aftermarket gauges... or possibly both. There are actually solid arguments for that last course of action, weird as it sounds. The stock gauges aren't really very informative at all. The temperature gauge, for instance, doesn't actually tell you the, uh... the temperature of anything. Its only calibration is relative: C / H OK, so, it's "hot". How hot? How close are we to boiling the radiator? This is important information, but it's just... not there. They're all like this--the bare minimum of information, not really much better than a warning light. To be fair, they had to be designed for the panel they're in, and that means they can't be big enough to show much more than they do. So I'm tempted to get them working for authenticity's sake, if possible, and run a set of newer ones elsewhere on the dash (probably where the old set was) that provide more helpful detail. Either way, cleaning first. Next time I'm in the shop I'll try to remember to lay the bits out and get some more informative pictures. There's an electrical sub-harness, too, that needs to have a bunch of light bulb sockets installed when the whole thing's reassembled. How they did the lights on this panel is kind of cool, too, so I want to try to give a better idea of how they did that. --G.
* by 1966 they were alternators, but GM still called them generators
-><-
Benjamin D. Hutchins, Co-Founder, Editor-in-Chief, & Forum Mod
Eyrie Productions, Unlimited http://www.eyrie-productions.com/
zgryphon at that email service Google has
Ceterum censeo Carthaginem esse delendam. |
|
|
Alert | IP |
Printer-friendly page | Edit |
Reply |
Reply With Quote | Top |
|
|
Gryphon
Charter Member
23033 posts |
Feb-16-25, 07:08 PM (EDT) |
|
|
14. "session 6"
In response to message #0
| |
or, Even More Than You Ever Wanted to Know About 1966 Chevrolet Pickup Gauge Clusters For background, I dug up a couple of pics of the two different styles of instrument panel this model could have had, as mentioned last time. 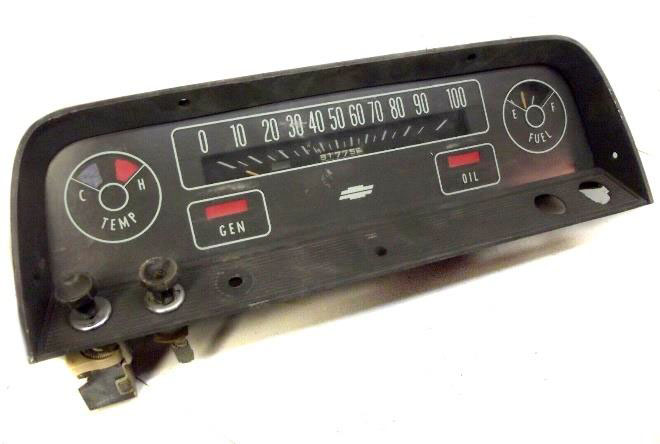
This is the version that only has indicator lights for most things. You can see how both of the round sectors are used, with the cold and hot lights on one side and the fuel gauge on the other. 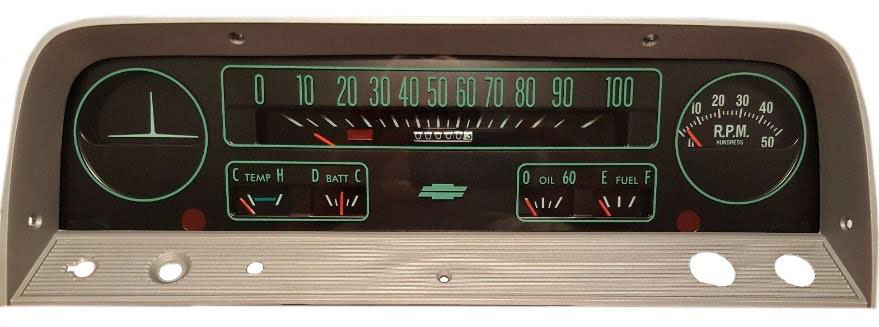
This is the type that we have; this one pictured has the optional tachometer in it, and the left side's round area is empty. Here's what it looks like when you've completely taken it apart: 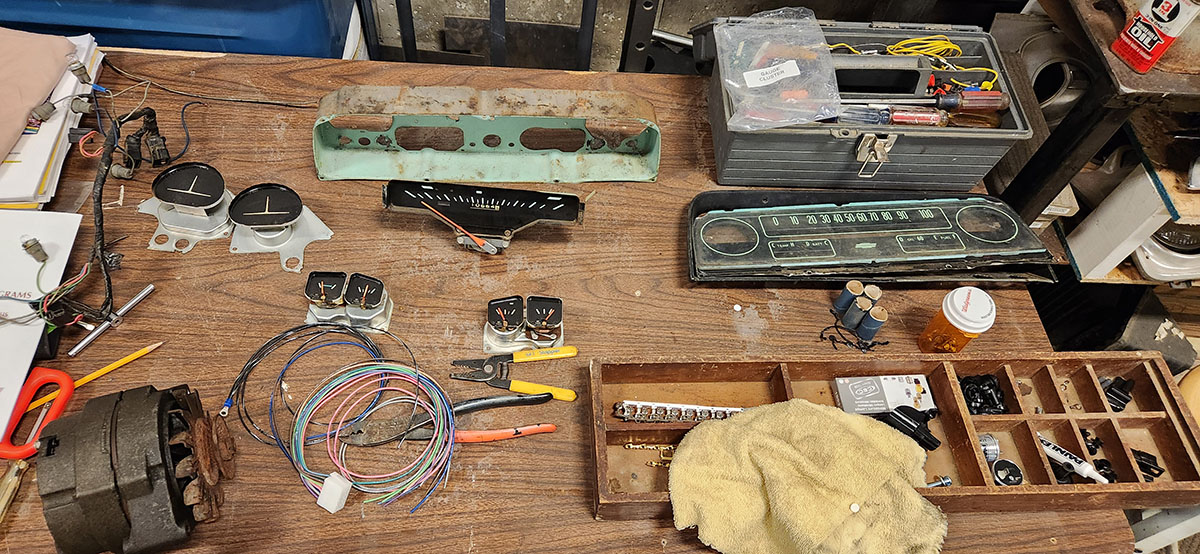
I'll get into the specifics in a second, but first, a couple of things to note here: - the old sub-harness for the gauge cluster is in the upper left. You can see it still has the lamp sockets and bulbs.
- the new sub-harness is that coil of multicolored wires in the lower left, next to the alternator. That will need to be rearranged so that the wires route to the correct parts of the assembly, and the ones that go to lights will have to have the sockets attached. All of the stuff required for that is in the wooden organizer on the bottom right, including a little cardboard box of new bulbs.
- those four cardboard tubes just above the wooden organizer are, collectively, the oddest and least expected thing I found in there. I'll show you what they're for in a bit. For now, let's take a look at some of the individual components. 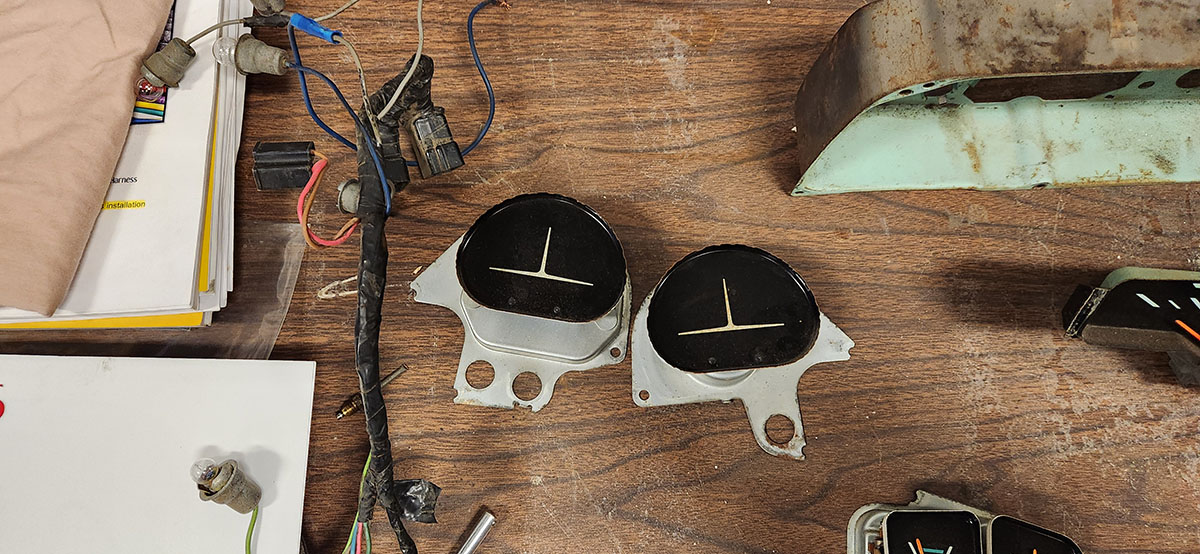
These are the blanks for the unused round segments. They're just bits of painted sheet metal, attached to what I assume would be the same backing plates the gauges or lights would be attached to in other models that had things in those holes. (As an aside, I don't know why it never occurred to anyone at GM to put a clock in the unused one on the "full gauges" version of the panel, but it appears that they never did. There was an optional clock available in these trucks, but it was mounted up on top of the dash.) 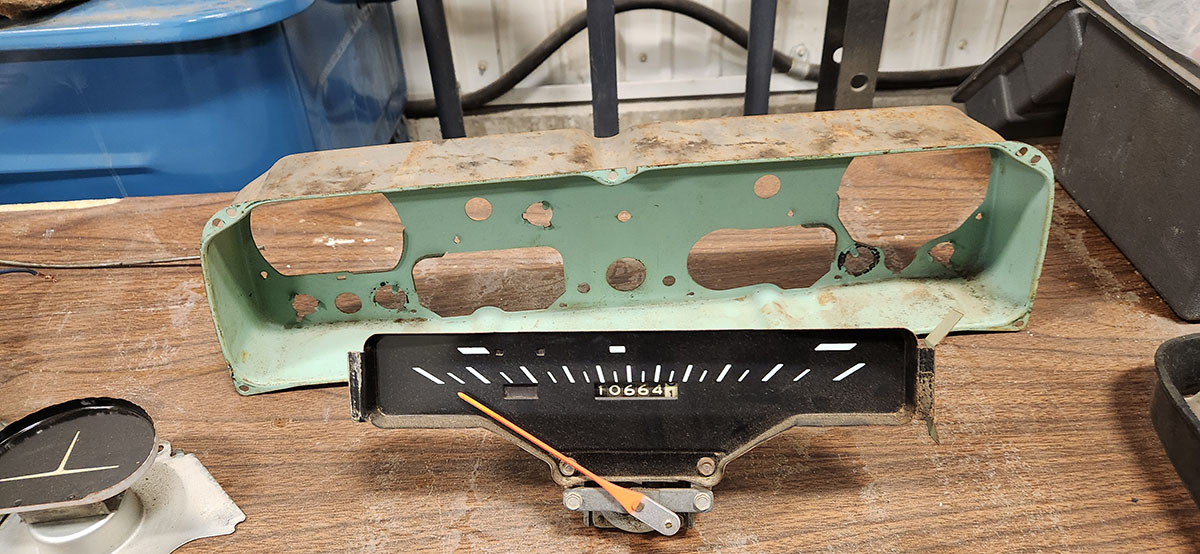
This is the enclosure that the whole mess goes into, once everything is removed, plus a look at what the speedometer/odometer looks like without the faceplate. 10,664.1 miles, right. More like 210,664.1... I should look up how to reset the odometer (it's probably pretty easy with a unit this old--they were notoriously not tamper-resistant). After all, we'll have to declare the mileage inaccurate on the registration regardless. Here's the enclosure after I took some Simple Green and dishwashing liquid to it... 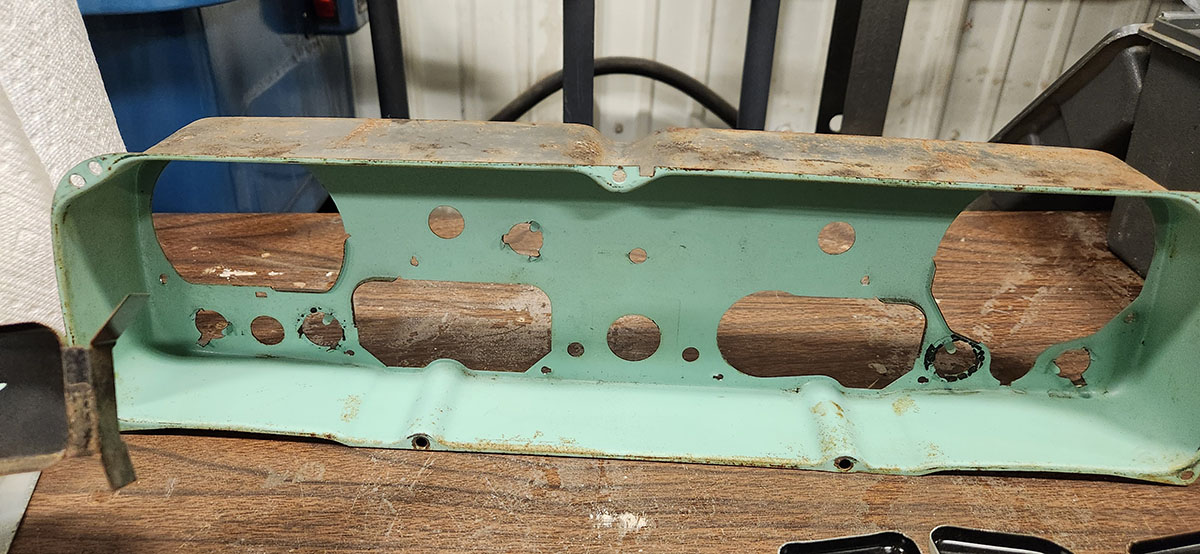
The spots on the inside that still aren't clean are rust bleeding through the paint, I think. I could try to match the color, sand, and repaint it, but I think I'll just leave it alone. We're not making a concours restoration here, after all. Note the four round holes, two lower left and two lower right, that have the little metal prongs and traces of some kind of black sealant around them? Those are where those four cardboard tubes attach. Literally all they're there for is to isolate the light from four of the many small lamps that come in through the back of the enclosure. I think they were probably originally painted white on the inside, but now the inner color is more of a dull beige. 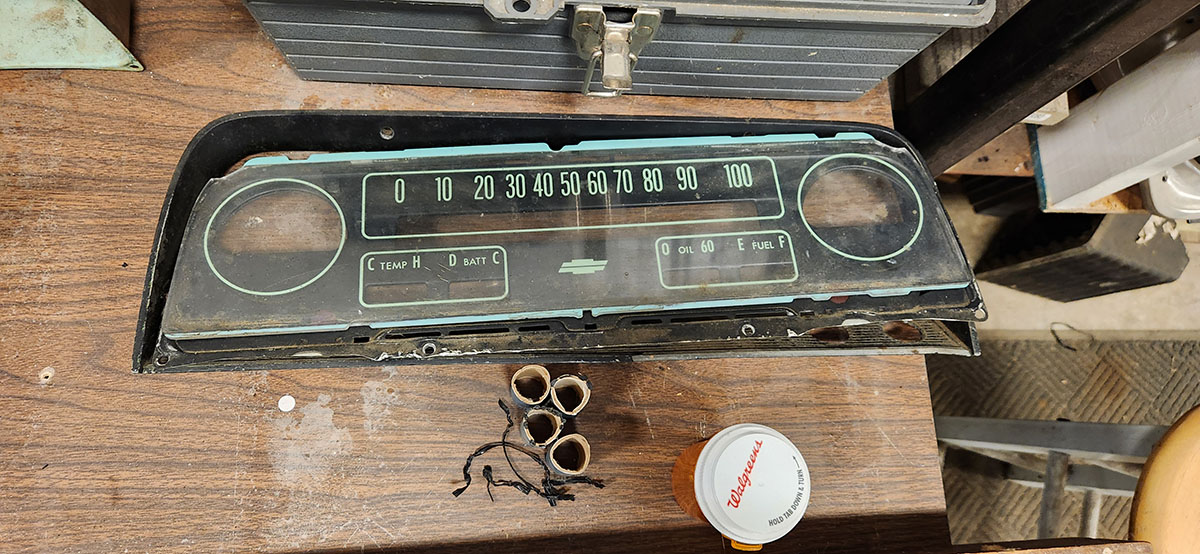
This shows the three pieces of the front panel, before cleaning. The plexiglas panel has a sheet metal mask behind it, like a clipping mask in Photoshop, that makes the layout come together. You can get a better idea of how it works from this pic, which I took after cleaning the transparency: 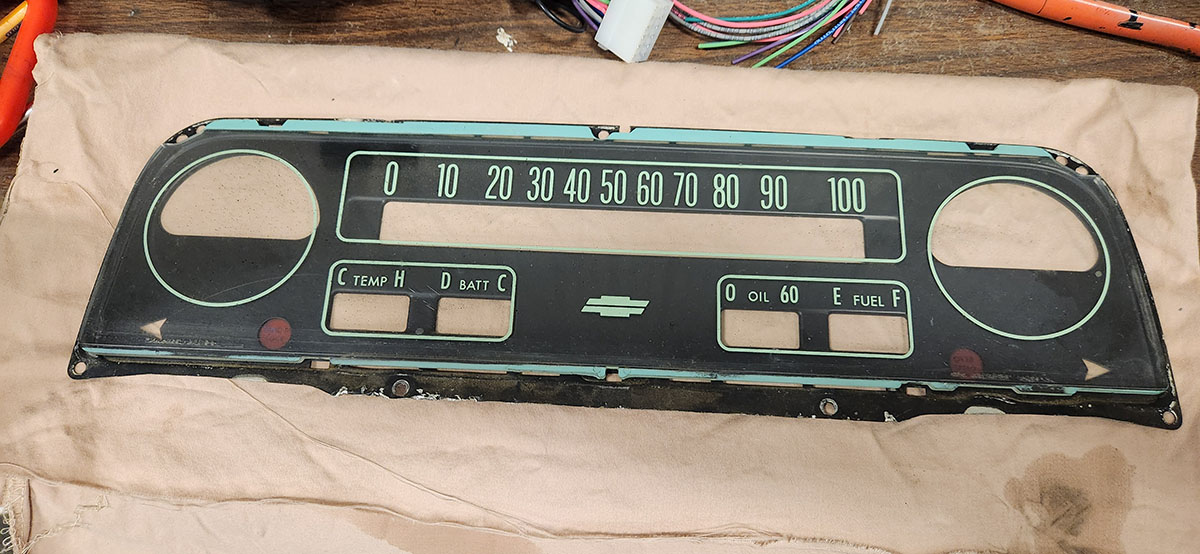
In this shot it's also clearer where the light coming through those four cardboard tubes goes. Two of them are for the directional indicators, and the other two would illuminate those two round red lights. I say "would" because they weren't actually used in this model truck. This gauge cluster was also used in heavier trucks of this era, and those two lights pertain to things they had that the light-duty trucks like ours never possessed. With some judicious use of a flashlight, we can see that one of them is a "tandem lock" light, which is only used in trucks with two rear axles... 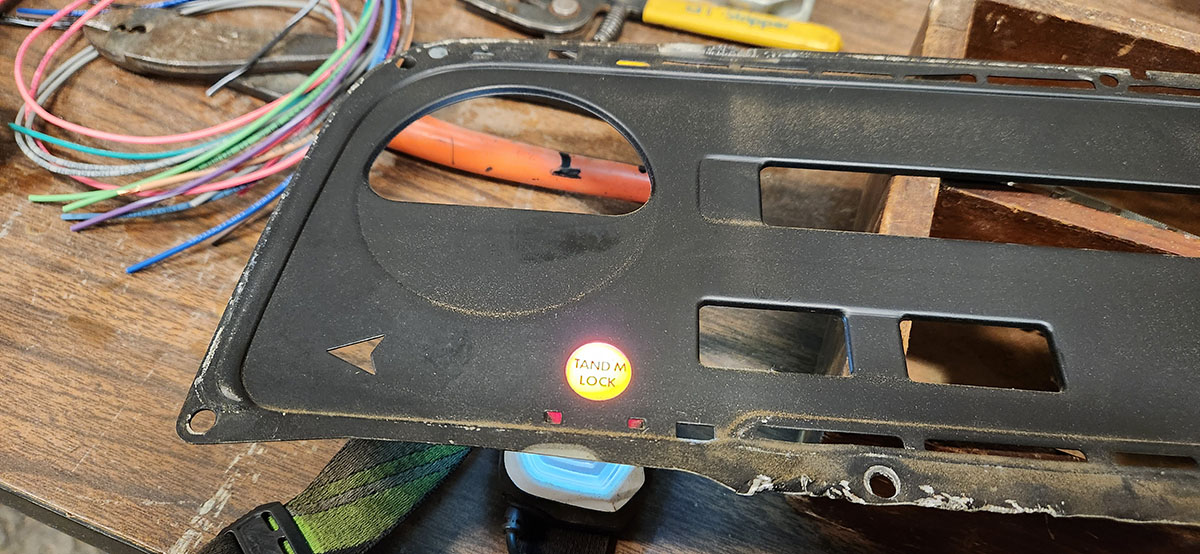
... and the other is an overspeed warning, which is also a dual-axle thing. 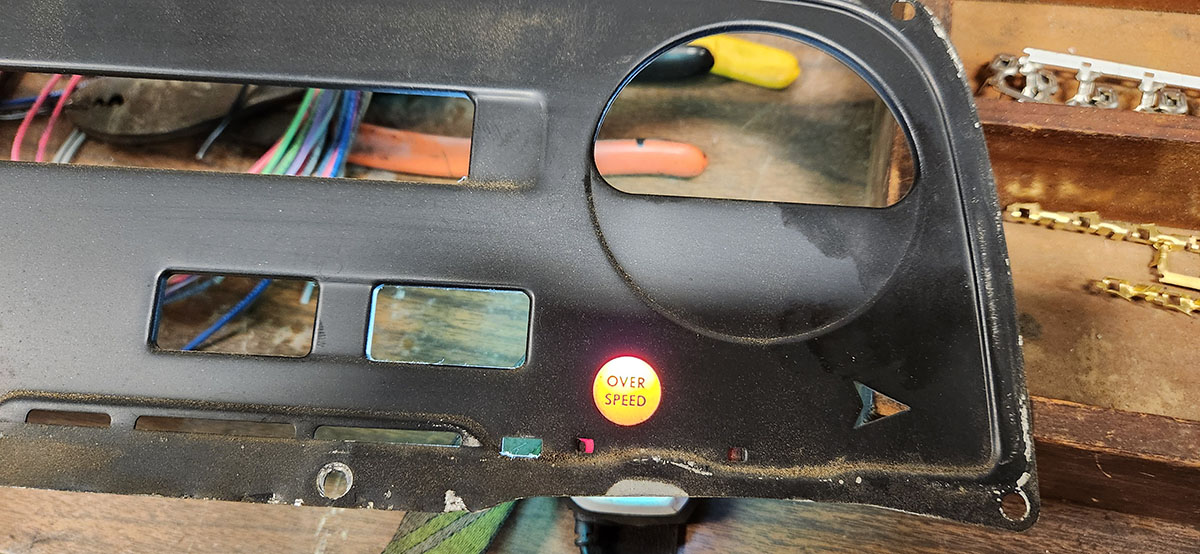
I think it's kind of neat that they included these features, complete with the lettered color inserts, in gauge clusters that were never going to be installed in trucks that needed them. I assume GM did that to save costs, since it simplified both assembly and supply--they could just have whichever factory made these make them all the same and put them in whatever trucks required them, without having to worry about whether they were the correct version. That said, we could use these lights for something else. It would be easy enough to wire, say, the TAND'M LOCK light to the temperature gauge, so it comes on when a HOT condition registers, or the OVERSPEED one to a parking brake sensor. We would just have to remember that in this instance TAND'M LOCK means high temp and OVERSPEED means the brake is on. :) 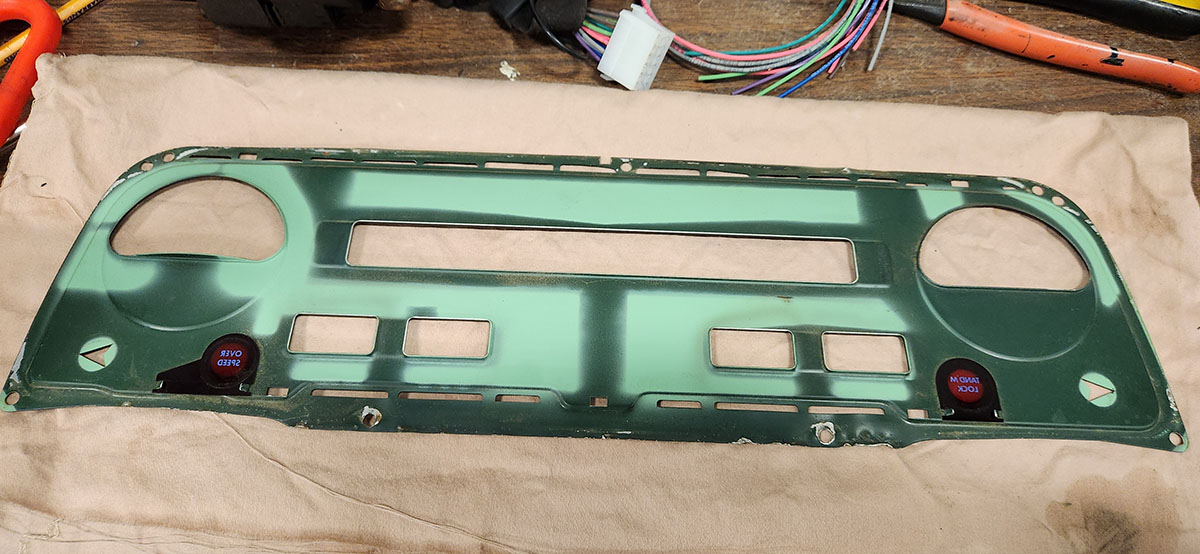
This is a back view of the instrument panel mask. I don't know why they painted it this way, but that's how it came from the factory. Notice that the directional indicators weren't customarily green when this was made. I think I might get ahold of some green transparency film and glue it in behind them... Speaking of things that weren't the colors in 1966 we now expect them to be, the light that comes on when the high beams are on is in the speedometer... 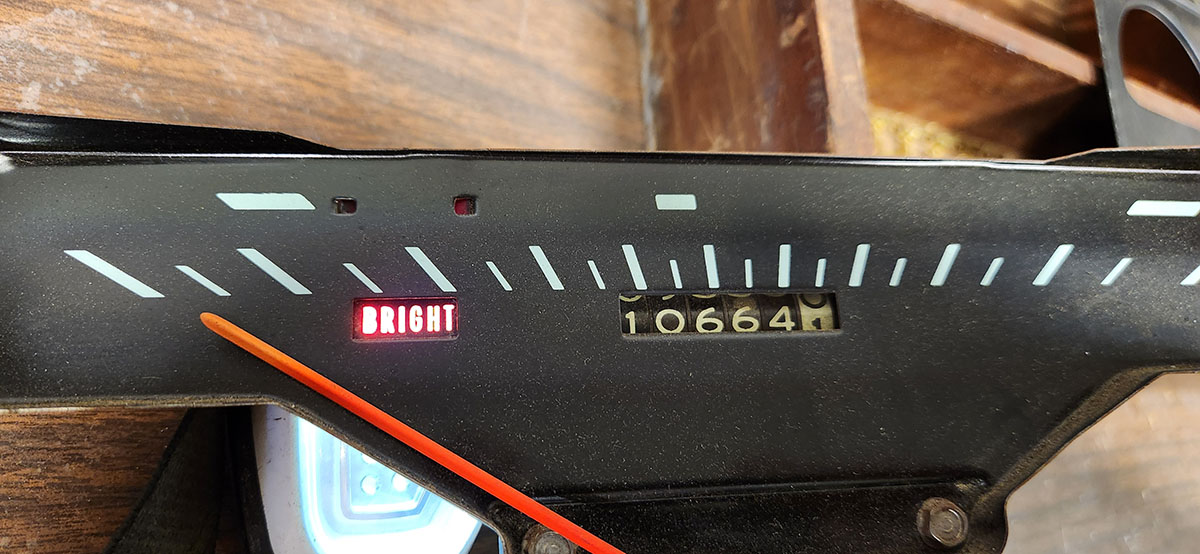
... and it isn't blue. Last but not least, here are the four smaller gauges, which are built in pairs. 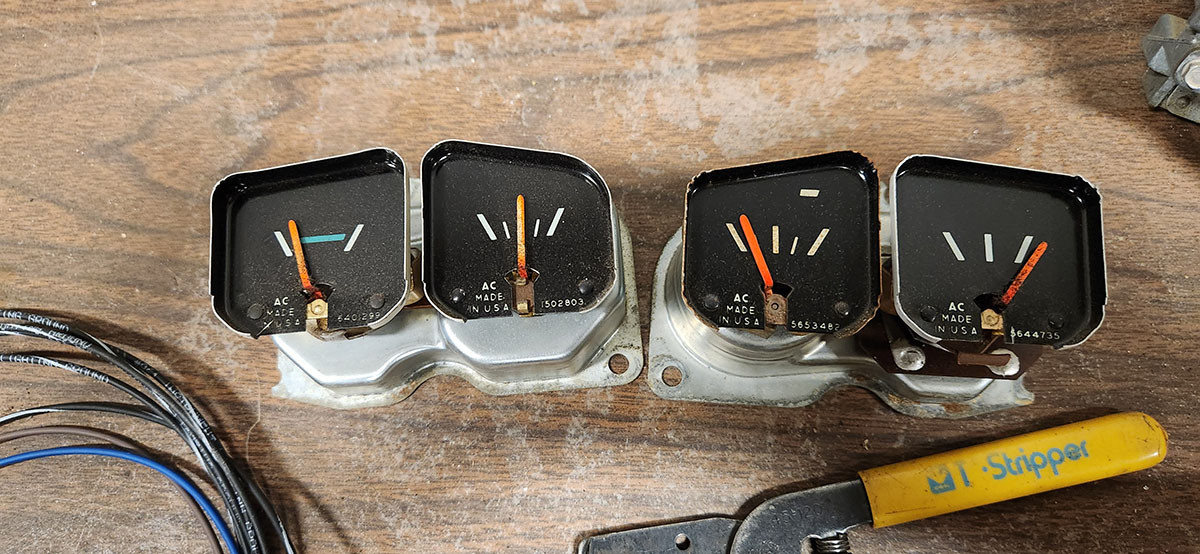
From left to right: coolant temperature, charging system status, oil pressure, and fuel level. From this shot and the pic of the complete unit up top, you can see what I meant last time about how they're really not all that informative. Only the oil pressure gauge is calibrated in any actual unit, and even it only shows a notional maximum value. One interesting feature of these gauges is that, while the other three are electrically powered and controlled, the oil pressure gauge is entirely mechanical. Instead of an electrical signal coming from a sensor in the engine, it's directly connected via a tiny pipe that literally carries engine oil up to it, exerting said pressure directly on the gauge. Nowadays they generally are electric, but in 1966 that just wasn't a thing yet. I hope you have enjoyed this somewhat random tour of what's inside a '66 Chevy pickup's gauge cluster and how it goes together. Next shop day, I'll probably be putting it back together and working on getting it wired up. Once it's completely wired and lit, it should just plug into the main wiring harness via that big white connector you can see on the new pigtail in the photo of everything laid out, up above. --G.
-><-
Benjamin D. Hutchins, Co-Founder, Editor-in-Chief, & Forum Mod
Eyrie Productions, Unlimited http://www.eyrie-productions.com/
zgryphon at that email service Google has
Ceterum censeo Carthaginem esse delendam. |
|
|
Alert | IP |
Printer-friendly page | Edit |
Reply |
Reply With Quote | Top |
|
|
|
Gryphon
Charter Member
23033 posts |
Feb-22-25, 00:39 AM (EDT) |
|
|
15. "RE: session 6"
In response to message #14
| |
LAST EDITED ON Feb-22-25 AT 00:39 AM (EST)
Finished re-wiring the instrument cluster!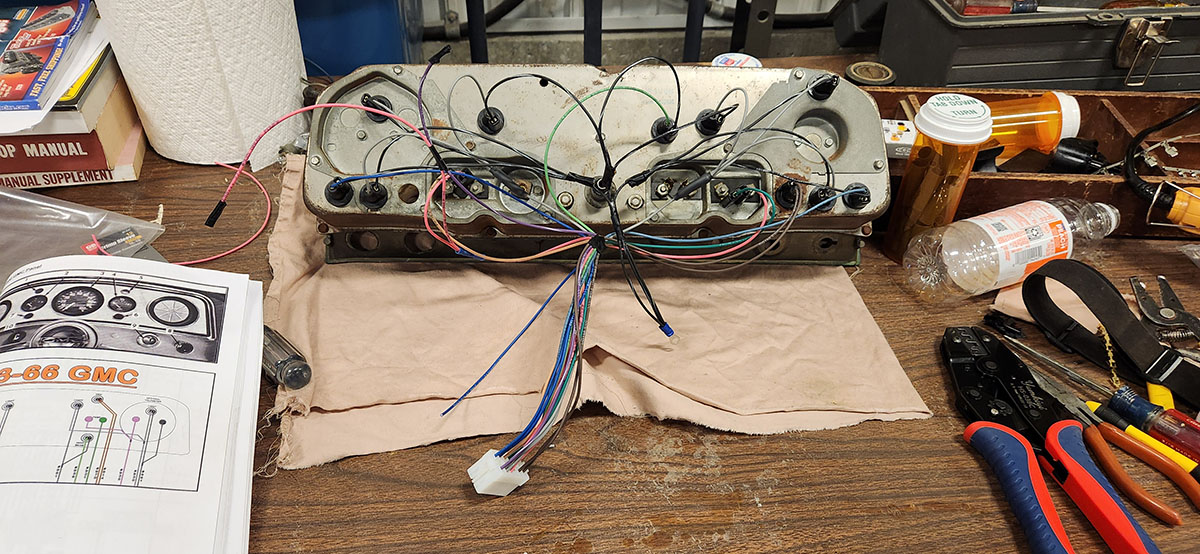
Each one of those round black things is a socket for a tiny light bulb. There are ten of them: the left and right turn signal indicators, the high beam indicator, six for panel backlighting, and one is a generator warning light. We don't actually need a generator warning light, since we're planning to add an aftermarket voltmeter, but the harness has the wires for one and we're not sure whether not connecting them would affect anything, so we used one of the unused lights. Theoretical future owners of this truck will presumably be slightly bemused to be told about an alternator problem by a light labeled TAND'M LOCK, but anyway. :) This wiring harness is a quality product, but some assembly is definitely required. Each one of those light sockets and the connectors had to be installed by hand, and the ones that go to multiple places (like the power wires for the lights and gauges) had to be spliced from a single strand. Things you may be wondering about: - The unattached pink and purple wires are for the optional tachometer, which we don't have yet but will probably be acquiring.
- The unattached blue wire is for an oil pressure gauge, which will be part of the same aftermarket package as the voltmeter. The stock one in the panel is mechanical, not electrical, and we're probably not going to use it.
- The unused electrical connection in the bottom row is for the stock ammeter, which we're leaving unconnected in favor of the aforementioned voltmeter.
- We have connected the stock temperature gauge, but since we're not sure whether it works and it's not super-informative anyway, we'll probably splice into those wires and share its signal/power with a third-party one. Those often come in sets of three anyway, so we might as well. The panel is ready to go back into the dash, but we have a bunch of work still to do on other stuff in the dash (such as the ignition switch and turn signal switch), which will be easier to do through the hole where the panel goes, so we won't be reinstalling it just yet. Progress! This electrical stuff is a complicated job. And just think--this vehicle has a downright primitive electrical system by modern standards... --G.
-><-
Benjamin D. Hutchins, Co-Founder, Editor-in-Chief, & Forum Mod
Eyrie Productions, Unlimited http://www.eyrie-productions.com/
zgryphon at that email service Google has
Ceterum censeo Carthaginem esse delendam. |
|
|
Alert | IP |
Printer-friendly page | Edit |
Reply |
Reply With Quote | Top |
|
|
|
|
|
|
Gryphon
Charter Member
23033 posts |
Feb-25-25, 00:55 AM (EDT) |
|
|
17. "RE: session 6"
In response to message #16
| |
LAST EDITED ON Feb-25-25 AT 00:56 AM (EST)
>Is that a glimpse of the manual open there on the left?It is, yes. Painless puts their manuals online if you're curious. (That's actually the facing page to the one I was using--the harness we're installing can also be used with GMC pickups, but back in 1966 there were still some fairly significant differences between GMCs and Chevrolets.) >I feel like
>I'd have to refer to that 3 times per wire, just out of paranoia and
>an abundance of caution. Oh, at least. There's a lot of flipping back and forth involved. --G.
-><-
Benjamin D. Hutchins, Co-Founder, Editor-in-Chief, & Forum Mod
Eyrie Productions, Unlimited http://www.eyrie-productions.com/
zgryphon at that email service Google has
Ceterum censeo Carthaginem esse delendam. |
|
|
Alert | IP |
Printer-friendly page | Edit |
Reply |
Reply With Quote | Top |
|
|
|
Gryphon
Charter Member
23033 posts |
Feb-27-25, 10:38 PM (EDT) |
|
|
18. "session 7"
In response to message #0
| |
Just a short one yesterday, unfortunately cut short by circumstances beyond, but we got a couple of useful things done. The big thing is that we took the heater core enclosure and the brake master cylinder off the firewall. 
This serves a couple of purposes. The main one is that, with the firewall cleared, we can clean and paint it (might need to pull those wires back through for a minute). Also, they both had to come off anyway. We thought the heater box needed to be cleaned out and the master cylinder replaced, but after investigating a bit, it seems likely they both need replacing. The reason for replacing the master cylinder is the same as it was on the Impala--in 1966, they were still using single master cylinders (you can see in the photo that there's only one tubing line running up to where it used to be), and replacing it with a dual-cylinder unit is sort of a bare-minimum safety improvement. The heater's a little more complicated. We knew it needed to be cleaned out; when we took the top cover off to examine the core, we found acorns on top, and sure enough, the cavity underneath was full of rodent nest. The core's all corroded, too, and almost surely needs to be replaced, and we found when we tried to turn it that the blower fan had seized. The weirder part, though, is that upon closer inspection, the core enclosure itself is the wrong one! In 1966, Chevy pickups were available with a choice of three heating systems: the Thrift heater, which is incredibly basic; the Deluxe heater, which is only not "incredibly basic" when compared with the Thrift one; and air conditioning, which in those days people in Maine pretty much never ordered. Our truck has the control panel and interior ducting of the Deluxe heater, but when we got it out and compared it to the shop manual, we discovered that the controls cables were hooked up incorrectly, in such a way that they basically converted the system into a jury-rigged equivalent of the Thrift version--because the part that most sets the Deluxe system apart is not present on the core enclosure. It's not just missing--the core box that was in the truck plainly never had it. It's the core box from a Thrift system. Owning these old vehicles always comes with mysteries, and here's our latest one: why does our truck, which plainly had the Deluxe heater from the factory, have a Thrift core box in it, which someone bodged up the Deluxe controls to work with? Did the original rust out, and the only one the owners at the time could find was from a more basic truck? That's the only scenario I could come up with when we made the discovery. So now we have a decision to make: do we clean up the Thrift box, get a new core for it, and set it all back up in the half-assed way it was when we got it, or try to find a Deluxe box and core someplace and put the system back the way it's supposed to be? (Sadly, AC is not really an option. There are really good retrofit kits out there, but they cost a thousand dollars and up. Back in the day, I think we paid 800 bucks for the whole truck! Admittedly, they were 1989 dollars, but still.) In other news, we've ordered a new set of gauges and a bracket for them. Sadly, the classic Sun gauges we had in there before are no longer in production, but the AutoMeter Sport-Comp series looks similar and isn't too expensive, so we went with those. The full set hadn't arrived yet, but a couple of them had, and they look good, but I forgot to take pictures, as usual. Here's a fun side benefit, though. The AutoMeter gauges come with a couple of colored covers for their backlight bulbs, in case you want your dash to be red or green. We're going to leave them white, to match the rest of the dash backlights... 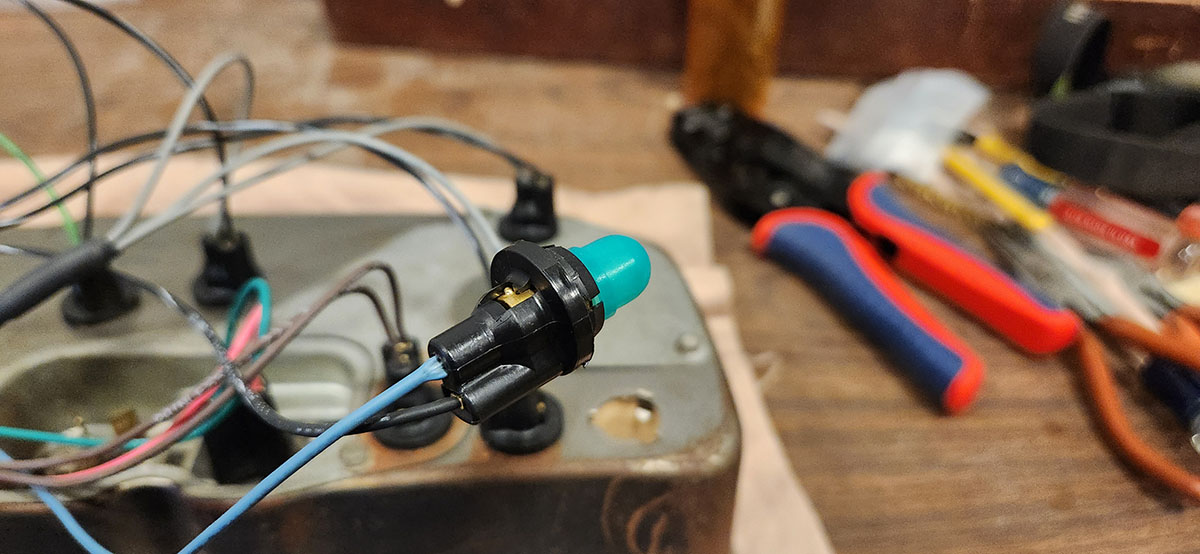
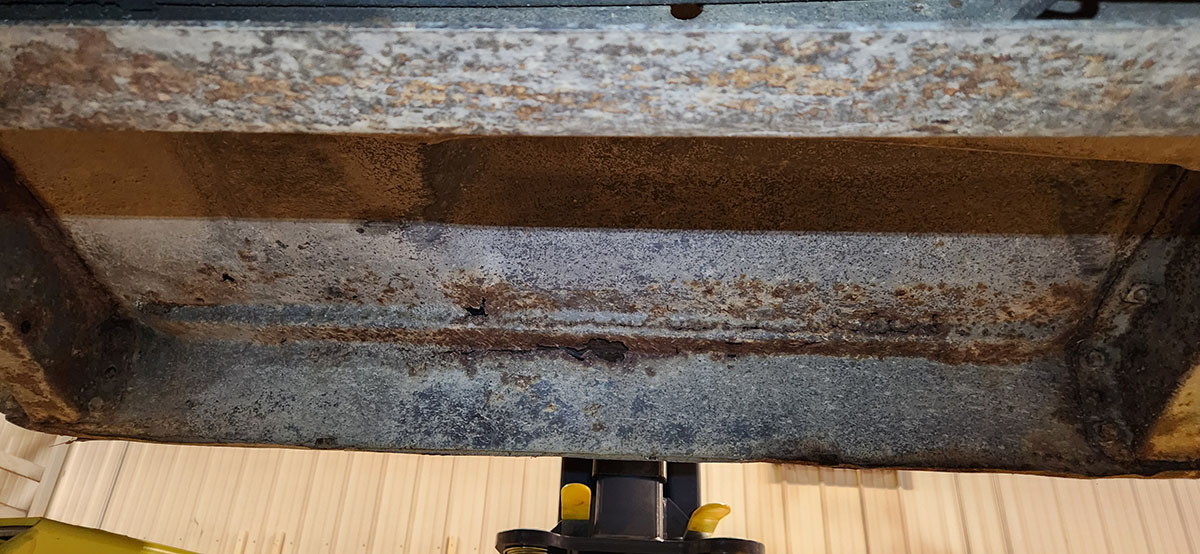
... so I stole the green ones for the turn signal indicators. I'm properly pleased with that little brainwave, I have to admit. :) That's all we had time for, but more supplies have arrived, so there may be more that's worth reporting next time. For now, let's close out with a little safety message: My father has a snow-thrower attachment for his tractor, which he uses to clean up his driveway and the area around the shop. The other day, while he was cleaning up after the latest snowstorm, it sucked up a crowbar some previous tenant had left lying around on the ground out back of the shop and did this to it. 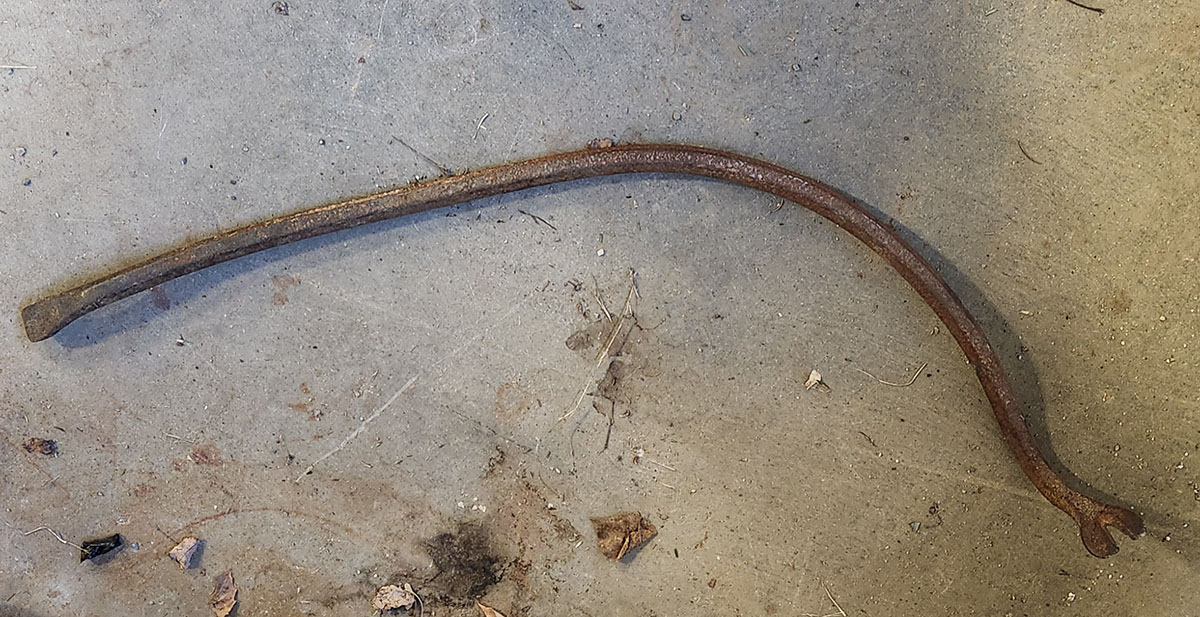
Dad didn't even notice it had happened until he realized that the auger had stopped and he was just plowing the snow, not throwing it. When he investigated, he found the crowbar wound around the center shaft, which he had to turn backward to get it out. Apart from snapping the sacrificial shear pins, it hadn't done any damage. Do not take these machines lightly, is all I'm saying. --G.
also, don't just leave crowbars lying around on the ground
-><-
Benjamin D. Hutchins, Co-Founder, Editor-in-Chief, & Forum Mod
Eyrie Productions, Unlimited http://www.eyrie-productions.com/
zgryphon at that email service Google has
Ceterum censeo Carthaginem esse delendam. |
|
|
Alert | IP |
Printer-friendly page | Edit |
Reply |
Reply With Quote | Top |
|
|
|
Peter Eng
Charter Member
2086 posts |
Mar-02-25, 03:20 AM (EDT) |
|
|
19. "RE: session 7"
In response to message #18
| |
>--G.
>also, don't just leave crowbars lying around on the
>ground
>-><- I'm reminded of a scene from The Court of a Thousand Suns where the Eternal Emperor is attacked by a traitor with a sword, and the only thing at hand is a crowbar. At least the real-life snow-thrower came out better than the fictional sword did. Peter Eng
--
Insert humorous comment here. |
|
|
Alert | IP |
Printer-friendly page | Edit |
Reply |
Reply With Quote | Top |
|
|
|
|
|
Gryphon
Charter Member
23033 posts |
Apr-08-25, 01:36 AM (EDT) |
|
|
21. "session 8"
In response to message #0
| |
Today's adventure: starting to clean up the firewall and front subframe so we can paint them before we drop in the new engine. First, of course, we went to light up the job area a little better and discovered that none of our standing floodlights actually work, because someone used them while spray painting and got overspray on the bulbs, so now they're all burned out. But who needs specialized job lamps? We've got an engine crane, some rope, and a spare workbench light... 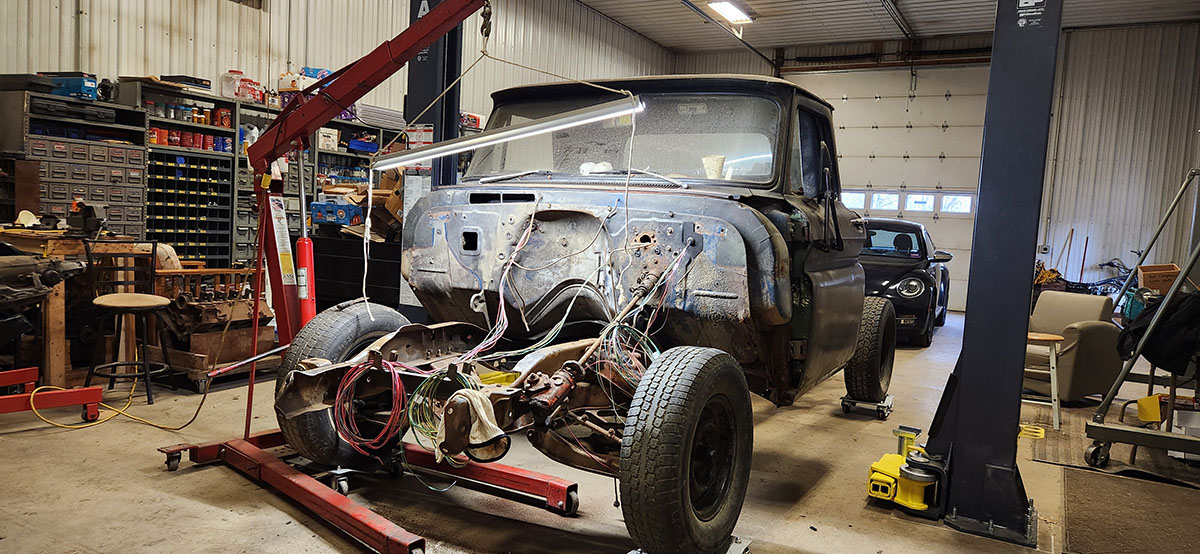
... what else do you need? Anyway, as you can see, the firewall could use some cleaning, given that it was probably last cleaned, uh... never. 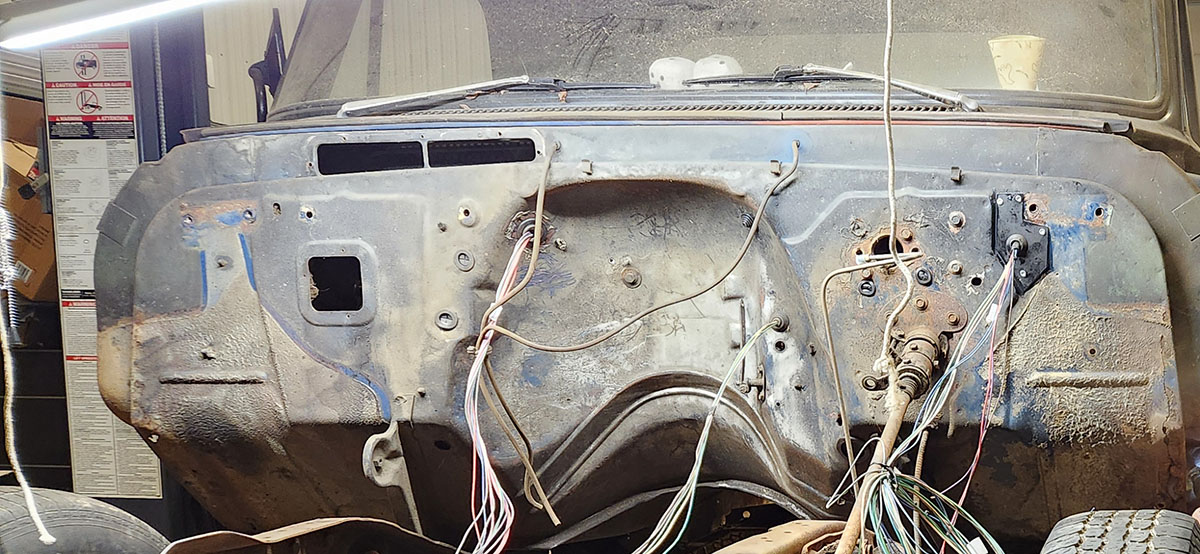
(Or possibly once, when whoever painted it black did that. It was once the original body color, as you can see in the areas that were covered by the inner fenders.) Unfortunately, all we had to work with today was an ordinary drill and wire wheel, so it was slow going. 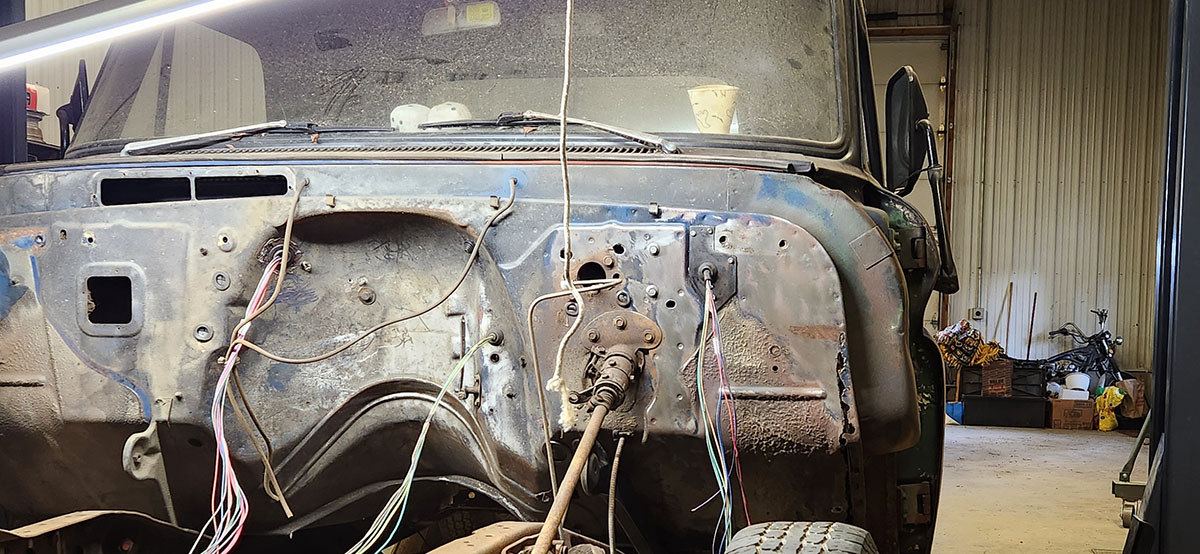
Of note: those holes over on the righthand edge, which... didn't look like they were there when we started. If there was any metal left there under the dirt, it was thinner than tissue paper. We'll need to have a corner piece welded on there or something--but then, we've already seen that there's a lot of seam work that needs to be done in that corner. This is just another manifestation of the same issue. Also, note that kinda-corrugated-looking stuff in that same vicinity. We thought it was just generational levels of crud from the wheel well, but it's not--it's some kind of long-hardened undercoating material. There's some on the passenger side in the same place. Evidently GM put some sort of sealant in there, possibly to cut down on cabin noise from gravel flying up into the fender wells. Our mere mortal wire wheel wouldn't touch that stuff at all. We have a die grinder that runs at a much higher speed than the drill and would also be a lot more ergonomic in tight/odd spaces, such as down on the subframe, which we also made a start on today: 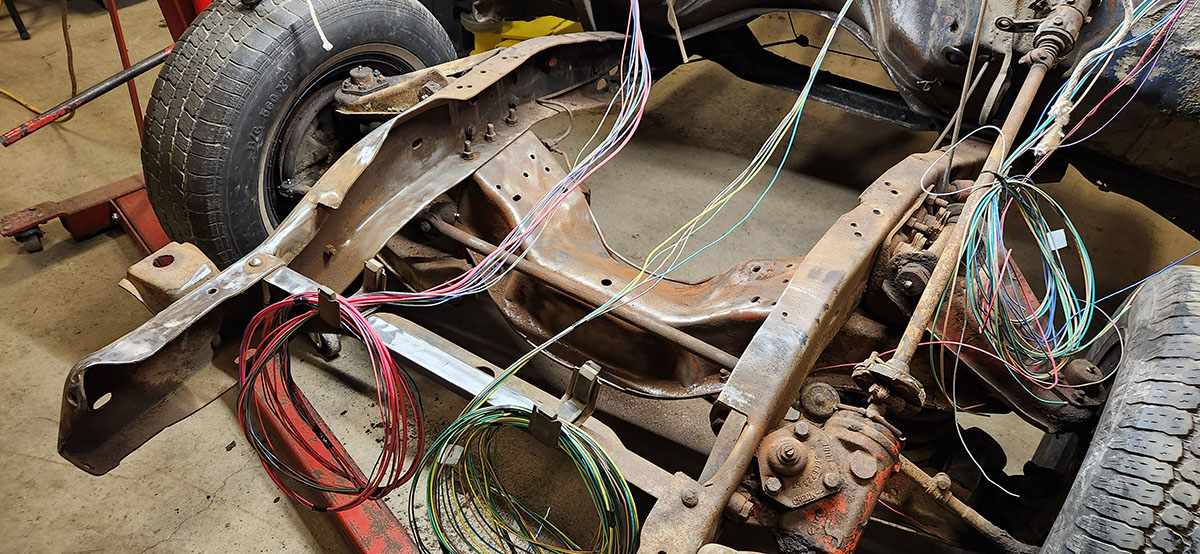
Unfortunately, the only wire wheels we could find at any of the local hardware stores were only rated for about 6,000 RPM, while the die grinder runs at circa 25,000. Such things do exist for speeds that high, but can't be bought locally, so that'll have to wait until we can get a shipment in. We'll have a while to wait for them, though, since Dad has some prior commitments that are probably going to keep him tied up for the next few weeks... --G.
-><-
Benjamin D. Hutchins, Co-Founder, Editor-in-Chief, & Forum Mod
Eyrie Productions, Unlimited http://www.eyrie-productions.com/
zgryphon at that email service Google has
Ceterum censeo Carthaginem esse delendam. |
|
|
Alert | IP |
Printer-friendly page | Edit |
Reply |
Reply With Quote | Top |
|
|
version 3.3 © 2001
Eyrie Productions,
Unlimited
Benjamin
D. Hutchins
E P U (Colour)
|
 Printer-friendly copy
 Session 1
 RE: Session 1